Reversing a QuickBooks Transaction
HawkSoft enables you to reverse transactions that have been exported from HawkSoft to QuickBooks® when using any QuickBooks with HawkSoft. This feature is used when a transaction that has been exported to QuickBooks needs to be modified and re-exported or should not have been exported to QuickBooks.
This task is typically performed by an Owner/Administrator, Manager, or Bookkeeper.
Reversing a QuickBooks transaction
This workflow applies to both QuickBooks Online and QuickBooks Desktop.
If a payment is part of a recorded QuickBooks deposit, you will not be able to reverse the payment unless that payment has first been removed from the deposit.
See Deleting a payment from a QuickBooks deposit, below.
- Open the Review Trust Accounting Report, and then verify that the receipt you want to reverse is on the report.
Check the box to the left of the receipt(s) you are reversing.
Click Reverse on the top-right.
The Confirm QuickBooks Reversal pop-up appears.
Click Reverse.
The Status column on the Trust Accounting Report will indicate that the transaction is pending reversal. To check the status of the reversal see QuickBooks Queue. If the reversal is successful Trust Accounting Report status will update once refreshed.
To delete a customer payment from a QuickBooks deposit, you must first remove the payment from the deposit in QuickBooks, and then reverse the transaction from the HawkSoft Trust Accounting Report. These instructions are for removing a payment from a deposit in both QuickBooks Desktop® and QuickBooks Online.
The steps below are for QuickBooks 2013. Although the steps are essentially the same for older versions of QuickBooks , some window titles, button labels, and field names may vary.
Select Banking > Use Register from the main QuickBooks menu bar.
The User Register task dialog opens.
Select the bank account that received the deposit, and then click OK.
The bank register opens.
- Find the deposit that includes the payment, and then right-click Edit Deposit from the main QuickBooks menu bar.
- Highlight the payment.
- Click Edit > Delete Line from the main QuickBooks menu bar.
Click Save > Close.
A confirmation dialog appears.
- Click Yes to record your changes.
The payment has been deleted from the deposit and you are now able to reverse the transaction from HawkSoft.
If you try to delete a payment that has been included in a deposit, QuickBooks will display a warning: “You need to delete this payment from the deposit before you can delete the transaction itself, or edit its name or amount.”
These instructions apply to QuickBooks Online with this logo:

Click the Customers tab in QuickBooks, and then click Customer Center.
The QuickBooks Customer Center window opens.
- Select the customer name.
- Select Transaction List from the customer tab, under the customer name details.
Select View/Edit on the right-side of the payment you are deleting.
The Receive Payment window opens.
The amount and date of the deposit are displayed in the bottom left of the window.
- Click the date to view the deposit.
- Uncheck the payment to remove it from the deposit, and then click Save.
The payment has been deleted from the deposit and you are now able to reverse the transaction from HawkSoft.
These instructions apply to QuickBooks Online with this logo:

Click the Customers tab in QuickBooks.
The QuickBooks Customers window opens.
- Select the customer name.
Click on the payment you are deleting.
The Receive Payment window opens.
Click the date link under the customer name in the upper left of the window.
A line appears under the link when you hover over it.
For example:
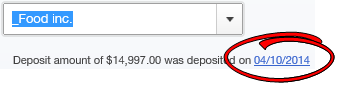
The Deposit window opens.
- Uncheck the payment you want to remove from the deposit.
Click Save and New.
The payment has been deleted from the deposit and you are now able to reverse the transaction from HawkSoft.
Required permissions
In order to complete this task, user permissions must be set to include:
Accounting Reporting > Allow QuickBooks Integration Workflows
See User Permissions for more information.
Related Topics