Agent Commission Rules
To make it possible for HawkSoft to calculate the commission due to your agents, you must create agent commission rules. These rules enable HawkSoft to use information on a transaction such as the agent, carrier, line(s) of business or application type to determine the type of commission, the amount due, and the agent(s) the commission is due to. This helps make the process of paying your agent commissions simpler and more streamlined, because the commission owed to each agent will be calculated for you based on the rules you've set.
This article explains how to create, edit, delete, and reorder agent commission rules in HawkSoft.
Before starting commission workflows, you will first need to both create agent rules and enable carrier downloads. This helps ensure that you have the statements to reconcile, and that HawkSoft has the information to calculate your agent payouts.
 Required permissions
To perform these actions, user permissions must be set to include:
Commissions > Access Commission Settings
See User Permissions for more information.
How do I get here?
-
Click Commissions > Commission Processing & Reporting from the main HawkSoft menu bar.
OR
-
Log into the HawkSoft Web app, accessed from any computer
-
Click the Commissions icon
 in the left column of the HawkSoft web start page to access Commission Processing and Reporting.
For more information about logging into the HawkSoft web app, see Logging In and Out of HawkSoft.
-
-
Click on the Settings tab and select Agent Commission Rules from the drop-down.
The Agent Commission Rules list launches.
To create an agent commission rule
Agent commission rules are based on the agent's position on the commission transaction: Agent 1, Agent 2, or Agent 3. When you create a commission rule, you create it for one of these three positions. A rule created for agent John on the Agent 2 tab, for example, will only apply to transactions where John is set as Agent 2, and will not be applied on transactions where John is set as Agent 1 or Agent 3.
-
Click on the tab for the agent position that you would like the new rule to apply to: Agent 1, Agent 2, or Agent 3.
-
Click the + Add New Rule button next to the Agent 1/2/3 tabs.
The New Rule panel opens.
-
Optional: Select the user(s) that the rule will apply to. By default, a rule will apply to all agents unless you select one or more agents.
Rules that apply to "all agents" will include agents added in the future. You may also manually add every agent to a rule. In this case, the rule will apply to all selected agents, but future agents would need to be manually added to this rule for it to affect them. There is no limit to the number of agents you can add to a rule.
Remember that even a rule that applies to "All Agents" will only affect the agent position which it is created for (Agent 1, 2, or 3).
-
Optional: Check the box for Apply to Agency-Only Transactions if this rule should only apply to transactions which you have marked as Agency-Only
Agency-Only commission transactions are those that do not apply to a specific client/policy, but may appear on commission statements. Examples may include transactions such as MVR fees, or general fees and bonuses that a carrier may include on your commission statement.
In previous versions of HawkSoft, these types of commission tranactions often had to be associated with a "dummy" agency or carrier client. By marking transactions as Agency-Only, these transactions are tracked without requiring this "dummy" file.. Agency-Only commission transactions are transactions on a commission statement that should not match to any specific client/policy, such as a fee from the carrier, or MVR fees. See Matching Commission Transactions for more information on Agency-Only transactions. -
Select the transaction carrier(s) that the rule will apply to. By default, a rule will apply to all carriers unless you select one or more carriers.
-
Select the lines of business (LOBs) that the rule will apply to. By default, a rule will apply to all LOBs unless you select one or more lines of business.
Lines of business selection is not available if you have checked the box for Apply to Agency-Only Transactions.
-
Select the application type(s) that the rule will apply to. By default, a rule will apply to all application types unless you select one or more application types.
-
Select the Agent Commission Payment Type. The following options are available:
-
% of Agency Commission Paid
-
% of Commissionable Premium
-
Flat Amount
-
% of Agent 1 (only available when creating a rule for Agent 2 or Agent 3)
-
% of Agent 2 (only available when creating a rule for Agent 3)
-
No Commission
-
-
Check the boxes for the policy terms that this rule should apply to ( New, Renew, or Rewrite), and enter the commission percentage/value that should be allocated to the agent when this rule applies to a transaction..
Term selection is not available if you have checked the box for Apply to Agency-Only Transactions, or if the Agent Commission Payment Type selected was "No Commission".
Percentages must be greater than 0% and less than 100%. Dollar amounts must be more than $0.01 and less than $999,999,999.99. If the values are outside these ranges, you will not be able to close or save the rule until they are corrected.
-
Optional: Add another rule for the selected Agent position.
If you want to add more rules for the current Agent position:
-
Click Close to close the New Rule panel and return to the rule list for the selected agent position.
-
Return to step 2 and follow these instructions to add another rule to the selected agent position.
You cannot change to another agent position tab while there are unsaved rules for the current agent position. See the steps below to save changes.
-
-
Click Save Changes in the lower right of the screen when you are done adding rules for the selected Agent position.
All unsaved rules for this agent position are saved. A popup confirms the successful save:

To cancel all unsaved rule changes, Click Discard Changes in the lower right of the screen
To edit an agent commission rule
-
Click on the tab for the agent position that contains the rule you want to edit: Agent 1, Agent 2, or Agent 3.
-
Click on the rule in the Agent 1/2/3 rule list that you want to edit.
The Edit Rule panel opens.
- Edit the fields for the selected rule as needed. For details about the fields that make up the rule, see To create an agent commission rule.
-
Optional: Edit more rules for the selected Agent position.
If you want to edit more rules for the current Agent position:
-
Click Close to close the Edit Rule panel and return to the rule list for the selected agent position.
Rules that have unsaved changes will display a
 notification badge to the left of the rule on the list.
 -
Return to step 2 and follow these instructions to edit another rule on the selected agent position.
You cannot change to another agent position tab while there are unsaved rules for the current agent position. See the steps below to save changes.
-
-
When you are done editing rules for the current agent position and want to save, click Save Changes in the lower right of the screen.
All unsaved rules for this agent position are saved. A popup confirms the successful save:
If you want to cancel your unsaved rule changes instead, click Discard Changes in the lower right of the screen. At the confirmation dialog, click Discard Changes again. You'll return to the rule list without saving any changes.
To delete an agent commission rule
-
Click on the tab for the agent position that contains the rule you want to delete: Agent 1, Agent 2, or Agent 3.
-
Click on the rule in the Agent 1/2/3 rule list that you want to delete.
The Edit Rule panel opens.
-
Click the Delete Rule button in the lower left of the Edit Rule panel.
The panel changes to Deleted Rule.
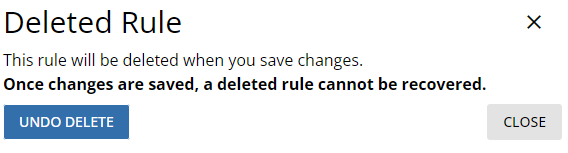
If you have mistakenly deleted the wrong rule, click Undo Delete to restore the rule. This can only be done before saving changes.
-
Optional: You can delete more rules for the selected Agent position.
If you want to delete more rules for the current Agent position:
-
Click Close to close the Deleted Rule panel and return to the rule list for the selected agent position.
Rules are set to be deleted will display a
 notification badge to the left of the rule on the list.
 -
Return to step 2 and follow these instructions to delete another rule on the selected agent position.
You cannot change to another agent position tab while there are unsaved rules for the current agent position. See the steps below to save changes.
-
-
When you are done deleting rules for the current agent position and want to save, click Save Changes in the lower right of the screen.
All unsaved rules for this agent position are saved, including rule deletions. A popup confirms the successful save:
If you want to cancel your unsaved rule changes instead, click Discard Changes in the lower right of the screen. At the confirmation dialog, click Discard Changes again. You'll return to the rule list without saving any changes.
Agent Commission Rule ordering
The ordering of agent rules in each position's list is vital to making sure these rules are correctly applied to transactions. When a transaction is selected for agent payout, HawkSoft will check each rule for Agent 1 first, starting from the top of the rule list and proceed to the bottom. When HawkSoft finds the first rule from the top whose criteria matches the commission transaction, that rule will be applied to generate the agent payout amount for that transaction, and HawkSoft will not check any rules further down the list, because it has already found a match.
HawkSoft will then check the Agent 2 rules against the transaction and apply the first Agent 2 rule that matches the transaction, followed by the Agent 3 rules in the same fashion.
What this means in terms of organizing your rules in each agent position is that the most specific rules should be at the top of the list, and rules that apply the most broadly should be at the bottom. This ensures that broad rules are only applied if a more specific rule does not match the transaction.
For example, let us assume we have created two Agent 1 rules:
-
Rule A applies to all agents and says that the agent should receive 12% commission on all policy terms.
-
Rule B applies only to agent John, and says the agent should receive 15% commission on all policy terms.
If we were to pay out a transaction where John is Agent 1 on the transaction, and the two rules above are listed in that order, then HawkSoft would see that the first rule applies to the transaction, and stop checking lower rules. The transaction would be set to pay out John only the 12% commission that the broad Rule A indicates.
In this situation, it would be better to place Rule B above Rule A on the Agent 1 list. If we did that, HawkSoft would instead see that Rule B applies first, and would set the payout for John on this transaction to the intended 15%.
Newly created rules are added to the bottom of the list. Be sure to check their positioning and move them as appropriate.
To adjust the position order of an agent commission rule
-
Use the "set rule order" buttons at the top of the New/Edit Rule panel to adjust the positioning of the rule on the list.
The up arrow will move the currently-selected rule up one position towards the top of the list, while the down arrow will move it down the list one position.
-
Click Close when you are done editing the current rule.
-
Optional: One by one, select any other rules you want to reposition and move them up and down the list accordingly.
-
After confirming that the rule list is in the desired order, click Save Changes in the lower right of the window.
-
The rule changes are saved, and the new order will be checked against the next time a commission transaction is selected for payment.
Deleted users and Agent Commission Rules
HawkSoft performs some automatic cleanup of Agent Commission Rules when you delete a user from HawkSoft.
-
If a user that is deleted is the only user assigned to the rule, the rule is deleted.
-
If a user that is deleted is one of multiple users assigned to the rule, the deleted user is removed from the rule and the rule remains active for the other assigned users.
Review any rules that apply to the user you are about to delete.
To view agent commission rule history
You can review snapshots of how the agent commission rules were configured each time they were updated in the last 3 months.
-
From the rule list, select the agent position to review rules for, then click Agent Rules History in the upper right.
The agent rule history dialog launches.
-
Review previous changes to the agent commission rules.
Each entry lists a date and time that these rules were last updated, and the user that updated them. Below that, you can see each rule that existed for the agent position at that time, and the details of those rules.
If you need to copy an entry, click anywhere in the blue box for that entry to copy it to your clipboard. You can paste this information into an email, Word document, or spreadsheet.
To set rounding for agent commissions
Your agency can change how HawkSoft rounds agent commission calculations. HawkSoft applies the selected rounding method to all agent commission calculations.
-
Click Rounding Setting.
-
Select a Rounding Method from the drop-down, and then click Save.
Always Round Down - Rounds agent commission down to the nearest penny. For example, $9.999 rounds to $9.99.
HawkSoft rounds down by default.
Always Round Up - Rounds agent commission up to the nearest penny. For example, $10.001 rounds up to $10.01.
Bankers (Round to Even) - Rounds to the nearest penny. At exactly half a penny, rounds to the nearest even number. For example:
-
$10.005 rounds to $10.00 (Half a penny rounds to the nearest even number of pennies)
-
$10.015 rounds to $10.02 (Half a penny rounds to the nearest even number of pennies)
-
$10.006 rounds to $10.01 (Values greater than half a penny round up)
-
$10.014 rounds to $10.01 (Values less than half a penny round down)
-
Related Topics