HawkLink Setup
HawkLink enables you to quickly and easily move data from HawkSoft to webpages for quoting, policy inquiries, payment uploads, and more.
- Quickly fill in client, policy, and agency data from HawkSoft to any compatible website, including carrier websites
- Save mappings to automatically flood data from HawkSoft into websites on future visits
- Export and import saved mappings to share with other agents
- Use crowd-sourced mappings to automatically flood data into commonly visited websites
- Take a screenshot of a carrier website and attach the image to a client or policy in HawkSoft
This article explains how to set up HawkLink. For a full tutorial on using HawkLink, see Using HawkLink.
 Required permissions
No special HawkSoft permissions are required to enable HawkLink.
Other tasks associated with HawkLink may require additional permissions, as noted below.
See User Permissions for more information.
If you've enabled HawkLink, but a different browser or a legacy version of HawkLink appears when selecting a policy and opening HawkLink, the selected policy's carrier may have a browser override set in Carrier Setup.
See the Configure Carrier Website settings section for more information.
Configure User PreferencesThe first step to setting up HawkLink is to enable it in User Preferences.
Click on your name or the portrait icon in the HawkSoft toolbar, and then select User Preferences.
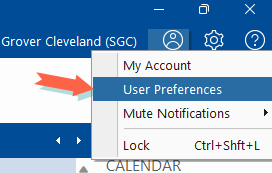
The User Preferences window opens.
Change the Browser setting to HawkLink for Google Chrome, or HawkLink for Microsoft Edge in the Website section of the General Preferences tab.
- Click OK to save and close the User Preferences dialog.
Install HawkLinkThe first time you launch HawkLink, you will be prompted to install the HawkLink extension within your web browser.
Click
 on the main HawkSoft toolbar.
 The carrier website launches in a new Google Chrome or Microsoft Edge window with HawkLink enabled (the default browser chosen in your User Preferences above).
In the browser window, click Install Now when prompted to install HawkLink.
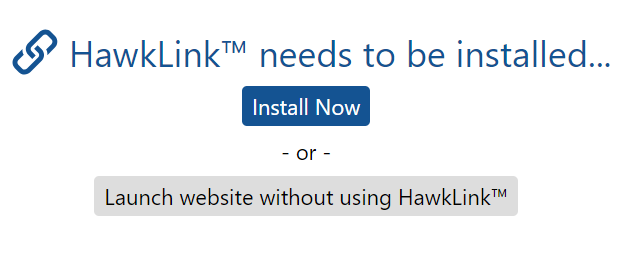
This takes you to the HawkLink page on the Chrome Web Store.
If using Google Chrome, click Add to Chrome.

If using Microsoft Edge, click Get.

Only download HawkLink using the Chrome Web Store link provided by HawkSoft. Searching for extensions in the Web Store may not provide you with the correct app.
In the pop up window that appears, click Add Extension.
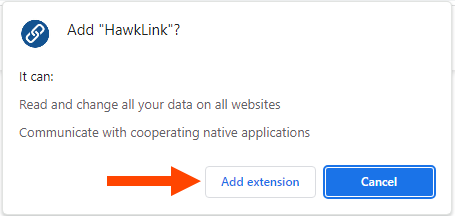
The HawkLink extension is now installed.
Recommended: Pin HawkLinkWe recommend pinning HawkLink to the address bar of your browser for easy access to HawkLink settings.
- Open the
 Extensions menu in the top-right corner of Chrome or Edge.
 Click
 Pin to Toolbar next to the HawkLink option.
The HawkLink icon
 should now be visible in the top right corner of your browser window. You can click this button at any time to access HawkLink options and settings.
- Open the
Configure Carrier Website settingsRequired permissionsTo add or edit the website for a carrier, the following permission is needed:
Agency Setup > Carrier Setup
See User Permissions for more information.
When you use the Website button to open a carrier site, HawkLink uses the address and browser preference stored in the carrier's Website tab in Carrier Setup to launch it. It is therefore important that carriers have Website settings filled out accurately for full HawkLink functionality.
Carrier website settings are typically configured by your agency administrator.
- Open the
 Setup menu, and then select Carrier/MGA Setup.
The Carrier/MGA Setup dialog opens in an Agency Setup window.
Click on the carrier whose website needs to be added.
The Editing Carrier - [carrier name] dialog opens.
Click on the
 button along the top of the dialog.
The Website tab opens, displaying any websites added to this carrier.
Click the
 button.
The Add Agent Website dialog opens.
Enter the website information.
Agent Website Label - A name that describes the website.
Agent Website URL - The URL, or web address, you use to access the website.
Browser - The browser you want this carrier website to open in. Defaults to User Preference.
If you want this carrier website to open in HawkLink for all users, no matter what the user has set in their User Preferences, select HawkLink for Google Chrome or HawkLink for Microsoft Edge in the Browser drop-down.
If the Browser setting is set to User Preference, then users must have HawkLink for Google Chrome or HawkLink for Microsoft Edge selected in their User Preferences to use HawkLink with this carrier website. If any other browser is chosen, HawkLink will not be available.
Click Add.
The Agent Website is added to the carrier's Website tab.
Click Save to save the changes to the carrier and close the Edit Carrier dialog.
The Website tab in Carrier Setup also includes a place to add a Customer Website. While these sites can be seen on the client in the carrier details, only Agent Websites will be launched when using the  button in the main HawkSoft toolbar.
Once you have enabled HawkLink in User Preferences, installed HawkLink within the browser, and configured your carriers' website settings within Carrier Setup, HawkLink is ready for use. You can click on the button from the main HawkSoft toolbar to open HawkLink with Google Chrome or Microsoft Edge. See Using HawkLink for a full tutorial on using HawkLink.
Related Topics