ScratchPad serves the purpose of a notepad built into HawkSoft.
ScratchPad has basic options, such as copy, paste, and print for your notes. ScratchPad is commonly used to paste comments or other information into a log note.
This article explains how to use the ScratchPad available from the HawkSoft toolbar.
The ScratchPad is intended to provide a quick place to temporarily note down information without the need to leave the HawkSoft window. Once the Scratchpad window is closed, the contents are lost, and as such it is not intended for long-term information storage. If you need to permanently save information in the Scratchpad, consider copying it to a log note or saving it as a .txt file before closing.
 Required Permissions
Required Permissions:
To open ScratchPad, no specific HawkSoft permissions are required.
Access ScratchPad
To open ScratchPad, click  on the main HawkSoft toolbar. Type into the space provided, as needed.
| Toolbar Icon | Description |
|---|---|

|
Copies all text in ScratchPad to the clipboard. |

|
Opens a new ScratchPad window, without closing the current window. |

|
Cuts selected text from ScratchPad. |

|
Copies selected text from ScratchPad. |

|
Pastes from the clipboard into ScratchPad. |

|
Prints the text in ScratchPad. |

|
Adds your current Date & Time to ScratchPad, at your cursor. |
To keep ScratchPad visible, select Always on Top from the ScratchPad View menu.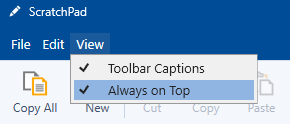
To copy ScratchPad notes to a log note
-
Close the ScratchPad.
A confirmation asks you if you'd like to copy your notes to the clipboard.
- Click Yes.
-
In the Create Log dialog, click the provided text box, then press Ctrl + V to include the contents copied from your ScratchPad.
See Creating a Log Note for more information.
To save ScratchPad notes to a text file (.txt)
A .txt file can be opened in programs such as Notepad or Microsoft Word.
HawkSoft cannot open .txt files itself, so notes saved this way cannot be reopened in HawkSoft.
- Inside the ScratchPad, click File and select Save As from the drop-down menu.
- Browse to a location on your computer or network where you would like to save the file.
- Enter a file name and click Save.
Related Topics