Sandbox Exercise - Create a Carrier
In this exercise, we will create a Carrier. Carriers control what lines of business and coverages are available when creating policies. They also provide contact information for your agents, and information that will auto-fill when you create ACORD forms and letters.
This exercise is for training purposes, and is intended for use in your sandbox environment.
-
Open the
 Setup menu, and then select Carrier/MGA Setup.
The Carrier/MGA Setup dialog opens in an Agency Setup window.
-
Next to <Prospect>, click the
 Copy Carrier button.
The Copy from Carrier dialog opens.
-
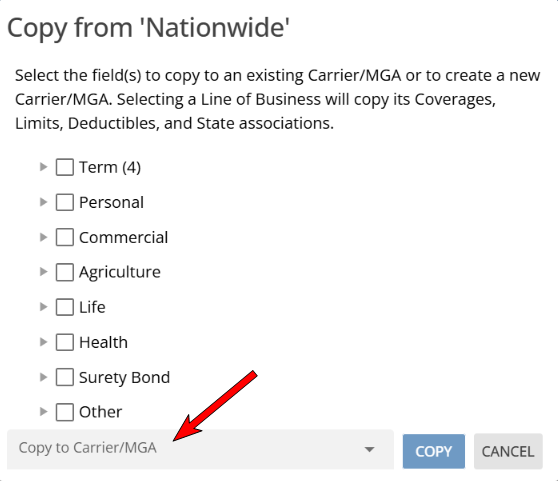
Check the Personal box.
This tells HawkSoft that you write personal lines policies with this example Carrier.
-
Optional: You can uncheck the box next to anything you do NOT want copied to the new carrier, such as specific lines of business.
For this exercise, leave all of the Personal lines boxes checked.
-
Select <Create a new Carrier> from the Copy to Carrier list at the bottom of the dialog.
-
Click the Copy button to proceed.
The Create New Carrier dialog opens.
-
Begin typing the carrier name into the Search field, then select your carrier from the list.
If you wish to enter all of the carrier information manually, this step is optional.
For this example, find a listed carrier you write with.
If your carrier is not certified for downloads with HawkSoft, they will not be listed. You will need to enter their information manually.
-
Optional: Customize the carrier display name.
This name is used inside of HawkSoft. You will have the option to print a different name on ACORD forms and letters.
-
Review the NAIC codes.
HawkSoft will automatically add NAIC codes for most carriers.
-
Optional: Customize which states you write with this carrier in.
This selection defaults to the carrier we copied from, <Prospect>.
-
Click Contact Info.
You can add phone numbers and email address to the top section. You can add physical and mailing addresses to the middle section. You can also link this to a Carrier Client, where you can add named contacts, attach documents, and more.
For this example, we will skip this section.
-
Click Policy Info.
This page lets you add term lengths and carrier codes. You can also customize receipt options.
For this example, we will skip this section.
-
Click Website.
This page lets you add agent and customer websites.
For this example, we will skip this section.
-
Click Lines of Business.
Carrier coverages are divided into eight application types: Personal, Commercial, Agriculture, Life, Health, Surety Bond, Other, and Employee Benefits.
You no longer need to create a separate carrier for each application type! All of the information you have already entered, such as Contact Information and Websites is shared between application types!
You can set different Lines of Business, coverages, limits and deductibles for each application type.
-
Review the Personal Lines.
These have been copied from your <Prospect> carrier, and should contain all lines of business and coverages you write.
For this example we have provided steps to add and remove a line of business, and to edit a coverage.
-
Optional: Add a line of business.
 Adding a Line of Business
-
Click Assign Lines of business.
-
Type AUTOP into the Filter field.
You can search by line of business or by ACORD code.
-
Check the box next to AUTOP
-
Optional: Click Edit to change which states you write AUTOP polices with this carrier in.
-
Click Close.
-
-
Optional: remove a line of business by clicking the
 Remove LOB button.
 -
Optional: Edit coverages for a line of business.
Editing Coverages
-
Select a line of business, and click the
 Edit Coverages button.
 -
Click on any of the coverages to set the default limits and deductibles.
You can also set state-specific overrides for this coverage.
-
Click Accept, then click Accept.
This will return you to the Creating Carrier dialog.
-
-
When you are finished, click Save.
Congratulations, you have finished adding a carrier!
For more information about adding a Carrier in HawkSoft, including detailed information about each of the Carrier Setup screens, see .
Related Topics