Customizing the Toolbar
The main toolbar in HawkSoft contains several buttons which provide shortcuts to perform common transactions in HawkSoft. You can customize the toolbar by adding buttons to provide additional shortcuts for common tasks performed by your agency, and you can remove buttons that your agency doesn't use.
This article explains how to customize the toolbar for your agency by adding and removing buttons for Action menu related tasks.
See My Workstation Settings and External Tools to configure button shortcuts to websites or programs (applications), such as a calculator tool or a real estate mapping website, etc. for your own workstation.
This task is typically performed by an Owner/Administrator, Manager, or Bookkeeper.
 Required permissions
In order to complete this task, user permissions must be set to include:
Agency Setup > General Configuration
See User Permissions for more information.
Default Action menu toolbar buttons
The buttons below are included with the HawkSoft installation. These buttons provide shortcuts for Action menu transactions and create a log note documenting the transaction. These buttons cannot be modified, however they can be removed and new buttons can be added.
Changes to the toolbar, which include Action menu shortcuts, are seen by all users in the agency and cannot be customized for an individual user.
| Default Button | Action Menu Shortcut |
|---|---|

|
Internal > Change Client/Policy Quickly fix data on a Client or Policy. See Client Changes or Policy Changes for more information. |

|
Phone > To > Insured Open the Action menu with "Phone To Insured". See Action Menu for more information. |

|
Phone > From > Insured Open the Action menu with "Phone From Insured". See Action Menu for more information. |

|
Phone > From > Insured > Print/Create > ID Card Open the Action menu to Create an Auto ID Card. See Auto ID Card for more information. |

|
Email > To > Insured > Print/Create > Certificate of Liability (025) Start the Certificate of Liability Insurance Wizard. See Certificate of Liability Insurance Overview for more information. |

|
Online > To > Carrier > Quote/Export Quote or Export a policy to a Carrier or Rater. See Quoting Policies Overview for more information. |

|
Mail > From > Company > Change Policy Status > Cancelled Select the reason for the cancellation from the Action menu. See Canceling a Policyfor detailed steps. |

|
Mail > From > Company > Change Policy Status > Issued Select the reason for the issued rate change. See About Policy Statuses: The life of a Policy for more information. |

|
Mail > From > Company > Change Policy Status > Reinstate Opens the Reinstatement Date dialog. See About Policy Statuses: The life of a Policy for more information. |

|
Mail > From > Company > Change Policy Status > Renew Opens the Renewal Date dialog and additional screens for modifying the policy. See About Policy Statuses: The life of a Policy for more information. |

|
Opens the Edit/Client Policy screen for modifying the client or policy as needed. See Processing Endorsements for more information. |
|
|
Mail > To > Insured > Trust Accounting > Create Invoice Opens the New Invoicedialog. |
|
|
Walk-in > From > Insured > Trust Accounting > Create Payment Opens the New Payment dialog to create a receipt when the insured comes into the office. If there is an invoice with a balance due, the Open Invoices dialog box opens enabling you to apply the payment to any open invoices. Use the Action menu to document money received from a customer in any other manner, such as Mail > From > Insured. |

|
Internal > Trust Accounting > View Transaction List Opens the client's Trust Accounting Transaction List. |


To customize the Action Menu toolbar options
-
Click
 Setup, and then select General Configuration.
 -
Select the Customize Toolbar side-tab.
A table opens with a description of the icons currently on the toolbar.
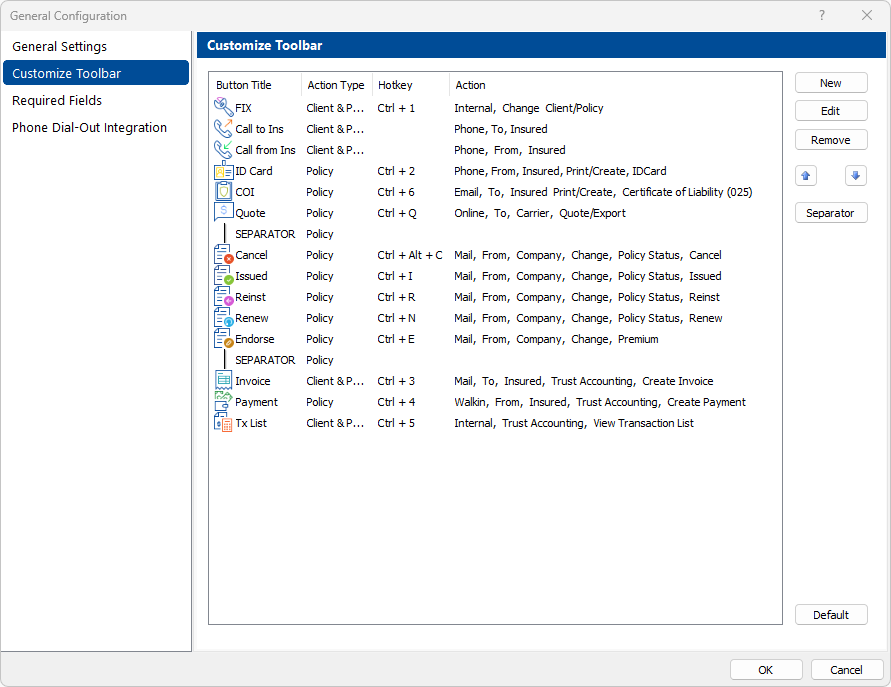
- Customize the toolbar as needed.
 Click to create a new toolbar item.
  Select a previously added item, and then click Edit to make modifications.
 Complete the Setup dialog to create a new item or modify an existing item:
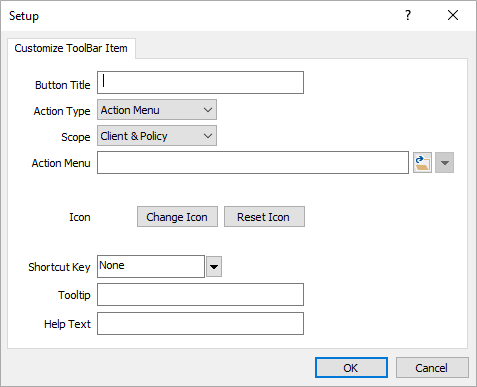
Button Title – The title appears below the icon image.
Action Type – The type of event the button initiates. Depending on the Action Type, one additional field will appear:
Action Menu (available when Action Type is set to Action Menu) – Click the folder
 button to open the Action menu, and then select the actions this toolbar icon will perform when clicked.
Command Line (available when Action Type is set to Application) - Click the folder
button to open File Explorer, then navigate to and select the program. Use the  drop down to select arguments to include in the command line.
Website URL (available when Action Type is set to Website) - Use the
drop down to select arguments to include in the command line.Command Lines and Website URLs appear exactly as entered in their respective fields. For example:
https://www.google.com/search?q=$(FirstName)+$(LastName)
Will open a Google search for the customer's first and last name.Scope - The types of policies the button can be used with.
Icon – Click Change Icon, and then select a HawkSoft icon to display for this toolbar item. If you want additional icon options, click Custom Icons to choose from Windows icons or browse to apply your own image. Click the Reset Icon to clear the icon selection.
Shortcut Key – HawkSoft keystrokes that launch the action. The shortcut key displays when a user hovers over the icon.
Tooltip – Pop-up text that appears when a user hovers the mouse over the icon.
Help Text – A brief description of the icon that appears below the Tooltip when a user hovers over the icon.
- Click OK.
 Select a previously added item, and then click Remove to delete the button from the toolbar.
 Click the arrows to change the position of a selected
button.
Click the arrows to change the position of a selected
button. Click to insert a separator to organize the buttons into sections.
Use the arrows to move the separator between two buttons.
 Click to restore the toolbar to the HawkSoft default items.
Custom icons will not be deleted when default items are restored.
- Click OK when finished.
Related Topics