Using DocuSign for E-Signature
 Looking for RightSignature instead?
RightSignature is no longer a supported integration in HawkSoft.
To send documents from HawkSoft for e-signature, you can either integrate with DocuSign as described below, or try our own HawkSoft E-Signature solution, powered by Formstack Sign.
HawkSoft integrates with Formstack Sign, so you can send documents straight from HawkSoft for electronic signature. Customers can then sign and return them electronically using the HawkSoft E-Signature application.
This article provides instructions to send attachments on a client/policy, ACORD forms, and change forms for E-Signature through DocuSign.
To set up your HawkSoft user profile with DocuSign integration, see Configure DocuSign for E-Signature.
HawkSoft offers our own E-Signature solution which seamlessly integrates with your HawkSoft application. For information about HawkSoft E-Signature (Powered by Formstack Sign), see E-Signature Overview.
Required Permissions
No specific user permissions are required to send documents for E-Signature.
See User Permissions for more information.
To send client/policy attachments for e-signature
- Retrieve a client.
-
Select the Client tab, or the policy tab that has the attachment you want to send for e-Signature.
- Select the Attachments tab.
-
Right-click on the document(s), and then select Send for E-Signature.
Your document package must be under 18 MB.
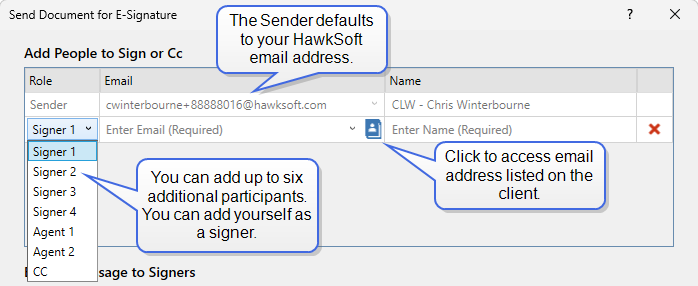
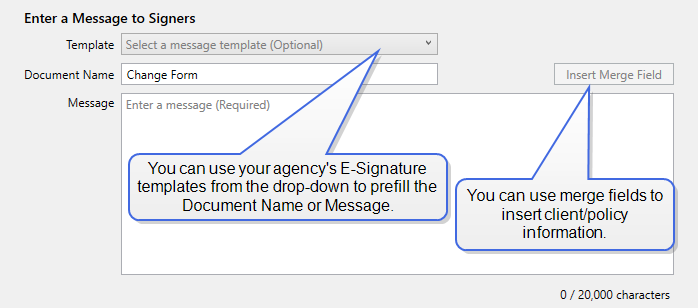
The Send Document for E-Signature dialog opens. This dialog behaves similarly to composing an email with attachments. Use this dialog to enter signer names and emails, enter a message or select an e-Signature template, and add documents to be signed.
-
Complete the Send Document for E-Signature dialog.
-
Add participants.
-
Enter a message to signers.
-
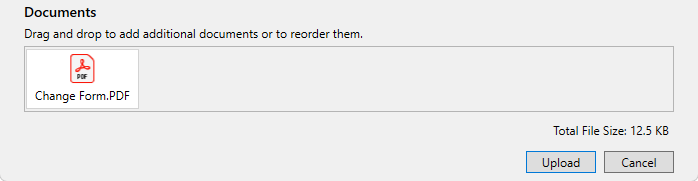
Attach documents.
The documents you've selected under Step 4 are attached, as well as any documents that may have been attached to the E-Signature template.
-
-
Click Upload to access DocuSign and upload the signer information, message, and documents to be signed.
DocuSign's website opens in a new window.
- Review the information in DocuSign website, and then click Next Step.
-
Follow on-screen prompts to complete the process in DocuSign.
The Create Log dialog opens in HawkSoft.
- Add comments and create any tasks for follow-up as needed on the Create Log dialog, and then click OK.
To send ACORD forms for e-signature
- Retrieve the client, and then select a policy.
- Click Action, and then select one item in each of the first three lists to describe what prompted this transaction.
-
Select ACORD Forms.
See Creating and Modifying an ACORD Form for steps on generating a form.
-
Once your form is complete, click Print or Send in the top left corner of the form.
The Print or Send Document dialog opens.
This dialog enables you to email, print, and attach the form, as well as send the form for signature.
-
Select Send for E-Signature.
The Send Document for E-Signature dialog opens. This dialog behaves similarly to composing an email with attachments. Use this dialog to enter signer names and emails, enter a message or select an e-Signature template, and add documents to be signed.
-
Complete the Send Document for E-Signature dialog.
-
Add participants.
-
Enter a message to signers.
-
Attach documents.
The ACORD form is attached, as well as any documents that may have been attached to the e-signature template.
-
-
Click Upload to access DocuSign and upload the signer information, message, and documents to be signed.
DocuSign's website opens in a new window.
- Review the information in the DocuSign website, and then click Next Step.
-
Follow on-screen prompts to complete the process in DocuSign.
The Create Log dialog opens.
- Add comments and create any tasks for follow-up as needed on the Create Log dialog in HawkSoft, and then click OK.
To send a Change Request form for e-signature
When a change is made to a client/policy, a Change Request form can be created to be sent to the insured or carrier as a client/policy change notification.
See Change Policy Information and Change Client Information for more information on making changes and creating a Change Request form.
-
Once you have created a Change Request form, click on the E-Signature button to send the form for an electronic signature.
The Send Document for E-Signature dialog opens. This dialog behaves similarly to composing an email with attachments. Use this dialog to enter signer names and emails, enter a message or select an e-Signature template, and add documents to be signed.
-
Complete the Send Document for E-Signature dialog.
-
Add participants.
-
Enter a message to signers.
-
Attach documents.
The Change Request form is attached, as well as any documents that may have been attached to the E-Signature template.
-
-
Click Upload to access DocuSign and upload the signer information, message, and documents to be signed.
DocuSign's website opens in a new window.
- Review the information in DocuSign website, and then click Next Step.
- Follow on-screen prompts to complete the process in DocuSign.
-
Return to the Change Form dialog to perform additional actions as needed, and then click OK to create the Change Form.
The Create Log dialog opens.
- Add comments and create any tasks for follow-up as needed on the Create Log dialog in HawkSoft, and then click OK.
Related Topics