Data Importer
The HawkSoft Data Importer is a tool that enables HawkSoft to import data into your client/policy database from a spreadsheet or database file. Using the Data Importer, you can map certain HawkSoft fields to columns in your spreadsheet/database file (or use a pre-saved configuration file to automatically map values), and then HawkSoft will automatically create new clients and/or policies from the data in the spreadsheet/database file. For example, you can import client data when performing an agency merge, or import prospect information from a leads generator.
This article explains how to import data into HawkSoft, map the data to HawkSoft fields, and then create and review the Data Imported Client report.
 Required permissions
In order to complete this task, user permissions must be set to include:
Client Actions > Mass Data Importer
Reports Run Quick Reports
See User Permissions for more information.
This procedure will create new client files from the imported information. To update client files that already exist in HawkSoft, see The HawkSoft Importer.
Importing data is an advanced function available within HawkSoft. Please consult with a HawkSoft, Inc. representative if you are unfamiliar with this process.
Before you begin
Prepare your spreadsheet or database file
Optional: You can create your spreadsheet using the HawkSoft template.
If you use the template, you will also be able to use the HawkSoft Configuration file, which will save you time.
The HawkSoft template has two tabs: one tab for the actual template which contains recommended headers and one tab for helpful instructions.
- Copy and paste your data into the template and save the file to your computer.
- Note the path where the file is saved on your computer.
- Whether you are using your own spreadsheet/database file or the HawkSoft template, be sure to confirm that all columns have headers.
- Remove columns that are not needed, and remove extra rows.
Modify your spreadsheet to include at least one of the following required fields:
Business Name
Last Name
Full Name
Your spreadsheet or database file must contain only fields available for import and must contain the required fields for the Data Importer to work correctly.
Recommended: Ensure your spreadsheet/database file includes HawkSoft's recommended fields for importing, as listed in the Recommended fields for importing section.
Example: When you are importing policy information, include an Application Type column so HawkSoft will know which default coverages, limits, and deductibles should be available to the policy.
Once your spreadsheet/database file is ready, save your changes and close the file.
Be sure to close the spreadsheet or database. Data Importer cannot import data if the source file is still open.
Download the HawkSoft Configuration file
The HawkSoft Configuration file can be used in conjunction with the HawkSoft Template to automatically map headers in the spreadsheet and save you time.
You can use the HawkSoft Configuration file or you can use one that you previously saved. If you do not use a saved or HawkSoft Configuration file, you must map all fields when you get to step 12 below (under Importing a spreadsheet or database).
To download, right-click on the following link:
Select Save target as, and then click Save.
Note the path where the file is saved on your computer.
- Optional: Click Open to view the All fields mapping.xml configuration file.
Import a spreadsheet or database
-
Click the
 Setup icon, and then select Data Importer.
The HawkSoft Importer dialog opens.
-
Click Browse to choose an Import File, and then select your database or spreadsheet to import.
HawkSoft can import several file types, including spreadsheets and database files.
-
Optional: Click Browse to choose a Configuration File to apply previously saved configuration settings.
If your spreadsheet was created from the HawkSoft template, you can download the provided configuration file to save time.
If you do not select a Configuration file, you will need to manually map all fields.
-
Click Next.
The Data Importer switches to the Select a Table step.
-
Choose a Table to import from the Choose Table drop-down list.
The "Table" is the source of data to import, and starts with the file name of your chosen Import File.
If you selected a CSV to import, the table is pre-selected. Confirm it matches your CSV file name.If you selected a spreadsheet file with multiple tabs as your Import File, such as an XLS, you may see multiple tables beginning with the same name in the drop-down. The part of the table name after the # symbol represents the tab name on such spreadsheets. Select the one corresponding to the spreadsheet tab you want to import from.
Once you select a spreadsheet tab or database, HawkSoft displays a preview of the data in the View of Data to Import field. The first 40 records that will be imported are displayed, not including any blank records.
-
Click Next.
The Data Importer switches to the Add Log Notes and Task step.
-
Add comments to the 'Client log note' field, as needed.
A log note containing the comments you enter here will be created for each imported client.
-
Optional: Create a Task for each of the imported clients.
-
Check the Add Task box.
-
Enter a task Title .
-
Enter or select the Assigned User responsible for the task.
You can select either a specific user, or have HawkSoft assign the user to the one of the default Agents or the default CSR, based on your office settings.
-
Select a Due Date.
-
Optional: Select a Priority for the task.
Each imported client will list a copy of this task on the Tasks tab, and the assigned user will see the task in their My Tasks list.
-
-
Click Next.
The Data Importer switches to the Select Key Fields step.
-
Under the 'Key field(s)' table, select the field(s) from the import table that uniquely identify/differentiate each client which will be created by the data import process.
If Last Name is selected as a key field, all entries with an identical last name will be inserted into the same client. For this reason, we recommend selecting multiple fields (such as Business Name, Last Name and First Name), or selecting a field that contains truly unique information (e.g. phone or work email).
Unique identifiers will not check for duplicate clients that already exist in your HawkSoft database. -
Click Next.
The Data Importer switches to the Map Fields step.
-
Map the HawkSoft fields to the fields in your spreadsheet or database, as needed.
To match fields (without configuration file)
This section provides steps to map HawkSoft fields to the fields in your spreadsheet or database. See below for additional information about matching specific fields.
- Optional: Select a Category View filter from the drop-down list to include only those fields specific to Client, Personal Info, Policy, or Client Misc info screens.
-
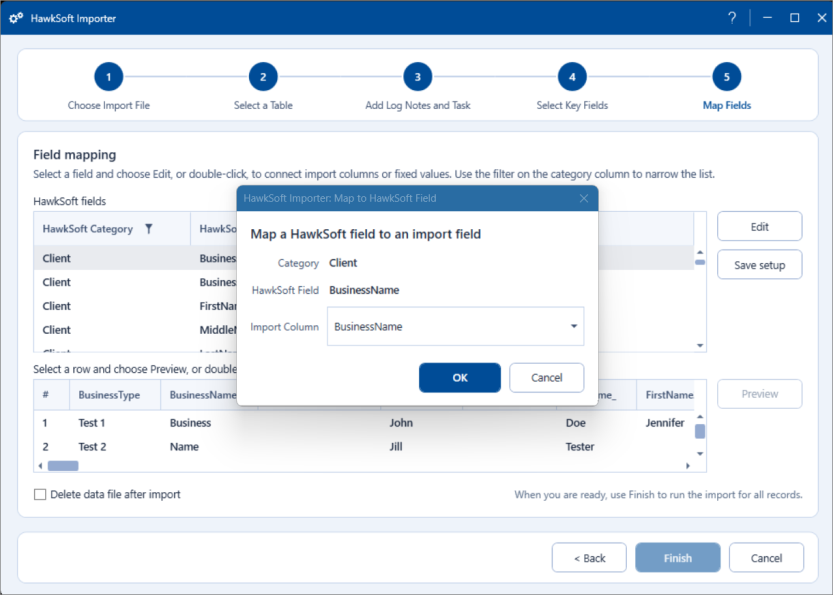
Select a HawkSoft field you want to map, and then click Edit.
The HawkSoft Importer: Map to HawkSoft Field dialog opens.
-
Select a field (column header) from your spreadsheet from the Import Column drop-down list.
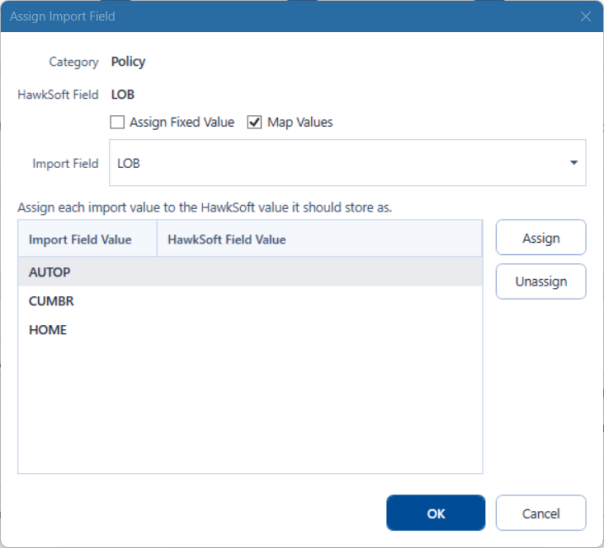
Some selected HawkSoft fields present you with additional mapping options.
Example: When you map the LOB, you may see multiple selections under the Import Field Value table.
-
Select the Import Field that matches to the spreadsheet/database (ex. 'LOB' or 'Line of Business').
The different values present under that field in your spreadsheet/database flood into the table below.
-
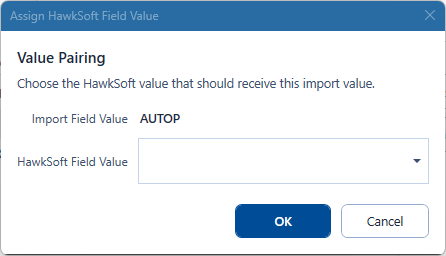
Select the first Import Field Value, (ex. HOME), and then click Assign.
The Assign HawkSoft Field Value dialog opens.
-
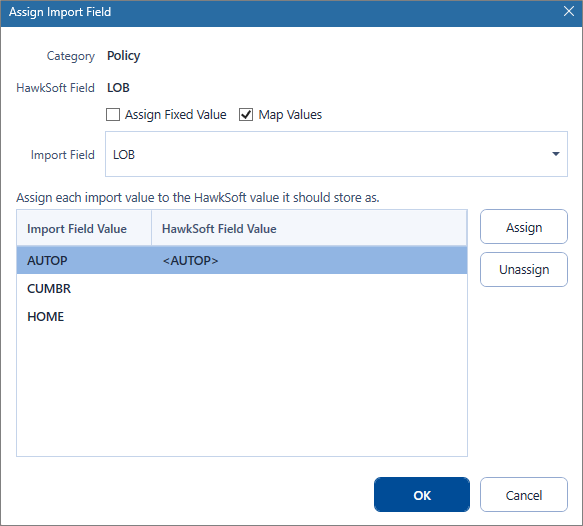
Select the HawkSoft Field Value that corresponds to this import field from the drop-down (ex. <HOME>), and then click OK.
Your selection is now in the HawkSoft Field Value column.
-
Continue assigning each field, and then click OK to return to the HawkSoft Importer: Map HawkSoft Fields to Import Fields dialog.
If a Carrier value is not mapped, then the import value will be imported instead.
The selected value(s) now appears under Mapped Value next to the HawkSoft field name.
-
-
Continue mapping the HawkSoft fields. Be sure to map all the fields that contain information that you want transferred into HawkSoft.
If you assign a value by mistake, you can select it from the list of assigned values and click Unassign to remove it from the list.
-
Optional: Select an import record and click Preview.
The record is virtually imported to HawkSoft for preview, and a dialog displays how the import data was mapped to the HawkSoft fields.
-
Optional: Check the Delete Data File After Import to delete your spreadsheet/database file from your local computer files after the import is complete.
-
Optional: Click Save Setup if you need to leave the importer before you are finished, or you have other spreadsheets with the same column headings that need to be imported.
The next time you run the Data Importer, you can select the setup file you saved here as the Configuration File.
-
Click Finish when field mapping/reviewing data is complete.
Be sure you have mapped data completely and accurately before clicking Finish.
It is highly recommended to preview several rows to check for issues before finalizing the import, as data import cannot be undone.A dialog asks if you would like to save the configuration file now.
-
Optional: Click Yes to save the Configuration file for future imports using this spreadsheet or database, or select No if you will not use the same configuration for mapping again.
The Convert database to client files now? dialog opens.
-
Select Yes to begin the conversion.
A Conversion in Process progress bar appears. The conversion can take several minutes, depending on the size of the file.
Once the data is converted, a Data Importer message opens showing Total Clients Added, Total Clients Updated, Total Clients Skipped, and Total Rows Imported.
-
Click OK to complete the Data Import.
The clients and policies in the selected spreadsheet/database are now imported into HawkSoft based on selected mappings.
Recommended fields for importing
HawkSoft recommends including the following fields in your data to be imported, and mapping this data to the corresponding HawkSoft fields.
Application Type
- Double-click Application Type in the HawkSoft Field list.
- Check the Assign Fixed Value check box.
Select the relevant application type from the Fixed Value drop-down list.
Example: Personal.
- Click OK.
- Match the HawkSoft Field named Application Type to the column header on your spreadsheet that contains the application type information.
- Leave the Assign Fixed Value check box unchecked.
- Double-click on each application type that is listed in the box below the drop-down menu, and then select the correct application type that corresponds with each of the policy types.
Click OK.
Policy State
When you are importing policies, it is important to map the Policy State field so HawkSoft can insert the correct state-specific default coverages for each policy (according to state-specific coverages configured in Carrier Setup).
- Match the HawkSoft Policy State to the column that contains the policy state information.
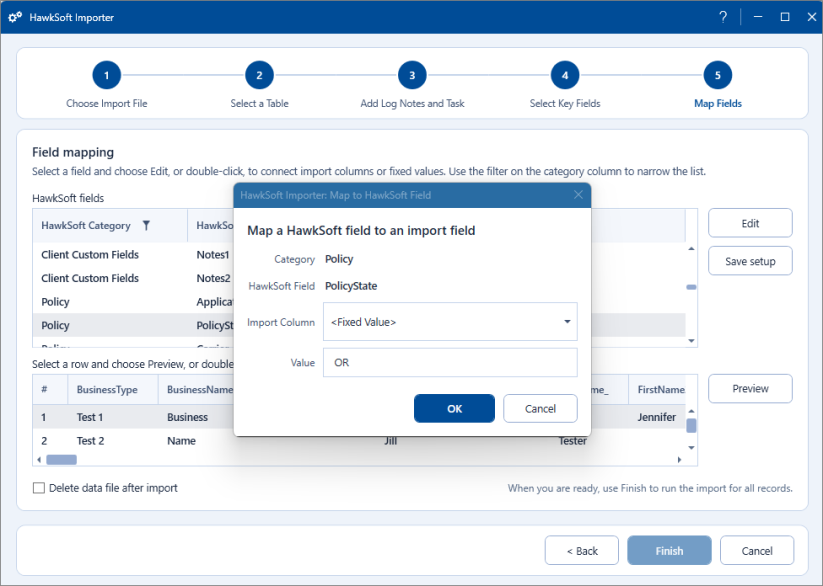
When your spreadsheet does not contain policy state information, and all policies are the same policy state, match the Policy State field from the HawkSoft Importer: Choose Field dialog to Fixed Value, and then insert the two-letter state abbreviation in the Value box below.
Example using Oregon (OR):
Other fields
Consider including Term, Policy Title
To run a Data Imported Clients Report
-
Click Reports > Quick Reports from the main HawkSoft menu bar.
-
Click + New Report.
The New Report dialog opens.
-
Click Client.
-
Click Data Imported Clients.
-
Optional: Add a Report Title.
-
Enter a Start Date and End Date in the Import Date Range field.
The report will only display data imported clients created during the date range you select.
You can set the Import Date Range to a maximum of 30 days.
-
Click Run Report.
A new tab will open with your report and your report is automatically listed under Recent Reports.
-
Review the report and edit/manage clients as needed.
To learn how to use filters, customize columns, and summarize your report, see Customize, Summarize, and Filter Report Data.
For information on 1-Click Reports, see 1-Click Reports.
For information on saving and sharing reports, see Saving and Sharing Report Data.
If you need to archive or update the same data for many clients at once, see Data Replace.
Related Topics