You can print mailing labels by exporting a list of customers from a report. This article walks you through the steps to export a report, and then use Microsoft Word's Mail Merge feature to create mailing labels.
-
Run a HawkSoft report to get a list of customers to print labels for.
You can create labels from any HawkSoft report. These steps use our Quick Reports as an example.
 To run a Quick Report
For a list of Quick Reports, see Quick Reports.
-
Click New Report.
-
Select the type of report, then select the specific report to run.
For example, Policy > Expired Policies.
-
Optional: Add a Report Title.
-
Check your report filter.
Filters are required for some reports.
Not all reports have filters. You will be able to narrow down your report results after running the report. -
Click Run Report.
A new tab opens with your report and your report is automatically listed under Previous Reports.
To learn how to use filters, customize columns, and summarize your report, see Customize, Summarize, and Filter Report Data.
For information on 1-Click Reports, see 1-Click Reports.
For information about saving and sharing reports, see Saving and Sharing Report Data.
Your agency can report on Client Custom Fields. For example, you can create a "Holiday Mailer" field your agents can fill-in when onboarding new customers. From this report, you can quickly create labels.
-
-
Verify that your report contains the mailing information for each customer.
Optional: Remove all columns that contain data that you do not need on the mailing label.
HawkSoft recommends exporting only the minimum necessary information.
HawkSoft recommends the following fields
Business Name
Last Name
First Name
Mailing Address
Mailing Address 2
Mailing City
Mailing State
Mailing Zip
For steps on customizing columns, see Customize, Summarize, and Filter Report Data.
-
After you have narrowed down your report, export the report as a CSV file.
To export a report
-
Click on the
 More Actions menu button.
 -
Click Export to CSV.
-
Optional: Rename your report.
-
Click the Download CSV button.
File Explorer opens.
-
Save the report to your computer.
-
-
Open a new, blank document in Microsoft Word.
-
Select the Mailings ribbon, then click Start Mail Merge > Step-by-Step Mail Merge Wizard.
The Mail Merge wizard opens on the right side of the window.
-
Under Select document type, select Labels, then click Next: Starting document.
-
Under Select starting document, ensure Change document layout is selected, then click Label options.
-
In the Label vendors drop-down, select Avery US Letter.
-
In the Product number list, select either 5160 Address Labels or 8160 Address Labels, and then click OK.
-
Click Next: Select recipients
-
Under Select Recipients, confirm Use an Existing List is selected, then click Browse.
File Explorer opens.
-
Navigate to your exported report, select it, then click the Open button.
HawkSoft 6 reports are exported to the Downloads folder.
The Mail Merge Recipients dialog launches.
-
Review the list of recipients and use the checkboxes to select or un-select recipients. By default all recipients from your exported report are checked.
If you want to avoid printing unneeded duplicate labels, you can click Find duplicates. Word displays the recipients with matching names in a new dialog. Uncheck one of the entries for each duplicate name to exclude it from the mailing labels.
Click OK to close the dialog, then click Next: Arrange your labels.
-
Click into the first label, near the top left of the page.
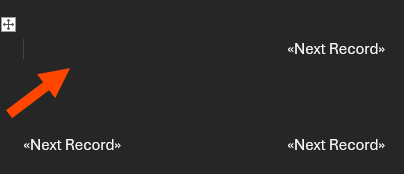
-
Under Arrange Your Labels, click Address Block.
The Insert Address Block dialog opens.
-
Click the Match Fields... button.
The Match Fields dialog opens.
-
Using the drop-down menus, map the address block labels to the fields from your exported report. First Name and Last Name should be matched by default.
For example, match the Address 1 field to Mailing_Address in the drop-down.
-
Optional: Check the Remember this matching for this set of data sources on this computer box.
This can save time when you print mailing labels in the future.
-
Click OK to close the Match Fields dialog.
The label Preview in the Insert Address Block dialog is updated with your matched fields.
-
Optional: Review any number of labels using the
 Previous and
  Next buttons.
 -
Click OK to close the dialog.
The address block has been added to the first label.
-
Under Replicate labels in the sidebar, click Update all labels.
The remaining labels are updated to include the address block.
-
Click Next: Preview Your Labels.
The labels are populated with recipient data matched from the exported report.
-
Review the labels. If changes are needed, use the Previous buttons at the bottom of the sidebar to return to prior steps, and the Next buttons to return here after making changes.
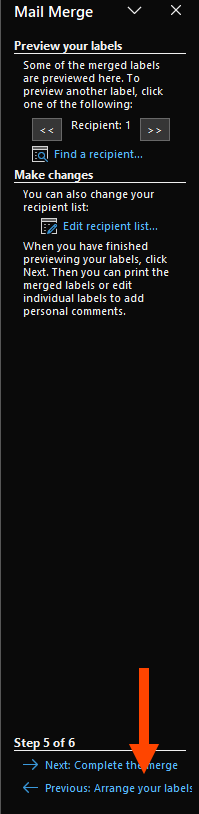
When you are ready to continue, click Next: Complete the merge.
-
Click Print in the Mail Merge sidebar.
The Merge to Printer dialog opens.
-
Click the OK button.
The Print dialog opens.
-
In the Name field, confirm that your printer is selected, then click the OK button.
Your labels are sent to your printer.
Related Topics