Task Categories and Templates
Task Categories are custom keyword labels that can be applied to tasks and task templates. Task Categories enable you to quickly group agency tasks in the Task Center and enable your staff to easily select a template related to a Category.
Task Templates are specific tasks with preset details, such as a title, category, assignees, and priority, that can be applied to new tasks or default tasks. Task Templates enable your staff to quickly create standardized tasks and allow for easier organization, review, and tracking of your agency's tasks.
This article teaches you how to create and edit task categories and templates. See Best Practices for Standardizing Tasks for Your Agency to help you better leverage categories and templates.
This task is typically performed by an Owner/Administrator or Manager.
 To access Task Settings
Click Activities > My Tasks from the main menu bar, and then select the Settings tab in the Task Center.
OR
-
Log into the HawkSoft Web app, accessed from any computer.
-
Click the Task Center icon
 in the left column of the HawkSoft web start page, then select the Settings tab.
For more information about logging into the HawkSoft web app, see Logging In and Out of HawkSoft.
To create a Task Category
You can create a task category to easily label task templates and tasks. Once you have created task categories for your agency, you can apply them to templates or your users can select a category from a drop-down list when creating a new task.
-
From the Settings tab, select the Task Categories tab, and then click + Create Category.
-
Enter a custom keyword for the category in the Label field.
-
Click Add.
To create a Task Template
You can create a task template to enter preset details for a specific task, such as title, category, assigned users, and priority. When a user creates a new task using the template, the details you entered in the task template fields will automatically be applied to the task. The user can modify these fields, if needed.
-
From the Settings tab, select the Task Templates tab, and then click + Create Template.
-
Fill in the required details:
The following task details are required for a task template.
-
Template Name - Enter a name that describes the purpose of the task.
-
Category - Select a category that applies to the task.
-
Task Title - The Task Title defaults to the Template Name. Modify the title, as needed.
See Tracking My Daily Tasks or Managing Tasks for the Agency for more information about filtering tasks from the Task Center.
-
-
Assign users and customize the task instructions:
The following task details are optional to include in the task template.
-
Assign Users - Assign up to 5 specific users or specific type of user(s) to the task. You can apply additional assignee settings below.
-
Task Instructions - Enter any steps that are needed for the user to complete the task.
To insert a hyperlink in the Task Instructions, you can highlight your desired text, click the
 link icon or press CTRL + K, and then modify the Link text as needed. You can also copy and paste a hyperlink directly into the Task Instructions.
 -
Priority - Select the level of urgency for the task.
-
-
Apply additional settings:
The following task template settings are optional to include in the task template.
-
Must be assignee to edit - Enable this setting to create a locked task and only allow assigned users or users with Task Management permissions to edit the task. All users can view the task on the client.
-
Assign one task per assignee - Enable this setting to create a duplicate task for each user assigned to the task. Each user manages the task separately.
-
Track Success - Enable this setting to create two additional status options, Successful and Unsuccessful, on each task this template is applied to. You can track the success rate of all completed tasks that use the template from the Templates tab on the Settings screen in the Task Center.
For example, you may enable Track Success on a template created for prospect policy tasks. As your staff continues to apply the template to all tasks related to prospect policy sales, you can easily view the successful rate of your agency's sales procedures.
-
Use Due Date Rule - Enable this setting and enter the due date/time rules that will be automatically applied to each task this template is applied to. For example, you can set the Due Date of the task to be 1 month before the policy expiration date.
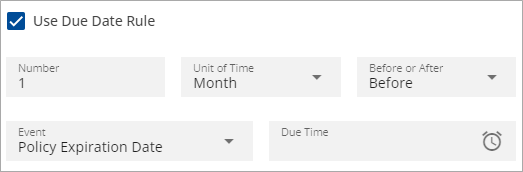
You can link due dates to these events:
-
Task Creation Date: The date the task was created.
-
Policy Effective Date: The date the policy goes into effect.
-
Policy Expiration Date: The date the policy expires.
-
Policy Status Date: The date the policy status changes.
-
Policy Inception Date: The date the policy was written.
-
-
-
Click Save.
To edit a Task Category or Template
You can edit task categories and templates, if needed. For example, you may update a task category to correct a spelling error, such as Cancelation vs. Cancellation, or you may update a template to modify the assigned users. Once the category or template is updated, they will be available for you and your staff to apply to tasks and templates.
When a task category is relabeled or a task template is modified, all existing tasks that original category or template was applied to will not be updated.
-
From the Settings tab, select the Task Templates or Task Categories tab.
-
Click
 Edit on the template or category you would like to modify.
 -
Modify the task details or category label as needed.
If the Track Success box is checked on the template you are editing, HawkSoft recommends leaving the box checked to ensure that the success of the template can continue to be tracked.
-
Click Save or Update.
You can delete a category or archive a template if it is no longer needed. Deleting a category or archiving a template will not impact previously created tasks that the category and/or template was applied to.
Once the category is deleted, it is removed as an option from the Category drop-down list when users create or edit tasks and it cannot be restored.
Once a template is archived, it is removed as an option from the Template drop-down list when users create or edit tasks. You can unarchive a template from the Archives tab in the top right of the Task Templates tab.
To delete a category or template, click  Delete or
  Archive, and then click OK.
To unarchive a template, click  Unarchive, and then click OK.
Required Permissions
In order to complete this task, user permissions must be set to include:
Tasks > Access Tasks Configuration
See User Permissions for more information.
Related Topics