HawkSoft enables your agency to reconcile and track commission paid to your agency, and to track commissions owed to the producers.
This article covers the many options for importing and creating commission statements in HawkSoft for reconciling.
See Carrier Downloads Overview for more information on downloading a carrier statement.
 In this topic
Required Permissions
In this topic
Required Permissions
In order to complete this task, user permissions must be set to include:
Commissions > Allow Commission Processing & Reporting
See User Permissions for more information.
To receive downloaded commission statements
Downloaded commission statements are automatically imported into HawkSoft. When a commission statement is included as part of the carrier downloads, HawkSoft separates the commission statements from policy transactions and holds them for later processing.
See Carrier Downloads Overview for more details about carrier downloads.
To import CSV and Excel commission statements
When you receive a commission statement electronically as a CSV, XLSX, or XLS spreadsheet file, you can import the statement into HawkSoft using the Commission Importer.
The Commission Importer converts the data from the spreadsheet to a downloaded statement, enabling HawkSoft to record the statement in the same way as a commission statement downloaded directly from a carrier. The Commission Importer also saves the configuration for future statements received from the same carrier.
For best results, review the spreadsheet and make any necessary modifications (see Tips below to clean up the data). Make sure the spreadsheet contains HawkSoft required data and supported data types.
Review and clean up the data in the spreadsheet.
Spreadsheets that contain certain formatting and missing data can cause issues with the Commission Importer.
Invalid file types – File extensions not specified in this article, such as XLSM or XLSB, are not supported. Open the file and save as a supported file type (CSV,XLSX, orXLS) before importing.
Merged cells – If the spreadsheet contains merged fields causing issues with the import, try copying the data to your clipboard and use the Import from Clipboard option to import the data. See To import a spreadsheet below.
Empty cells – Columns with required data (see below) cannot be empty. For example, if you have a column that contains the "Transaction Types", or "Transaction Dates", all the rows in that column must have data.
Invalid Data – The layout of a spreadsheet could inadvertently cause invalid data. For example, some spreadsheets include a "Total" at the bottom of the rows. If the "Total" label is in a column that contains a date or a number, this could trigger the Invalid Data error message to appear when configuring a carrier. In these cases, copy the spreadsheet (including the column headers) and use the Import from Clipboard option to import the data.
See for a table of common formulas you can use to quickly modify data in the commission spreadsheet.
Verify that required data is included in the spreadsheet.
Carriers do not label the columns with the same terms that HawkSoft uses. You will have the opportunity to map the labels during the import process. It is important that the spreadsheet contains the actual data listed below, as the data contained in the spreadsheet is used to create commission transactions in HawkSoft.
Named Insured – Name of the person or business entity as it's displayed on the policy in HawkSoft. This data should be included in only one column.
If the First Name and Last Name are in different columns, use an Excel formula to combine the content of the columns into one. See for more information.
- Policy Number – The policy number as it is displayed on the policy in HawkSoft.
Transaction Date – The date the commission transaction is effective.
Valid date formats:
mm/dd/yyyy
mm-dd-yyyy
- Transaction Type – The type of transaction (For example: New Business, Renewal, Cancellation, Payment Correction, etc.).
- Commissionable Amount – The premium the commission transaction is based on.
Commission Paid – The amount of commission for the transaction due to the agency.
Check supported data types
Make sure your spreadsheet contains only the following cell data types. If the spreadsheet contains types of data not supported, modify the spreadsheet.
- General
- Date
- Currency
- Accounting
- Percentage – The percentage must be in a whole number (For example: 14, not .14, to represent 14%).
Once your spreadsheet is ready, save the spreadsheet if modifications have been made.
Save the modified spreadsheet with a different name, to keep the original unmodified spreadsheet.
Optionally, you can copy the data in the spreadsheet to your clipboard, and then use the Import from Clipboard option when importing your commission statement into HawkSoft.
When you copy data to your clipboard, be sure to include the header rows as well as the data below the headers.
To import a spreadsheet
The Commission Importer enables you to import commission statements from a spreadsheet file, or from your clipboard when you have copied spreadsheet data tables.
The Commission Importer opens in a completely separate window from HawkSoft, so you can open and use HawkSoft if you need to reference any data during the import process.
Click Commissions > Commission Importer Tool from the main HawkSoft menu bar.
The Commission Importer dialog opens.
Import your new commission statement.
Drag a file from your computer and drop it in the Commission Importer dialog.
OR
Click Import from Clipboard if you have copied commission data to the clipboard.
OR
- Click Browse to Spreadsheet to browse your computer's local files for the saved commission spreadsheet, and then open the file.
The Commission Importer window opens with the Select Data to Import tab open.
If more than one spreadsheet is included in the file, you can select a specific Spreadsheet from the available drop-down.
The spreadsheet data appears in the main section of the dialog.
Select the row that contains column headers (Policy Number, Insured, Transaction Type, etc.), and then click Next.
The data listed below the header will be included in the import as well as the selected header row.
The Preview Data to Import dialog opens and displays your selected header row and the data listed in each column.
Verify that the header row is the top row, and then click Next.
If the header row and/or data does not look correct, click Back to select a different header row.
The Map Imported Data dialog opens.
This screen enables you to configure how the data is mapped with HawkSoft for this carrier's Commission Statement.
- Enter the Statement Date for the statement you are importing.
Click Select Configuration.
The Carrier Configurations window opens.
Select your carrier from the list and click OK.
As the configurations list states at the top, if a carrier is missing from the list, add it to Carrier Setup, then close all HawkSoft windows and restart the process.
If you need to enter a statement that doesn't always correspond to one carrier, such a statement from a managing general agency that covers multiple carriers, click Add Custom Configuration and type in a name for the custom import configuration.You can sort the carrier/configuration list by clicking on any of the column headers. Clicking the same header a second time will reverse the sort order.
You can also filter the list by typing in the Search Configurations box. HawkSoft searches for what you type anywhere in the carrier/configuration name, and filters as you're typing.The Carrier Configurations window closes and the selected carrier's name is now displayed next to the "Select Carrier Configuration" button.
Confirm whether the configuration has mapped the fields under Field Mapping on the left of the commission importer.
If you have previously imported a statement for this carrier, the field mapping will be set to the previously-selected values. If this is the first time you are importing a statement from this carrier, see below for steps and information on mapping these fields, which will be remembered for future imports of statements from this carrier.
If this is the first time importing a spreadsheet from this carrier, use the Map Imported Data dialog to configure data for a new carrier. Once mapped, you can use the configuration for future imports from the same carrier.
Map the required data fields for the information to be included in the commission statement.
Field Mapping table
The Items To Map column includes a list of data fields to be mapped so that a commission statement is created successfully.
Mapping is required for each item listed in this column, except Commission Rate %.
Use the drop-downs in the Mapped Fields column to select the field names from the spreadsheet that correspond with each of the items to map.
Required Fields
These fields must be mapped to proceed with the import process.
Items to Map Description Named Insured Name of the person or business entity as it's displayed on the policy in HawkSoft. Policy Number The policy number as it's displayed on the policy in HawkSoft. Transaction Date The date the commission transaction is effective. Transaction Type The type of commission transaction. See steps below.
Commissionable Amount The premium the commission transaction is based on. Commission Rate % The commission percentage rate.
This field is not required to be mapped. If commission rate is not mapped, the importer will take the commission paid and divide it by the commissionable premium to calculate the commission rate %.
Commission Paid The amount of commission for the transaction due to the agency. Optional Fields
Mapping these fields is not required to proceed with the import process. If your spreadsheet contains data for these fields, you may choose to map the fields to pull these values from the spreadsheet data, rather than from policy data in HawkSoft.
Items to Map Description Effective Date The date the related policy takes effect. Expiration Date The date the related policy expires. Line of Business The policy Line of Business.
To use this field, you must map each LOB code used in your data to existing LOB codes in HawkSoft (such as HOME, AUTOP, DFIRE, etc.).
The Transaction Type drop-down opens an additional mapping dialog.
Select Transaction Type from the available drop-down options.
The Items To Map column lists the transaction types found on the Commission Statement.
Use the available drop-down in the Mapped Fields column to map the statement's transaction types with the appropriate Transaction Types from the drop-down (New Business, Renewal, Policy Change (Endorsement), etc.), and then click OK.
Once you have mapped the transaction types, you can click on the
to modify as needed.
View of Imported Data table
This table displays the spreadsheet's column headers in the Field Names column with the corresponding data to the right. Use this display to review the data as the fields are being mapped.
Follow these steps when a statement from this carrier has previously been imported. Once a commission statement has been created by the Commission Importer for a carrier, you can select the configuration for future downloaded commission statements so that you do not have to map the fields again.
Click the Load Company Configuration button.
TheCompany Configurations dialog opens with a list of company configurations.
Select the saved carrier configuration, and then click OK.
If the configuration has a date in the Last Used column, it was previously used for an import on that date. If it has no date, there is no saved import configuration for that carrier yet.
Review the mapped fields in the Field Mapping table and make any necessary changes.
Click Next to complete the import process.
If the new spreadsheet contains fields that were not mapped for the selected configuration, instructions will appear in red text.
The Create Statement dialog opens.
This dialog lists any rows that will not be included in the imported statement because required fields are missing. Review the items listed and re-import the spreadsheet if necessary.
See Prepare the spreadsheet before importing to make sure your spreadsheet contains the required data.
- The Commission Statement Total will be listed at the bottom of the statement once the import is complete.
HawkSoft calculates theAgency Commission Paid amount based on the data mapped for the Commission Paid. This total will also be listed at the bottom of the statement once the import is complete.
This amount can be modified during the reconciliation process.
Click Finish to complete the import process and save the configuration for this carrier.
The Create Statement confirmation appears.
Click OK.
You can now view the imported commission statement in HawkSoft. See Viewing commission statements.
To create an anticipated commission statement
Anticipated commissions enable you to create a commission statement containing transactions (premium paid or premium written) that HawkSoft expects based on the anticipated commission rules your agency has defined for the policy carrier. This enables you to quickly create commission statements, for carriers that don't send commission statements via download or an importable file, without having to manually enter each transaction. Once created, you can edit, remove, or add transactions to match a paper or PDF statement from the carrier.
Before you can create anticipated commission statements, your agency must set the commission basis and percentages for each carrier in Agency Commission Settings (Anticipated Commissions).
-
Click Commissions > Commission Processing & Reporting from the main HawkSoft menu bar.
OR
-
Log into the HawkSoft Web app, accessed from any computer
-
Click the Commissions icon
 in the left column of the HawkSoft web start page to access Commission Processing and Reporting.
For more information about logging into the HawkSoft web app, see Logging In and Out of HawkSoft.
-
-
Select the Reconcile Statements tab.
-
Click Create New Statement at the top of the commission statement list.
The Create Statement dialog launches.
-
Select the Anticipated Commissions radio button.
-
Optional: Adjust the Statement Date. This defaults to the current date.
-
Select the carrier(s) to include in the Search Agency Carriers field.
If the carrier is missing from this list, ensure that they are set to Premium Paid or Premium Written in Agency Commission Settings (Anticipated Commissions).
-
Select the date range to search for policy changes generating commission transactions, in the Select Range field.
OR
Manually change the Start Date and End Date.
The date range is limited to 90 days between the start and end dates.
-
Click View Anticipated Commissions to continue.
HawkSoft generates a report of anticipated commissions that meet the search criteria and have not yet been added to an anticipated commission statement.
-
Optional: Adjust the Statement Description. The default is the carrier name and the selected date range.
-
Optional: Enter the statement amount.
-
After reviewing the transactions, click Create and Continue to create a statement with these anticipated transactions.
You will be able to edit, duplicate, or add transactions during reconciliation, as well as select which anticipated commission transactions you want to keep.
To create a manual commission statement
As an alternative to Anticipated Commissions, for example if you only have a few transactions that are not downloaded or imported, you can create a manual commission statement. Carriers or managing general agencies (MGAs) may sometimes send commission statements in a format that cannot be imported into HawkSoft, such as a PDF or paper statement. To help make sure you can accurately track your commissions even with these sort of statements, HawkSoft enables you to manually create a commission statement.
Manually created commission statements will have only manually-created commission transactions. See Adjusting Commission Transactions for more details on manually creating commission transactions, such as field descriptions and auto-matching functionality.
-
Click Commissions > Commission Processing & Reporting from the main HawkSoft menu bar.
OR
-
Log into the HawkSoft Web app, accessed from any computer
-
Click the Commissions icon
in the left column of the HawkSoft web start page to access Commission Processing and Reporting.For more information about logging into the HawkSoft web app, see Logging In and Out of HawkSoft.
-
-
Select the Reconcile Statements tab.
-
Click + Create New Statement at the top of the commission statement list.
The Create Statement dialog launches.
-
Select the Manual Statement radio button.
-
Select the carrier that the statement applies to from the Search Agency Carriers drop-down list.
You can begin typing the carrier name into the text box to filter the list.
OR
Select No Carrier (enter description) from the Search Agency Carriers drip-down list, and then type in a Description.
You can use the No Carrier option if your statement does not apply to one specific carrier, such as a statement for multiple carriers or a statement to record payments received from insureds for miscellaneous fees.
-
Enter the Statement Date.
You can click the
 calendar icon to open a date selector.
 -
Optional: Enter the Statement Amount.
This is the amount paid to your agency by the carrier for this statement.
-
Click Create Manual Statement.
HawkSoft creates the statement and opens the Add Transaction to Statement dialog.
-
Fill in the dialog fields with the information about the first transaction on this statement, then save the transaction.
See To add a commission transaction to a statement for more information about entering manual commission transactions, such as field descriptions and auto-matching functionality.
-
Optional: Continue to add transactions to the statement as needed.
To continue adding transactions to the statement
If the Add another transaction on save box is checked when saving a manual commission transaction, the Add Transaction to Statement dialog will refresh with all fields reset so you can add the next transaction. This box is checked by default.
If Show Policy Details is enabled when adding another transaction on save, it will remain active on the next transaction entry until you close and reopen the add transaction dialog, or disable it.
After choosing not to add another transaction on save, or canceling the add transaction dialog, HawkSoft returns to the statement view.
If you close the add transaction dialog and need to return to it, click + Add Transaction at the top-right of the statement to add the next transaction to the statement.
Once the statement is created, you can continue to reconciliation, or you can close the statement and reconcile it at a later time.
To create an agency bill commission statement from paid company payables
You can create commission statements from paid company payables for agency bill policies, so that you don't have to enter them manually.
When viewing a company payable report that includes paid transactions, you can use the Create Commission Statement button to generate an unreconciled commission statement from any or all of the paid payables on your report.
Commission statements created from company payables will have the transactions automatically matched to the clients and policies that the payables are associated with.
After statements are created from company payables, they appear in the Reconcile Statements tab like other statements, and you can proceed to reconcile them.
See Creating an Agency Bill Commission Statement for more information on creating a statement from a payables report.
To create a commission transaction and statement from a policy
As another alternative, you can easily create a single transaction directly from a policy. Commission transactions created in this way are added to a new commission statement.
You may want to create a commission transaction on a policy when you want to immediately pay agents on an agency bill policy or when you want to create a commission statement for a single agency bill policy.
When you create a commission transaction from a policy, it always creates a new commission statement containing only the created transaction.
Watch a video to see this workflow in action!
For more information, see Policy Commissions and Commission Overrides.
Viewing commission statements
You can view lists of your unreconciled, reconciled, and archived commission statements.
To view the list of unreconciled commission statements
This list includes all downloaded, imported, or manually created commission statements which have not yet been reconciled.
-
Click Commissions > Commission Processing & Reporting from the main HawkSoft menu bar.
OR
-
Log into the HawkSoft Web app, accessed from any computer
-
Click the Commissions icon
in the left column of the HawkSoft web start page to access Commission Processing and Reporting.For more information about logging into the HawkSoft web app, see Logging In and Out of HawkSoft.
-
-
Select the Reconcile Statements tab.
When viewing a list of commission statements, you can sort the list by clicking on the column headers.
Clicking a header once will sort by that column in ascending order. Clicking a header twice will sort by that column in descending order. Clicking a third time will restore the list to its default sort order.
Unreconciled statements are listed in this tab. Each statement has a Statement Number in the format "COM00000001". Click on the Statement Number to view that commission statement.
You can export the list of transactions you are viewing by clicking the  Export to CSV button at the top right. CSV files can be opened with Microsoft Excel or similar applications.
The filename of the exported file can be changed before saving. If you would like to include the total row in the exported CSV, check the box for Add total row. Some agencies may want to leave total rows out to more easily perform calculations on exported data in Excel.
Navigate to the Reconcile Statements tab as described above.
Click
More Actions to the right of the statement you want to view the download for.
If the statement was downloaded, the drop-down menu that opens will have a
button.
Select
From here, you can print or download a local copy of the statement as needed, using the buttons in the upper right. See Downloads Viewer for more information.
Archiving a commission statement removes the statement from the Commission Statement Summary without reconciling it, and is generally used to remove a duplicate or otherwise incorrect commission statement.
Navigate to the Reconcile Statements tab as described above.
Click
Select
from the drop-down.
A confirmation prompt warns that archived statements will not appear on the Commission Statement Summary, and that transactions in the statement will not appear on clients or commission reports.
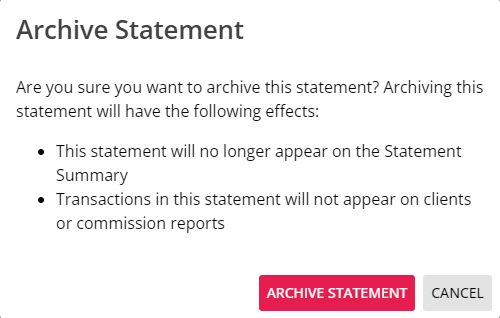
Click Archive Statement.
A pop-up notification confirms that the statement has been archived, and it is moved from the Commission Statement Summary to the Archived Statements list:
 To view previous (reconciled) commission statements
This list includes commission statements for which you or your users have completed the reconciliation process.
-
Click Commissions > Commission Processing & Reporting from the main HawkSoft menu bar.
OR
-
Log into the HawkSoft Web app, accessed from any computer
-
Click the Commissions icon
in the left column of the HawkSoft web start page to access Commission Processing and Reporting.For more information about logging into the HawkSoft web app, see Logging In and Out of HawkSoft.
-
-
Select the Previous Statements tab.
The Previous Statements list launches, displaying all your previously reconciled commission statements, including the total commissionable premium, the total commission paid, the reconcile date, and the user who completed the reconcile.
When viewing a list of commission statements, you can sort the list by clicking on the column headers.
Clicking a header once will sort by that column in ascending order. Clicking a header twice will sort by that column in descending order. Clicking a third time will restore the list to its default sort order. -
Optional: Click the link for any previous statement in the Statement Number column to see details about the transactions on that statement.
When viewing a list of commission transactions, you can sort the list by clicking on the column headers.
Clicking a header once will sort by that column in ascending order. Clicking a header twice will sort by that column in descending order.Details of a reconciled statement or the transactions on it cannot be edited.
To view or restore archived commission statements
Archived commission statements are statements that a user has determined were unneeded and marked for archival, such as duplicate or erroneous statements. They are not reconciled, but do not appear on the list of unreconciled statements.
-
Click Commissions > Commission Processing & Reporting from the main HawkSoft menu bar.
OR
-
Log into the HawkSoft Web app, accessed from any computer
-
Click the Commissions icon
in the left column of the HawkSoft web start page to access Commission Processing and Reporting.For more information about logging into the HawkSoft web app, see Logging In and Out of HawkSoft.
-
-
Select the Previous Statements tab.
-
Click the View Archived Statements button on the right.
The Archived Statements list launches, displaying all your archived commission statements, including the total commissionable premium, the total commission paid, the date the statement was archived, and the user who archived it.
When viewing a list of commission statements, you can sort the list by clicking on the column headers.
Clicking a header once will sort by that column in ascending order. Clicking a header twice will sort by that column in descending order. Clicking a third time will restore the list to its default sort order. -
Optional: Click the link for any previous statement in the Statement Number column to see details about the transactions on that statement.
When viewing a list of commission transactions, you can sort the list by clicking on the column headers.
Clicking a header once will sort by that column in ascending order. Clicking a header twice will sort by that column in descending order. -
Optional: To restore the archived commission statement, click Restore Statement in the upper right of the archived statement details.
The statement will be removed from the Archived Statements list, and will appear again on the Reconcile Statements tab.
Commission statements titled "<Carrier Not Found>"
If a commission statement is downloaded and HawkSoft is unable to match the carrier name on the downloaded statement with a carrier on your carrier list, the statement's Carrier/Description will be listed as <Carrier Not Found>. You can modify these statements to match them to the correct carrier.
-
Click Commissions > Commission Processing & Reporting from the main HawkSoft menu bar.
OR
-
Log into the HawkSoft Web app, accessed from any computer
-
Click the Commissions icon
in the left column of the HawkSoft web start page to access Commission Processing and Reporting.For more information about logging into the HawkSoft web app, see Logging In and Out of HawkSoft.
-
-
Select the Reconcile Statements tab.
-
Click on the statement labeled <Carrier Not Found>.
The Reconcile Statements window launches, displaying the statement details and list of transactions, as with any other statement. Use these details to determine the statement carrier.
-
After confirming the carrier the statement belongs to, click
 Change Carrier/Description at the top of the Reconcile Statements window.
The Change Statement Carrier/Description dialog launches.
-
Select the carrier from the drop-down list.
If the carrier is not in the list, click the Carrier Setup link in the dialog to add the carrier, then come back and select it from this list.
-
Click Save Carrier/Description.
The dialog closes and a popup message confirms that the Carrier/Description was edited successfully.

-
Reconcile the statement or close it to finish later. The statement is now listed with the selected Carrier/Description.
Related Topics