Copying a Carrier
Adding your carriers and managed general agencies (MGAs) to HawkSoft is one of the first and most important steps to successfully completing the setup of your agency's HawkSoft Insurance Platform. The information entered in Carrier/MGA Setup determines which carriers/MGAs can be selected for a policy, the contact and website information for the carrier/MGA, as well as the default lines of business and coverages available for each carrier/MGA, when users insert policies in HawkSoft.
This article describes how to copy a carrier in HawkSoft. Copying a carrier enables you to copy carrier information from one carrier to another or create a new carrier using information from an existing carrier. For example, you may want to copy the LOB information for personal lines policies from one carrier to another who you do similar business with, or copy information from your Prospect Carrier to use when entering a new carrier.
 Before you begin
Before you can copy a carrier, the carrier you want to copy data from must already have been set up in your Carrier List.
If you have not set up the carrier to copy from yet, or if you need to create a carrier without copying any information from an existing one, see Adding a Carrier.
Copy a carrier
-
Open the
 Setup menu, and then select Carrier/MGA Setup.
OR
-
Log into the HawkSoft Web app, accessed from any computer.
-
Click the
 Setup menu at the top-right corner, and select Carrier Setup.
 For more information about logging into the HawkSoft web app, see Logging In and Out of HawkSoft.
The Carrier/MGA Setup dialog opens in an Agency Setup window.
-
-
Locate the source carrier (the carrier you want to copy information from) on the Carrier List, and click the
 Copy Carrier/MGA button at the far-right of the carrier's row.
For agencies with large carrier/MGA lists, you can use the filtering options located directly above the carrier list to find your source carrier/MGA.

You can type some or all of the source carrier/MGA's name, select a state assigned to the carrier/MGA to filter by, and toggle whether to show inactive carriers/MGAs. You may also clear any filtering you have already performed on this list.The Copy Carrier/MGA dialog opens.
-
Select the Term(s) and/or Application Type(s) that you want to copy to the new carrier/MGA, and then review the associated details for each.
The associated details for the Term and/or Application Type(s) (such as Term Length, Policy Snapshot Override, Custom Policy Titles, Policy Coverages/Fees/Taxes, or Lines of Business) are selected by default. Uncheck any details that you do not want to copy to the new carrier/MGA, as needed.
Click the Lines of Business drop-down under the Application Type(s) to review the associated LOBs. Each Line of Business that is selected will be copied to the new carrier/MGA with its Coverages, Limits, Deductibles, and State associations.
Uncheck any LOBs that you do not want to copy to the new carrier/MGA, as needed. -
Click Next: Choose Destination(s).
-
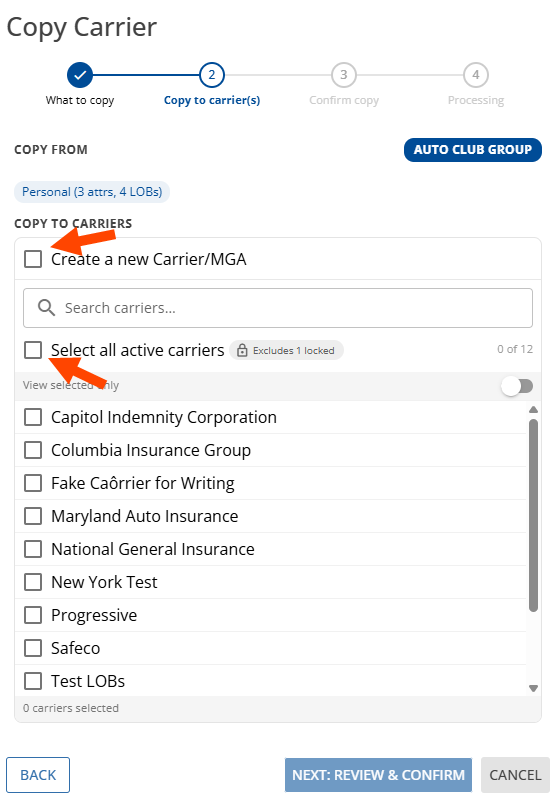
Check the box for Create a New Carrier/MGA to copy the selected information into a new carrier entry, or choose one or more existing carriers from the list to copy the information to the selected carrier(s).
To copy the selected information to all your other active carriers, check the Select all active carriers box.
Currently locked carriers cannot be selected for copying. Click the Excludes # locked button to see currently-locked carriers and who has each one locked, so you can work with coworkers to unlock any carriers needed for copying.
-
Click the button at the bottom of the dialogue, which is called Create New Carrier/MGA if you are copying information to a new carrier, or Next: Review & Confirm if you are copying to existing carriers.
If you copied the information to a new carrier
The Create New Carrier dialog opens.
-
Enter the name of this carrier/MGA or broker in the Search for carrier/MGA or enter a custom name field.
As you type the carrier/MGA's name, HawkSoft searches through the list of download-certified carriers
Carriers who are 'download-certified' by HawkSoft have had their downloads reviewed and tested by HawkSoft to confirm that some or all of the carrier's download types can be processed into HawkSoft without any issues. Not all lines of business and download types from a 'download-certified' carrier may be certified. To see a full list of download-certified carriers, as well as which lines of business/download types are certified by HawkSoft, visit https://carriers.hawksoft.com/ for a match. You can see the full list of carrier/MGAs, certified for downloads into HawkSoft, at https://carriers.hawksoft.com/. -
Complete the remaining information on the Carrier Info, Contact Info, Policy Info, and Website tabs.
-
The Carrier States are copied from the source carrier and are pre-selected on the new carrier.
-
The Terms are copied from the source carrier and are applied to the Policy Info tab on the new carrier.
-
The Lines of Business tab is pre-filled with information from the source carrier, for the Application Types and LOBs selected during the copy.
-
Other information that is entirely carrier-specific, such as Programs, Contact Info, Terms, Agent Codes, and carrier Website information, has not been pre-filled and should be entered into the tabs. Writing Carriers and NAIC Codes may have been pre-filled if matched to a download-certified carrier in step 1 of this section.
See Adding a Carrier for more details on filling out the carrier information tabs.
-
-
Review the information on the Lines of Business tab, which was copied from your source carrier.
If any of the copied information needs to be modified for the new carrier compared to what was copied from the source carrier, or if you need to add further Lines of Business information to the new carrier, you can do so here.
-
After completing all of the Carrier Setup tabs, click Save
This carrier's details are saved. Users can now select this carrier when inserting a new policy or editing an existing policy. These settings also ensure that accurate options are available for Writing Carrier, Program, Agent Code, Term, Policy Title, and LOBs & Coverage options when this carrier is selected.
If you copied the information to existing carriers
Review the selected information to copy and the carriers to copy to on the Confirm Copy screen. This screen also includes warnings and a reminder that this process will overwrite any existing data in the selected sections for copy on the destination carrier(s) and cannot be undone.
Carrier information that is overwritten by the copy function cannot be recovered. Ensure that you have selected the correct source and destination carriers, and that you have only checked the boxes to copy the specific sections needed before proceeding.
Other warnings on this screen to take note of are reminders that any carrier that becomes locked during this process will be skipped, and that this window needs to be kept open during the copy process.
-
Click Confirm Copy to start the copying process.
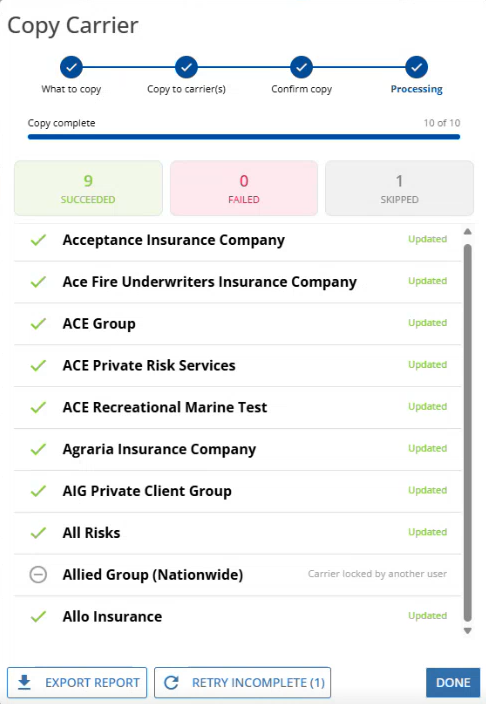
HawkSoft works through the list of carriers to copy to, copying the selected information to each of them. If a selected carrier to copy to has become locked since the Copy Carrier process was started, it is skipped.
-
Review the results.
HawkSoft lists the selected carriers to copy to, and shows whether each one succeeded and was updated, failed (due to a network interruption while communicating with the carrier API, for example), or was skipped due to a lock.
-
Conditional: If copy to any carriers failed or was skipped, you can click the Retry Incomplete (#) button to attempt to repeat the copy process for those carriers. You may need to work with others in the agency to release any carrier locks before retrying.
-
Optional: Click Export Report to save a report to your device listing the changes made in the copy process. The report is a CSV spreadsheet that can be opened with Excel or similar programs. The file may be automatically saved to your computer's Downloads folder, or you may be prompted to select a location, depending on your browser settings.
-
When you are finished reviewing the results, click Done.
The dialog closes and the copied information is available on the selected carriers.
Required permissions
In order to complete this task, user permissions must be set to include:
Agency Setup > Carrier Setup
See User Permissions for more information.
Related Topics