Adding a Carrier
Adding your carriers and managed general agencies (MGAs) to HawkSoft is one of the first and most important steps to successfully completing the setup of your agency's HawkSoft Insurance Platform. The information entered in Carrier/MGA Setup determines which carriers/MGAs can be selected for a policy, the contact and website information for the carrier/MGA, as well as the default lines of business and coverages available for each carrier/MGA, when users insert policies in HawkSoft.
This article describes how to set up each of your carriers/MGAs in HawkSoft. A carrier/MGA profile includes:
- Carrier information (Carrier display name, writing carriers & NAIC codes, programs, carrier states)
- Contact information (Carrier phone/fax numbers & email, mailing addresses, link to carrier client)
- Policy information (Policy terms, agent codes, receipt information)
- Carrier website information (Agent website URL, preferred browser, and customer website URL)
- Lines of Business & Coverages (including Policy Forms, Custom Policy Titles, LOB & Coverage states)
Save time by cloning an existing carrier/MGA (including the Prospect Carrier) to copy some or all Lines of Business and Coverages to a new carrier. See Copying a Carrier.
This task is typically performed by an Owner/Administrator, Manager, or Bookkeeper.
 Before you begin
Before you can add active carriers to your agency's HawkSoft database, your agency must configure the following in Carrier/MGA Setup:
-
Configure your Agency States (the US states and territories in which your agency does business)
-
Add and configure a Prospect Carrier (the placeholder carrier for prospect policies)
If you do not see the + Add Carrier/MGA button in Carrier/MGA Setup (not to be confused with the Create Prospect Carrier button), this means one or both of these steps have not been completed. See Creating a Prospect Carrier for steps on configuring your Agency States and Prospect Carrier.
When a download is received from a carrier who is not listed in your agency's Carrier Setup, HawkSoft can automatically add the carrier to the list if Auto-Create Non-existent Carriers is enabled in your Download Rules.
Before attempting to add a carrier, confirm that it has not already been added by the download process.
Carriers added by the download process are marked as "Needs Review". These carriers only contain basic name, writing carrier, and NAIC code information, and must be manually completed by a user at a later time. See Editing Carrier/MGA Information and Reviewing Changes to Carrier Information for more details.
Add a carrier/MGA
-
Open the
 Setup menu, and then select Carrier/MGA Setup.
The Carrier/MGA Setup dialog opens in an Agency Setup window.
You can also access Carriers/MGAS Setup from your browser on any device. Just bookmark the following URL: https://myagency.hawksoft.app This enables you to make changes without having to log into the HawkSoft desktop program.
-
Click the + Add Carrier/MGA button.
If you do not see the Add Carrier/MGA button (not to be confused with the Create Prospect Carrier button), this means your agency still needs to complete some additional setup before new carriers can be added. See Before you begin for more information.
The Creating New Carrier/MGA dialog opens.
-
Select one of the following options to create a new carrier:
-
Select <New Blank Carrier/MGA> from the Create a new carrier/MGA based on the following carrier/MGA drop-down, and then click Create New Carrier/MGA to configure a new carrier profile from scratch.
OR
-
Create a new carrier/MGA using an existing carrier's Term(s), Application Type(s) and/or Line of Business information as a template:
-
Select an existing carrier/MGA from the Create a new carrier/MGA based on the following carrier/MGA drop-down to use as a template.
Any carrier/MGA that is managed by HawkSoft will have the
 chip next to it. These carriers/MGAs have been certified for downloads with HawkSoft, and their writing carriers and NAIC codes will automatically be added to the carrier profile by HawkSoft.
 -
Select the Term and/or Application Type(s) that you want to copy to the new carrier/MGA, and then review the associated details for each.
The associated details for the Term and/or Application Type(s) (such as Term Length, Policy Snapshot Override, Custom Policy Titles, Coverages/Fees/Taxes, or Lines of Business) are selected by default. Uncheck any details that you do not want to copy to the new carrier/MGA, as needed.
Click the Lines of Business drop-down for each Application Type to review the associated LOBs. Each Line of Business that is selected will be copied to the new carrier/MGA with its Coverages, Limits, Deductibles, and State associations.
Uncheck any LOBs that you do not want to copy to the new carrier/MGA, as needed. -
Click Copy to New Carrier/MGA.
-
-
-
Complete each of the five tabs on this carrier/MGA's profile: Carrier Info, Contact Info, Policy Info, Website, and Lines of Business.
Carrier/MGA Info
Select the
 tab, and complete each section as needed.Search for the carrier/MGA or enter a custom name
Enter the name of this carrier/MGA or broker in the Search for carrier/MGA or enter a custom name field.
As you type the carrier/MGA's name, HawkSoft searches through the list of download-certified carriers
Carriers who are 'download-certified' by HawkSoft have had their downloads reviewed and tested by HawkSoft to confirm that some or all of the carrier's download types can be processed into HawkSoft without any issues. Not all lines of business and download types from a 'download-certified' carrier may be certified. To see a full list of download-certified carriers, as well as which lines of business/download types are certified by HawkSoft, visit https://carriers.hawksoft.com/ for a match. You can see the full list of carrier/MGAs, certified for downloads into HawkSoft, at https://carriers.hawksoft.com/.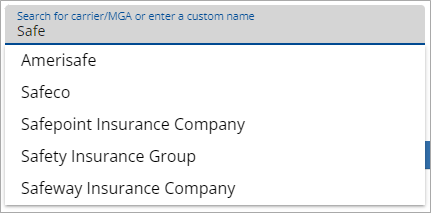
-
If you see the carrier/MGA's name appear in a drop-down below the "Search for carrier/MGA..." field, click on the matching carrier/MGA.
If you see a "Carrier/MGA for this Managed Carrier/MGA already exists" upon selecting the matching carrier/MGA, this means that the carrier/MGA has already been added to Carrier/MGA Setup.
If you do not see the carrier/MGA's name appear below the field, move onto the Writing Carriers and NAIC Codes section.
When a carrier/MGA name is selected through this drop-down, a new "Carrier/MGA Display Name" field appears below the original "Search for carrier/MGA..." field, and the carrier/MGA's known writing carriers and NAIC codes are automatically flooded into the Writing Carriers and NAIC Codes table. In addition, a
 label appears at the top-right of the Editing Carrier/MGA dialog, and the Type is listed as HawkSoft Managed Carrier/MGA for all carriers in Carrier/MGA Setup matched to a HawkSoft-certified downloadable carrier/MGA.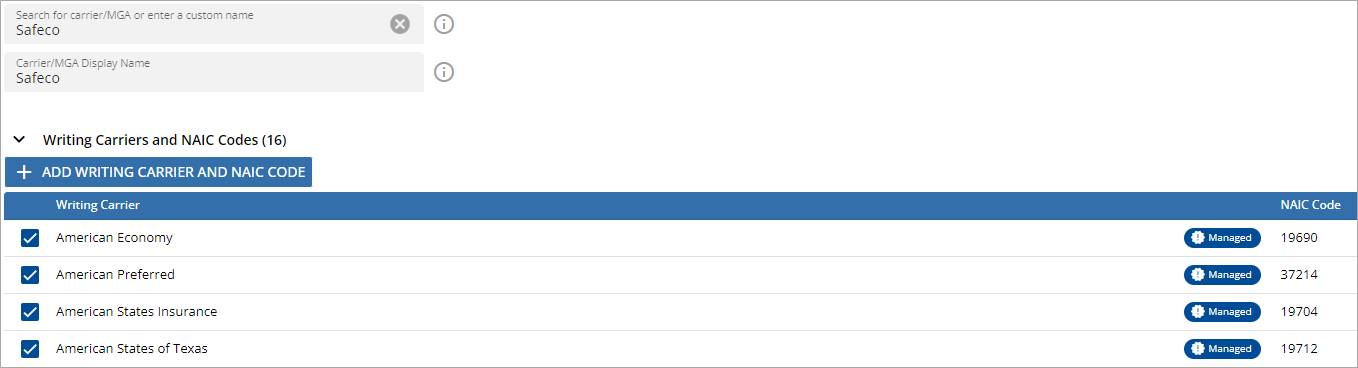
-
Optional: If you want this carrier/MGA to appear to your employees under a different name, enter a custom carrier/MGA name in the Carrier/MGA Display Name field.
This is the name that the carrier/MGA will appear under in Carrier/MGA Setup, and on clients and policies in HawkSoft, but not on forms and correspondence.
Once you have entered the carrier/MGA's name, and display name if applicable, move onto the next section.
Writing Carriers, NAIC Codes, and Company Numbers
The Writing Carriers and NAIC Codes table is where you will enter each of this carrier/MGA's writing companies (a.k.a. sub-carriers) and their associated NAIC codes. In addition, if your agency writes auto policies in states that require a state-specific Company Number on Auto ID cards, you can configure each writing carrier's Company Number in this table, for each state that requires one. If this carrier is a broker or managing general agent (MGA), this table is where you will enter each of the carriers that this broker writes policies for.
How does this impact my agency?
When inserting a policy into HawkSoft under this carrier/MGA, users are prompted to select a Writing Carrier for the policy. The selected Writing Carrier is the legal name of the carrier that will appear on forms, correspondence, and ID cards for that policy.
If this carrier/MGA does not have any writing carriers/sub-companies, enter the legal name of the carrier and their NAIC code into this table as a single Writing Carrier.
If this carrier/MGA is certified for downloads with HawkSoft, and you've selected the carrier/MGA in the "Search for carrier/MGA or enter custom name" field, HawkSoft automatically floods this carrier's known Writing Carriers and NAIC codes into this table.
These automatically-inserted Writing Carriers are marked with a tag.
tag.
If any of these Managed Writing Carriers do not apply to your agency, you can un-check the box next to a Writing Carrier to de-activate it.To add a Writing Carrier and NAIC code:
-
Click + Add Writing Carrier and NAIC Code.
The Add Writing Carrier and NAIC Code dialog appears.
-
Enter the full legal name of the Writing Carrier and their associated NAIC Code.
If this carrier does not have any sub-carriers, enter the full legal name of the carrier and their NAIC code as the single Writing Carrier.
-
Conditional: Click New to add State-Specific Company Numbers. The State-Specific Company Numbers will appear on State Specific ID Cards when you print/create the auto ID card for a policy associated with this writing carrier.
HawkSoft supports Auto ID Cards for all states. You only need to configure Company Numbers for states that require a state specific ID card (NY, NJ, or FL).
-
Click Add and Continue to save this Writing Carrier and enter the next one.
OR
Click Add to save this Writing Carrier and close the dialog.
To edit or delete an existing Writing Carrier/NAIC code
Only user-created Writing Carriers can be modified or deleted. Any Writing Carrier with a
 tag is automatically created by HawkSoft, and cannot be modified or deleted.
-
Click the
 Edit button next to the Writing Carrier/NAIC code to be edited.
 -
Modify the Writing Carrier, NAIC Code, and/or Company Number fields as needed, and then click Update.
OR
Click the Delete button to remove this Writing Carrier.
Programs
If this carrier/MGA has any programs, enter each program into the Add a Program... field. Click Add to add the current program and begin adding the next one.
When your agency creates forms associated with a policy, HawkSoft uses the Writing Carrier in the form's "Carrier Name" field by default. If no Writing Carrier has been selected on the policy, HawkSoft will use the Program Name. If neither a Writing Carrier nor a Program Name have been selected on the policy, HawkSoft will use the Carrier/MGA Display Name.
To remove a program, click the X button next to the program to be deleted.
Carrier/MGA States
The Carrier States section enables you to select which states this carrier's policies can be written in. This carrier can only be selected for policies in states checked in this list.
Only states that your agency does business in appear in the list of Carrier States. If you need to add an additional state to this carrier that does not appear in the list, see Agency States for steps on adding a new state to your Agency States.
By default, all states that your agency does business in are added. To remove a state, click on the state to de-select it.
To add a state back to the carrier, click Show All, then click the inactive state (white background) to make it active (blue background).
(Optional) Carrier/MGA Notes
The Carrier/MGA Notes field enables you to keep a record of agency-specific notes regarding this carrier. You can enter any notes about this carrier that your agency may need to know or find useful about this carrier. For example, if only certain agents write policies or certain LOBs under this carrier, you could record that information here.
Only users with access to the Carrier/MGA Setup permission can access and modify Carrier/MGA Notes.
Contact Info
Select the
 tab and modify each of the sections as needed.Primary Contact Information
The Primary Contact Information fields are where this carrier's primary Customer Service Phone, Claim Phone, and Underwriting Phone numbers, Fax Number, and Email address are listed. For each of the phone/fax fields, you can also enter an extension in the respective Ext. field, if needed.
The contact information entered here will flood to the appropriate fields on forms and correspondence.
You can store additional contact information for this carrier on a Carrier Client, then link the Carrier Clientto this carrier to see these additional contacts in the Client Contacts section. For more information, see Inserting a New Carrier Client.
To add a new primary contact to this carrier/MGA:
-
Click the + Add Primary Contact button.
-
Select the Primary Contact Type from the drop-down list.
-
Enter phone number, fax number, or email for the primary contact.
-
Check the Use this contact for populating merge fields box to flood the appropriate fields on forms and correspondence.
Only one of each primary contact type can be designated for populating ID cards, forms, and correspondence.
-
Click Add to save the primary contact.
Addresses
The Addresses table enables you to keep a record of all physical and mailing addresses associated with this carrier. You can choose one of these addresses to be the "primary" address which automatically floods to ID Cards, ACORD forms, and correspondence for this carrier's policies; this address is marked as the Merge address.
To add a new address to this carrier:
-
Click the + Add Address button.
The Create Address dialog appears.
-
Enter this carrier's Address, Address 2 (if needed), City, State, and ZIP code.
-
Enter a Description for this address.
For example, if this is the carrier's primary mailing address, you could enter "Primary" or something similar.
-
Check the "Use this address for populating ID Cards, ACORD forms and merge fields" check-box if this is the carrier address you want to appear on all ID cards, forms, and correspondence for this carrier's policies.
The address will be marked in the table with
 to signify that this address will populate this carrier's ID cards/forms/correspondence.
Only one address can be used for populating ID cards, forms, and correspondence. If there is already an address with this setting enabled, a warning will appear beneath the check-box stating that setting this address as the new main address will remove the setting from the previous address.
-
Click Submit to save this address.
Client Contacts
The Client Contacts section enables you to link a Carrier Client to this carrier. A Carrier Client enables you to store additional contact information for a carrier beyond the primary contact information.
For full instructions on creating a Carrier Client, see Inserting a New Carrier Client.
-
Click the Link Carrier/MGA Client button.
The Search Carrier Clients dialog opens.
-
Enter the carrier's Business Name, and then click Search.
-
Select the carrier client from the Search results.
The carrier client is now linked to the Carrier.

To un-link a carrier client
If this carrier is linked to the wrong carrier client, click the
 button, and then click Confirm on the dialog that appears.
The carrier is no longer linked to that carrier client, and you can follow the steps under To link a carrier client to link a new carrier client to this carrier.
Policy Info
Select the
 tab and complete each section as needed.Terms
The Terms list determines which Policy Term lengths can be selected for a policy under this carrier. Add or remove term lengths as needed to match this carrier/MGA's policy term lengths. By default, 12 Months, 6 Months, 3 Months, and 1 Month are already added.
To add a new term length:
-
Click + Add Term.
-
Enter a number in the Value field, and select whether this value should be Days, Months, or Years in the Time Unit drop-down.
For example, to enter a new term length of 15 Years, we would enter 15 in the Value field, and select Years in the Time Unit drop-down.
-
Click Add.
The new term length is saved.
OR
Click Add & Continue to save the term length and immediately add another new one.
Agent Codes
The Agent Codes table is where you will enter all agent codes given to your agency by this carrier/MGA. You can also add a description to each agent code (such as which agent(s) the code belongs to), and if your agency has multiple offices, you can choose which agent codes can be used by a certain office.
To add a new Agent Code:
-
Click + Add Agent Code.
-
Enter the Agent Codein the first field.
-
Optional: Enter a Descriptionfor this agent code.
-
Optional (Multi-office agencies only): Check each office that this agent code applies to.
If only certain offices are checked, all other offices not checked will not be able to select this agent code on policies under this carrier/MGA.
For agencies with many offices, you can use the Filter field to quickly search for an office, as well as the Select All checkbox to quickly check all offices.
-
Click Add.
The Agent Code is added to the table of Agent Codes.
OR
Click Add & Continue to save the Agent Code and immediately add another new one.
Receipt
The Receipt section enables you to choose which values appear for the Reference and Payee fields on receipts generated on this carrier/MGA's policies.
Use the Reference drop-down to select whether receipts for this carrier/MGA should use the value in the Policy Number field, or the Account Number field (both from the Policy Information screen), as the Reference number.
Use the Payee drop-down to select whether the payee (carrier/MGA name) should appear as the Carrier/MGA selected, or the Writing Carrier selected.
Website
The Website tab enables you to enter website URLs for Agents as well as for Customers who want to service their own policy. The Agent Website URL(s), can be enabled for your agents to quickly request quotes directly from a policy by clicking the
 button in the HawkSoft toolbar.
Add an Agent Website
-
Select the
 tab at the top of the Create New Carrier/MGA dialog.
 -
Click the + Add Agent Website button.
The Add Agent Website dialog opens.
-
Enter an Agent Website Label for this agent website.
-
Enter the Agent Website URL for this carrier/MGA.
When a user clicks the
button with a policy selected, written with this carrier/MGA, this is the website that will open.If more than one website is entered for the carrier/MGA, your agents will have the ability to select which website they want to use.
-
Select whether a specific Browser should be used for this carrier/MGA website.
HawkSoft recommends leaving the Browser drop-down set to User Preferences, HawkLink for Google Chrome, or HawkLink for Microsoft Edge.
The Browser selection in Carrier/MGA Setup will override the individual browser setting enabled in User Preferences. Users can use HawkLink for this website only if HawkLink for Google Chrome or HawkLink for Microsoft Edge is selected as the Browser in Carrier/MGA Setup or in the user's Preferences. -
Check the Quotes checkbox if this website should be made available for quoting.
If this option is checked, users will have this carrier/MGA website as one of the quoting options when Quote/Export is selected in the Action Menu.
-
Click Add to save the agent website.
Add a Customer Website
If this carrier/MGA has a website that customers can access to service their own policies, you can enter that website in the Customer Websites list. Your agents will be able to find and copy this website link from the Carrier/MGA link on any policies associated with this carrier. You can add multiple Customer Websites for a carrier/MGA.
-
Select the
tab at the top of the Create New Carrier/MGA dialog. -
Click the + Add Customer Website button.
-
Enter a Customer Website Label for this customer website.
-
Enter the Customer Website URL for this carrier/MGA.
-
Click Add to save the customer website.
Lines of Business
The
 tab enables you to configure this carrier/MGA's default lines of business, as well as default coverages, limits, and deductibles for each LOB. In addition, you can configure certain LOBs and coverages to only be available to certain states. Custom Policy Titles and Policy Snapshot Override settings are also configured under the Lines of Business tab.
You can save time during the carrier/MGA creation process by copying some or all of another existing or prospect carrier's Lines of Business information to your new carrier/MGA, and using the copied LOB information as a template. SeeCopying a Carrierfor more information.
Application Types
Notice there are eight different sub-tabs under the Lines of Business tab: Personal, Commercial, Agriculture, Life, Health, Surety Bond, Other, and Employee Benefits. These tabs correspond with the eight different policy Application Types. Each tab has their own Policy Snapshot Override setting, Custom Policy Titles list, and table of LOBs and Coverages.
How does this impact my agency?
The Application Type selected when entering a policy, determines that policy's Policy Snapshot Override setting, the Custom Policy Titles that can be selected for that policy, as well as the default list of LOBs and coverages that can be added to that policy.
See Carrier Coverages and Lines of Business for full instructions on completing the Lines of Business tab.
-
- After completing all of the Carrier/MGA Setup tabs, click Save.
This carrier's details are saved. Users can now select this carrier when inserting a new policy or editing an existing policy. These settings also ensure that accurate options are available for Writing Carrier, Program, Agent Code, Term, Policy Title, and LOBs & Coverage options when this carrier is selected.
If your agency uses the HawkSoft Trust Accounting feature, see Company Payables Setup to create both General Liability accounts and Line Item Templates for each of your carrier/MGAs. This will help your bookkeeper more easily track funds by carrier/MGA.
Required permissions
In order to complete this task, user permissions must be set to include:
Agency Setup > Carrier/MGA Setup
See User Permissions for more information.
Related Topics