Creating a carrier client in HawkSoft enables you to store carrier information in addition to what is typically stored in Carrier Setup, such as additional contacts, phone numbers, e-mail addresses, commission statements, and underwriting guidelines.
The Carrier Client can be linked to from the Contact Information screen in Carrier Setup for the same carrier.
 Inserting a Carrier Client from the HawkSoft menu bar
You can insert a Carrier Client from the HawkSoft menu bar, and then link it to the existing carrier within Carrier Setup later. To learn more about inserting a new carrier in HawkSoft, see Adding a Carrier.
-
Select Insert > All Other > New Carrier from the Client menu on the HawkSoft menu bar.
The Action menu opens.
-
Select Other from the Action menu.
The Insert Policy dialog opens with the Name and Address side-tab selected.
The Client Type defaults to Carrier.
Most of the fields on the Name and Address screen are not relevant to the "Carrier" Client type, such as Customer Type, Producer, CSR, and Source.
- Check the Business check box to activate fields specific to business contacts.
- Enter the Carrier’s Name.
-
Add each contact and person at this carrier that is relevant to your agency:
-
Click Add under Contacts and People to open the Add/Edit - Person dialog and enter contact information for specific individuals.
- Enter the Name and Personal Underwriting information for your first contact with this carrier, such as your Underwriter, Marketing Representative, Customer Service Department, etc.
- Enter the contact's job title in the Occupation field.
- Click Add under Contact Info to add the contact information such as phone number, e-mail address, mobile phone number, etc.
- Click OK to save the Contact.
- Click OK to save and close the Add/Edit - Person dialog.
- Repeat steps 5a-5f for each carrier contact you want to add.
-
-
Optional: Under Contact Info, you can add additional phone numbers, fax numbers, and email addresses without setting up personal profiles as detailed above.
- Complete the Mailing Address fields.
- Enter the carrier's Physical Address if it is different from their Mailing Address.
-
Enter the carrier's primary Website URL.
-
Click Finish to save the new carrier client, and close the Insert dialog.
The Finalize Log dialog opens.
You can attach underwriting guides, commission statements, and any other company-specific forms to the Log Note. You can also attach these documents at any time after the file is saved.
- Add log comments and create a Task as needed, and then click Save Log.
The newly created carrier client is opened.
You'll notice the carrier client also has a blank "Other" policy tab. If needed, your agency can use this blank policy to track and report agency fees.
Required Permissions
In order to complete this task, user permissions must be set to include:
Client Actions > Insert Client
Client Access: You must have permission to the Client/Customer Type you are inserting
See User Permissions for more information.
Linking a Carrier Client from Carrier Setup
Now that you have created the carrier client, you can link the file to the carrier in Carrier Setup.
If you have not yet added the carrier to Carrier Setup, see Adding a Carrier to learn how to add a new carrier to your HawkSoft database.
-
Click the
 Setup icon, and then select Carrier Setup.
The Carrier Setup dialog opens.
-
Select the carrier you would like to link the carrier client to.
The Editing Carrier dialog opens.
-
Select the Contact Info tab, and then click the Link Client button.
The Search Carrier Clients dialog opens.
-
Enter the carrier's Business Name, and then click Search.
-
Select the carrier client from the Search results.
The carrier client is now linked to the Carrier.
-
Click Save to save the linked carrier client to the carrier contact information.
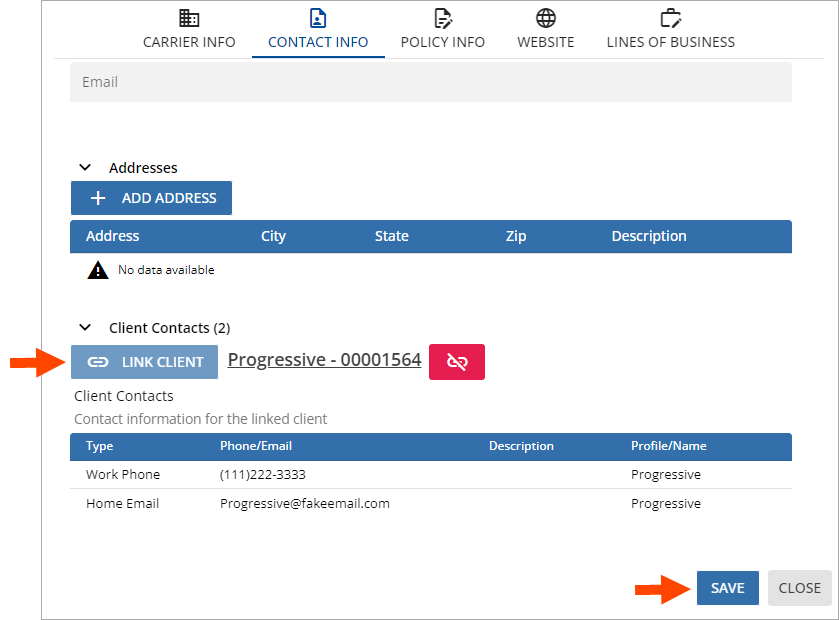
Now that your carrier is linked with the carrier client, you can easily click the link on the Contact Info screen to quickly access additional contact info and attachments. Additionally, you can quickly flood any carrier contacts, such as underwriters, to any Submissions to this carrier which you track.
Click the client contact link, and then click Open to access the carrier client in HawkSoft.
If you've mistakenly linked the wrong carrier client, or otherwise need to remove the currently-linked carrier client, click the
 Remove Linked Client button to remove the linked carrier client. You can then follow the steps above to link a different carrier client to this carrier.
Required Permissions
In order to complete this task, user permissions must be set to include:
Agency Setup > Carrier Setup
See User Permissions for more information.
Related Topics