Creating a Log Note
Log notes enable you to create a permanent record of your agency’s actions and communications with each client. These log notes create an important history for each client’s requests and policy activity. Log notes are an important part of state-required record keeping and can be subpoenaed in the event of legal action.
Most log notes are automatically generated as a result of transactions made in HawkSoft, such as changing customer contact information or recording a payment. Others can be initiated independent of any transaction.
This article explains how to manually create a log note and use the optional features available in the dialog.
For more information about modifying an existing log note, see Append new information to an existing log note.
Video: Creating a Log Note Overview
How Log Notes are created
| Source | Description |
|---|---|
| Client/Policy Change | Log Notes are created each time a client or policy is updated. This includes changes made outside of the action menu, such as changes made from the Trust Accounting window. |
| Manually Created | Users can create log notes without making changes to a client or policy. |
| Download | As part of processing carrier downloads, HawkSoft will create a log note on the policy. |
| HawkSoft Partners | HawkSoft partners can create log notes on clients. If you use products that integrate with HawkSoft through the HawkSoft Marketplace, such as Rocket Referrals, those programs may automatically create log notes in HawkSoft. |
 Create a Quick Log without making a change to the client/policy
You can create a log note on a client without making any changes to the client or policy information.
-
Retrieve the client, then click
 .
.You can also start a Quick Log using the keyboard shortcut Ctrl+L.
-
Describe what prompted this log note using one item from each of the three lists.
The Create Log dialog opens with the username and the Create Log breadcrumbs that created the log.
You can edit the breadcrumbs
Options you have selected on the Quick Log Menu. This populates on the resulting log note. for a Quick Log by clicking on them.The Date/Time you created the quick log is recorded in the top left of the log. The time stamp on the log note displays the time in your local time zone.
Example: Erica works on the West Coast, which is in Pacific Standard Time. Jeff works on the East Coast, which is in Eastern Standard Time and is 3 hours ahead of Pacific time. Erica enters a log at 8:00 am. When Jeff opens that client, Erica's log note will show as being created at 11:00 am.
- Complete the log note details.
Create a log note with a change to the client/policy
A log note is automatically generated when you use the Action menu to perform a task on the client or policy.
Required Permissions
Required Permissions:
To open the action menu, user permissions must be set to include:
Client Actions > Action Menu
See User Permissions for more information.
- Retrieve the client, and then select the Client or Policy tab.
- Click Action, and then select one item in each of the first three lists to describe what prompted this transaction.
- Select Change Client/Policy.
-
Make necessary changes to the client or policy, and then click Finish.
After you complete your first action, the Action menu opens to enable you to perform an additional task.
-
Optional: Select an additional action to perform.
Each additional action selected from the Action menu is documented on the log note.
-
Click Finish when you are done with all actions.
- Complete the log details.
The Finalize Log dialog opens with the username and the Action menu thread that created the log.
The time stamp on the log note displays the time you completed your first action, in your local time zone.
Example: Erica works on the West Coast, which is in Pacific Standard Time. Jeff works on the East Coast, which is in Eastern Standard Time and is 3 hours ahead of Pacific time. Erica enters a log at 8:00 am. When Jeff opens that client file, Erica's log note will show as being created at 11:00 am.
Append new information to an existing log note
Log notes provide a permanent record of all transactions taking place within a client, and cannot be deleted. Although you can't modify an existing log note, you can append additional text, attachments, tasks, and activity tags to an existing log note.
-
Retrieve the client, then select the Logs tab on any policy tab, or from the Client tab.
Log notes are listed by date and time, with newest at the top.
-
Double-click to open the log note.
You can use Search and Filters to more easily locate the log note. For example, you can search for key words, or filter by user logs. For more information, see Searching and Viewing Log Notes.
-
Click Append to Log.
-
You can add hyperlinks, attachments, tasks, and activity tags to the appended log note. If one or more of these items is added, you do not need to enter additional text or data to save the log note.
-
When finished creating your appended log, click Append Log.
Your appended log note appears below the original log note in the View Log window. Appended logs are indented from the original log.
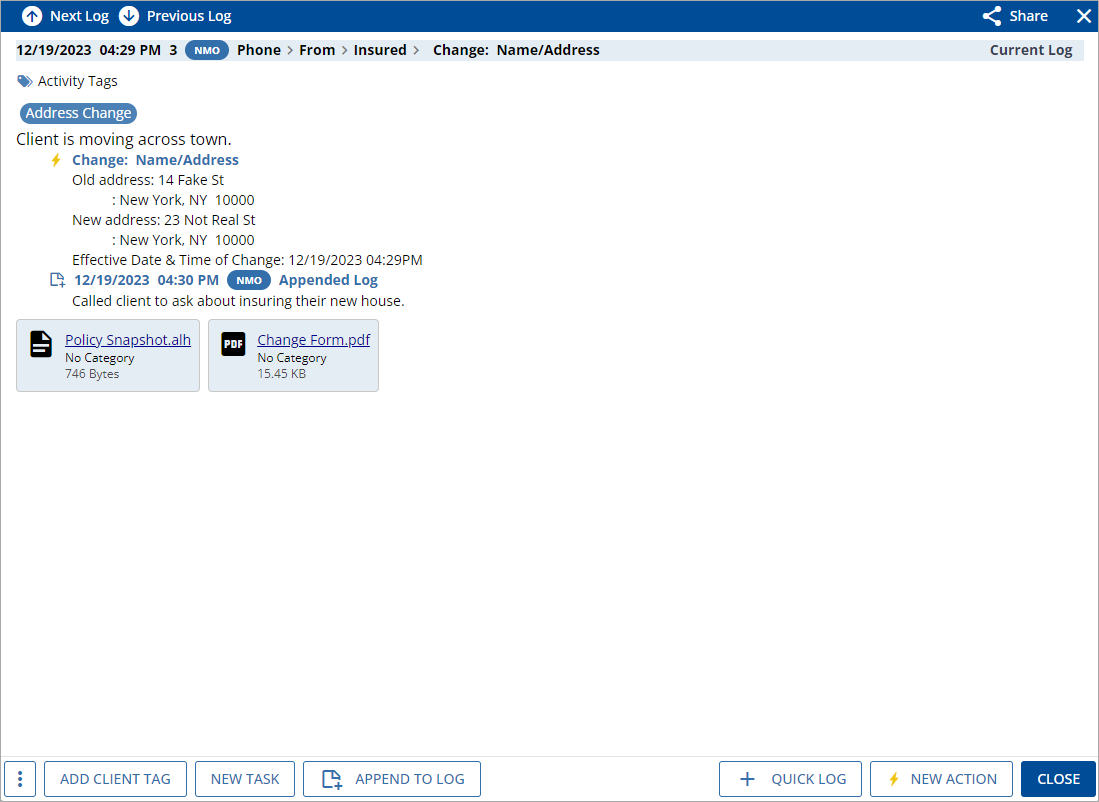
Hover over the icon next to an action in the log view to see the date and time the action occurred.
For example, in the log above you can hover over the  or the
  to see the date and time that the action and the append to log each took place.
Complete the log details
-
Describe why you are creating the log in the provided text box.
To speed up entering text into logs, you can select
 Insert Log Templates to add pre-formatted text to the log. For more information about creating templates, see Customize Log Note Templates.
Additionally, you can use Windows 11's Voice to Text feature to type into the log by simply speaking aloud. Watch the video below to learn more. -
Optional: Use the available formatting options to modify the text.
Formatting options
The following editing icons are available above the text box for modifying the log details:
Alignment- Click the
 icon, and then select the preferred alignment
Formatting options- Bold, italic, and underline

Bulleted or numbered lists

Decrease/Increase indent

Indent is used for bulleted or numbered lists, to create a sub-list.
Clear formatting

Highlight

Font Color

The highlight and font colors are displayed when viewing log notes on a Client/Policy, but not in activity reports.
Insert Hyperlink- Highlight your desired text, then click the
 icon or press CTRL + K to create a hyperlink and modify the Link text, as needed. You can also copy and paste a hyperlink directly into a log note.
 To open and view the content, press and hold the CTRL key and then click the link.
HawkSoft recommends that you only link to permanent URLs that are not subject to change.
Remove Hyperlink

Insert Log Template
See Customize Log Note Templates for information on creating and editing log note templates.
-
Optional: Add relevant Activity Tags.
To add activity tags
See Activity Tags for more information.
-
Optional: Click Add Client Tag to add a client tag that is related to the log note for the client.
To add client tags
A client tag can be added to a log note to bring attention to important information. For example, you might create a "late payment" client tag directly on the log note where you document a call about a late payment. When that client tag is opened from the client, the agent will be able to click on the associated
 log note from the client tag to read additional information. Once the late payment has been resolved, you can archive the client tag, or change the client tag category, as a note that this client had a late payment during a prior term.
Once a client tag is associated with a log note, you can't dis-associate it. You can however, archive or edit the tag from the Client Tags link on the client view screen.
-
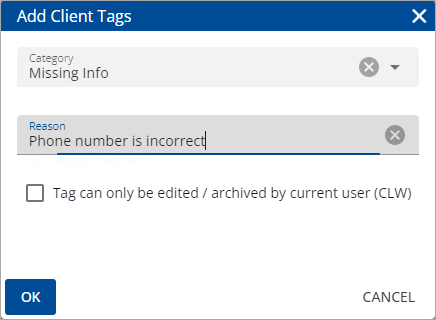
Select a Category from the drop-down.
-
Optional: Enter a Reason to further describe the client tag.
For Example: Missing Info. Phone number is incorrect.
-
Optional: Check Tag can only be edited / archived by current user.
Users with the Client Actions > Allow Editing/Removing of Exclusive Tags permission can still edit exclusive client tags. For more information, see User Permissions.
-
Click OK.
You can link multiple client tags to a specific log note.
See Client Tags to learn how to add a client tag to an existing log note or modify existing client tags.
The Client Tag is not added to the client until the log note is completed and saved. If the Log Note is not saved, then the client tag will not be saved either.
-
-
Optional: Click Add Task to create a Task as a reminder to follow up with this client.
To add tasks
Once created, the task is associated to the log note. The task can be managed from the client or from the Task Center. See Tasks Overview for more information.
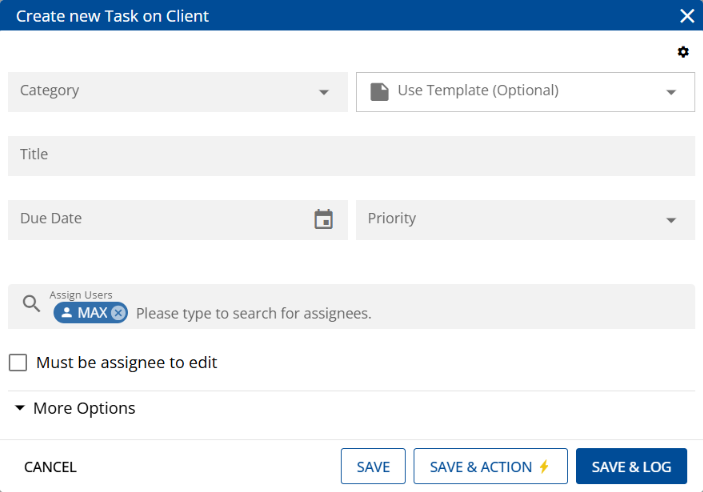
Description of the Task fields and options
Use Template - You can select a relevant template to complete some of the information in your Task. If a template is selected, you can modify the following information:
Task templates are created by your agency administrator or manager.
Category - Select a Task category created by your agency administrator or manager.
Task categories help you organize and filter your Tasks list in the Task Center.Task Title- Insert a brief description for the task. The description should have a clear call to action, such as "Call insured with a new quote".
Assign Users - The Task is assigned to you by default. You can assign the Task to another user, or select up to 5 users. Each user will see the Task in their Task list until one of the assignee's completes the Task.
Due Date - Set a Due Date for the Task. The due date defines when the Task is due. After this date the Task is listed in the Task Center as overdue.
You can sort your tasks by due date in the Task Center.
Priority - You can filter tasks by level of importance in the Task Center.

Status - Select Not Started or if you have already begun working on this Task, select In Process.
Optional: Due Time - You can set a specific time that this Task must be completed.
Description - Enter any details that will help you remember what needs to be done to complete the Task.
Optional: Must be assignee to edit - Check the Must be assignee to edit box to create a locked task. Only the user(s) assigned to the task or a user with Allow Tasks Management permissions can manage, edit or close the task.
User permissions must be set to include Allow user to select Must be assignee to edit in order to lock the Task.
Optional: Assign one task per assignee - Check the Assign one task per assignee box to create a duplicate task for the other users assigned to the task. Each user manages the task separately.
See Creating a Task for more information.
Click Save & Exit, or click Save & New if you need to create an additional Task for this log note.
The Task appears in the References section of the Log Note and displays the task status, due date, and assignee(s).
You can click on the task from the References section of the log note to edit the task details, as needed.
Any overdue task(s) associated with the log note will display in red text and have an alert icon. For more information about updating and modifying tasks, see Tracking My Daily Tasks.
This Task is not added to the client until the log note is completed and saved to the client.
-
Optional: Attach documents to the log note.
To attach documents
HawkSoft makes it easy to upload files such as documents, images, and emails into a log note.
-
Drag and drop your document(s) anywhere on the log note.
HawkSoft supports attaching of documents with file sizes up to 100 MB. Files approaching this size limit may be slower to attach or to view later.
The Attachment Properties dialog opens, with a row for each file to be attached.
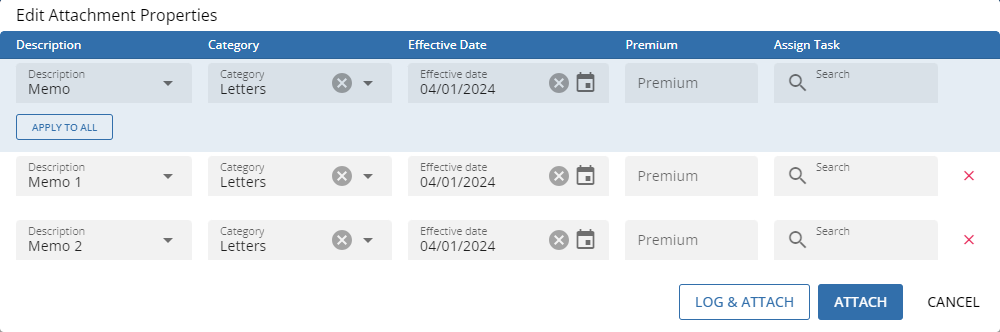
The Description defaults to the file name of the attachment.
When adding multiple attachments, the top row allows you to update all of the new attachments at the same time. To make changes to all attachments at once, make your desired changes in the top row, and then click Apply To All.
The Description field will use numbers to distinguish between each attachment. -
Enter a new description for the file(s), or select one from the Description drop-down list.
-
Optional: Select a Category.
See for instructions and permissions required to modify Description and Category drop-down lists.
-
Optional: Modify the Effective Date, as needed.
The Effective Date defaults to the current date, and is typically the effective date of the transaction the document is relevant to.
-
Optional: Record the Premium associated with the files(s).
The entered amount will display in the Premium column on the Attachments list on the client/policy.
-
Optional: In the Assign Task field, enter a user's name to create a new Task related to this document.
Once the attachment is saved, a Task with the same name as the attachment will appear in the assigned user's Task Center.
This is a "quick task" and will not include the same level of detail as other tasks. For example, this task will not have a due date. See Tasks Overview to learn how to modify tasks and create tasks after the document is attached.
-
Click Attach or press CTRL + Enter on your keyboard to save the attachment(s).
The attached document or image is now listed in the References section of the log note.
You can click the attachment link to open and view the attachment or click the
 More icon in the upper-right corner of the attachment to edit the attachment properties or remove the attachment.
Note: HawkSoft generated forms, such as a Change Form or an ACORD form, cannot be removed from the log note.
If you use the Virtual Printer to add a document to this client while you are creating a log note, or while you have the action menu open, the resulting document will be attached to the resulting log note.
See Drag and Drop Documents for more information.
-
-
Review your log before saving.
The Documentation Preview section (only for logs created using the Action menu) includes a list of actions you took on the client.
The References section includes any documents you attached to the log and any Tasks you created for this log.
-
Click Save Log.
You can see your log note from the Logs tab. See Searching and Viewing Log Notesfor more information.
To Share a log note, you can open an existing log note to view it, and then click Share to copy a link to the log note to your clipboard. You can paste the link into emails and chats with other users in your agency to allow them to quickly open the linked client or log note.
Related Topics