Certificate Holder Document Library
HawkSoft's Certificate of Liability Insurance wizard makes it easy to generate the ACORD© 25 form with your client's unique policy coverage information and including supplemental documentation. The Document Library tab enables you to keep a list of all PDF documents attached to the client that are relevant to the certificate, making it easier to select specific PDFs to include with specific holders' certificates.
Only a Certificate of Liability Insurance (ACORD 25) created via the HawkSoft Certificate of Liability Insurance wizard can be published to the Self-service Certificates portal. Certificates created through the wizard are listed with a form number of "025XX HawkSoft" in the Edit - ACORD Forms dialog.
Any additional documents attached to the certificate—such as those added from the Document Library or ACORD forms and packages created via the HawkSoft Form Filler—will not be included in the Self-service published certificate.
This article describes how to add additional documents to a "master" certificate and how to specify which documents to print for each certificate holder.
See Create or Modify a Master Certificate of Liability for more information.
 Required permissions
In order to complete this task, user permissions must be set to include:
Client Actions > Action Menu
See User Permissions for more information.
To add documents to the Document Library for a "master" certificate
-
Access the Certificate of Liability wizard.
To access the wizard
- Retrieve a client, and then select the Client tab or a policy within that client.
- Click Action, and then select one item in each of the first three lists to describe what prompted this transaction.
-
Select Print/Create > Certificate of Liability (025).
The Edit - Certificate of Liability Insurance dialog opens.
-
Highlight the master certificate, and then click Edit.
The Certificate of Insurance wizard opens.
-
Select the Document Library side-tab.
-
Click Add to add documents.
The Select Attachments dialog opens.
-
Use the Attachment Search field to locate existing PDF documents attached to the client.
All PDFs matching the search criteria are listed.
OR
Drag and drop files into this dialog to attach new PDF documents to the client file and certificate.
Only PDF, TIF, TIFF, files can be added to the document library.
-
Select each document to be added to the Document Library, and then click OK.
Once the documents are added to the Library, they are available to include with certificates for specified certificate holders.
Documents in the Document Library will not print until they are added to a certificate holder.
Once a document is in the library, you can select the document and click View to preview.
The documents are now available to be included the next time you print the certificate. See Print or Email an Existing Certificate of Liability to send the certificate now.
-
Click OK to close the Certificate of Liability wizard.
A task dialog opens, presenting you with options to Print, Email, or Attach the certificate.
-
Click No to close the Certificate of Insurance wizard and return to the Edit - Certificate of Liability Insurance dialog.
-
Click OK to close the Edit - Certificate of Liability Insurance dialog.
-
Click Finish to close the Action menu.
The Finalize Log dialog opens.
-
Add log comments and create a Task as needed, and then click Save Log.
To select documents to print for one or more certificate holders
You can add documents from the Document Library to multiple certificate holders at once.
-
Access the Certificate of Liability wizard.
To access the wizard
- Retrieve a client, and then select the Client tab or a policy within that client.
- Click Action, and then select one item in each of the first three lists to describe what prompted this transaction.
-
Select Print/Create > Certificate of Liability (025).
The Edit - Certificate of Liability Insurance dialog opens.
-
Select a certificate, and then click Edit.
The Certificate of Liability wizard opens.
-
Select the Certificate Holder side-tab.
-
Select the certificate holder(s), then click Edit Docs.
You can select multiple certificate holders by holding Shift or Ctrl on your keyboard, and then selecting the relevant certificate holders. You can also use the Select By button to select certificate holders by Additional Insured status, Subrogation Waived status, or by sections applied.
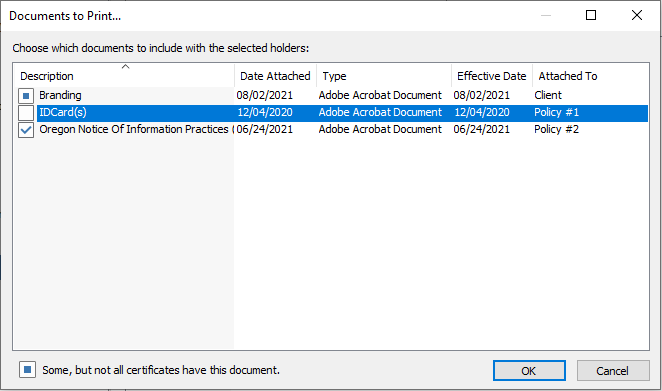
The Documents to Print dialog opens.
-
Check or uncheck the box next to each document. These documents are pulling from the Document Library.
Documents with a checkmark have already been selected for all of the selected holders.
Documents with a blue square are currently attached to only some of the selected certificate holders. To include these documents with all of the selected holders, check the box.
-
Click OK to save the selected documents for the selected holders.
A dialog opens asking if you are sure you want to change the documents included with the selected certificate holders.
-
Click Yes.
See Print or Email an Existing Certificate of Liability to send the certificate now.
-
Click OK to close the Certificate of Liability wizard.
A task dialog opens, presenting you with options to Print, Email, or Attach the certificate.
-
Click No to close the Certificate of Liability wizard and return to the Edit - Certificate of Liability Insurance dialog.
OR
- Click OK to close the Edit - Certificate of Liability Insurance dialog.
-
Click Finish to close the Action menu.
The Finalize Log dialog opens.
- Add log comments and create a Task as needed, and then click Save Log.
Related Topics