Add a New User
Each agency employee who uses HawkSoft must have a user profile that includes their name, login credentials, email, and permissions set to accommodate their job functions. The User Profile is also where you can set this user's contact information for placement on forms and correspondence.
HawkSoft User Profiles can be added and configured through the User Setup tab in Agency Setup.
This article is intended to help an agency administrator or manager add new users and assign permissions.
 Required Permissions
In order to complete this task, user permissions must be set to include:
Agency Setup > Agency Info/Office Setup
Agency Setup > User Setup
See User Permissions for more information.
How to access User Setup
-
Click the
 Setup icon, and then select User Setup.
 -
Select the
 Users tab.
The User Setup tab
This screen enables you to add new users and manage existing users. This view enables you to quickly see if the existing users have validated their email, which office is their default office, if they are a roaming user (ability to log into any of their assigned offices), if they are a Tracking only user, and the status of their password.
Before you begin
Before you enter a new user, you will need the following information:
-
The user's initials, which will be used when the user logs in to HawkSoft and will be used for reporting and tracking purposes. These initials cannot be changed.
-
The user's Account Email. This email is required to enable the user to reset their own password.
-
Password. You can use the same initial password for all users and then force users to set their own unique password upon logging in for the first time. The password can be reset by the user at any time.
To add a new user
-
Click the Add New User button to get started.
You are prompted to select a template. HawkSoft has provided templates which include permissions based on common roles in an agency: Bookkeeper, CSR/Producer, and Manager.
To create a unique user template for your agency, click Manage User Templates. You can select an existing template to get started, and then you can modify the template name, offices the template applies to, and the permissions for the template. See User Templates for more information.
-
Select a template or leave the No Template selection, and click Go.
For Tracking Only users, select No Template.
HawkSoft enables you to create a user profile as a Commissions and Sales Tracking placeholder. For more information on Tracking Only users, see To add a Commissions or Sales Tracking Only user. -
Complete each of the User tabs. See a description of each tab below.
Account
The Account tab includes basic information about the user. You can use this tab to inactivate a user or reset their password.
Tracking Only - HawkSoft enables you to create a user profile as a Commissions and Sales Tracking placeholder. For more information on Tracking Only users, see To add a Commissions or Sales Tracking Only user.
User Initials - (Required) Must be three alphanumeric characters, can also include dashes and underscores.
Once user initials have been entered and saved, they cannot be changed.
If you make a mistake when inserting user initials, or need to change them, you must inactivate the previous user and re-add the user under the new initials.
If the old profile is assigned to any policies or clients as an Agent or Producer, you will need to use Data Replace to re-assign the new profile to those clients/policies. See Remove or Replace a User.First and Last Name - Enter the user's First Name and Last Name as you would like it to appear on correspondence. Admins can modify the name later, if needed.
Account Email - (Required) This email is used for resetting the user's password.
HawkSoft will Automatically Send User an 'Invite Email' with Installation Instructions, unless you uncheck the slider.
The invite email contains a link to download the HawkSoft Installer and basic instructions on running the installer, but it does not contain the agency ID or the user's Initials or Password. You will still need to provide those details to the new user yourself.Password - (Required) You must enter a password for the new user. You have the following options:
-
Enter a generic password such as Password#01, and then email the user with the temporary password.
-
Click Generate Password. HawkSoft creates the password. You can click the Copy to Clipboard button and then paste the generated password into an email to the user.
-
You can require a password change the first time the user logs in. Select the toggle to turn this setting on or off. By default, they are required to change their password when they log in for the first time.
To add a HawkSoft enables you to create a user profile as a Tracking-Only placeholder. Your agency might need placeholder user profiles for commission and/or sales tracking purposes only. For example, some agencies create a 'House' user to track clients that are assigned to the entire agency within commission and sales reports.
Users marked as Tracking Only can be assigned to policies as Agents and assigned to clients as Producers/CSRs. These users can appear in reports, but cannot log into HawkSoft.
When the Tracking Only button is clicked, the Account tab changes to include only the Initials and First/Last Name fields, and the Permission tab is removed.
User information
The user information on this tab can be filled in by the administrator or the user can complete their own information from the My Account tab.
The Email Address on this screen will be used on any correspondence generated by this user through HawkSoft.
Information in the Email, Phone, Address, and Notes fields will be available for the user to insert into forms and correspondence.
All of the fields on this tab are optional. If you want to skip User Info, click Continue to move onto the next tab.
Offices (Multi-office agencies)
The offices tab includes a list of each of your agency offices. You can determine which offices users log into by default. You can select a default office for each user, or make them a roaming user.
Default Office - The primary office for the user. When they log in, they will log into the default office. They can change the default office in My Account settings. Each of their assigned offices are available from the Default Office drop-down.
Roaming User - Enables the user to select one of their assigned offices upon logging in.
Users can change this setting in My Account settings.
If your agency has a large number of offices, you can use the Filter Search Offices field to filter offices by ID or name.
Also, if the user should have the option to log into all offices, you can quickly select the checkbox at the top.
You can click the checkbox in the header of the table to quickly check all offices.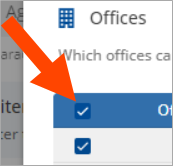 Permissions
From this tab, you can open the Permissions Editor to modify the permissions assigned to this user. See User Permissions for a description of what each permission enables the user to do.
If you selected a User Template when creating this profile, permissions are already set based on the profile type. Review the permissions and modify as needed.
-
Under the Select Permission Groups column, check the different groups of permissions that apply to this user.
-
If needed, you can click Show All to see all Permission Groups, or Hide All to hide all groups.
This does not enable or disable any permissions for this user; Permission Groups only determine which permissions can be seen in the table of permissions.
-
In the Permissions table, check
 each permission that this user will need for their agency role(s) and responsibilities.
 The Description next to a permission explains what this user will have access to if that permission is enabled.
If your agency sets User Permissions by Office (UPBO), then the Permissions Editor may appear differently. See User Permissions by Office for more information.
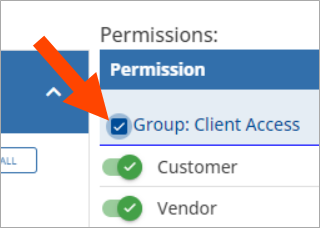
To quickly enable all permissions in a group, check the box next to a Permission Group.
-
Once you have finished with this user's permissions, click Close.
See User Permissions by Office to learn how to set different permissions depending on the office the user is logged into.
-
-
Once you have completed each of the User tabs, select the Summary tab to review the information before saving the profile.
-
Click Create User to add this user to your HawkSoft database once you have confirmed the information shown on the Summary tab is correct.
A dialog opens stating that the user was successfully created and instructs you to provide the new user with their agency ID, user initials, and password.
-
Optional: Click Copy to copy the user's Agency ID, user initials, and password to your clipboard. You can then paste this information into other applications to send to the user.
Because the credentials, including password, are copied in plain text and are not encrypted, HawkSoft recommends using a secure messaging system to provide these credentials to the user. For extra security, you can also require the user to reset their password on their first login.
When the user logs in for the first time, they will receive an email verification code to finish logging in.
-
Click OK to close the dialog.
Complete user setup through User Preferences
Once you have added the user to HawkSoft, the user will need to complete their setup through User Preferences. Setup for integrations such as email, batch email, calendar, text messaging, and e-signature are completed through User Preferences.
At this time, HawkSoft administrators cannot directly access another user's Preferences. Each user will need to log into HawkSoft and complete their own User Preferences. Agency technicians and administrators may assist a user in setting up their own User Preferences and integration settings.
For information and steps on completing User Preferences and configuring integrations such as email, text messaging, and e-signature, see User Preferences.
If your agency has enabled the IP Access Management feature, you will need to ensure an IP address rule allows this user access.