Drag and Drop Documents
HawkSoft makes it easy to upload files such as documents, images, and emails into a client or policy. You can simply drag files from your computer to a log note or anywhere on a client or policy.
You can also drag and drop client and policy attachments out of HawkSoft to destinations such as your desktop or other folders on your local PC, or into an email you're composing.
To learn about other ways to download attachments from a client or policy in HawkSoft to your local computer, see Save Attachments to Your Computer.
You can assign an attachment to be reviewed by another user. Simply create and assign a task as you attach the file.
 Required Permissions
In order to complete this task, user permissions must be set to include:
Client Access: You must have permission to the Client type and/or Customer type you want to access (i.e. Customer, Vendor, Carrier, etc.)
See User Permissions for more information.
To drag and drop documents into HawkSoft
HawkSoft supports attaching of documents with file sizes up to 100 MB. Files approaching this size limit may be slower to attach or to view later.
To drag and drop documents to a client in HawkSoft, retrieve the client, and then choose whether you want to include a log note with the document(s), or attach just the document(s):
During the process of creating a log note for the action being performed, HawkSoft enables you to drag and drop files anywhere on the Create Log dialog.
Dragging and dropping a document, image, or other file onto the Create Log dialog attaches the item(s) to both the log note, and to the Attachments List of the selected client or policy. Log notes with attachments are denoted with a paperclip icon
and contain a link to an associated document.
- Select the policy you want to attach the file(s) and log to, or select the Client tab to attach the file(s) and log directly on the client.
Click the Quick Log button at the right of the Client/Policy Bar, and select what prompted this log note from the "What started this?" menu.
OR
If you have any additional actions to perform related to the log note/document(s):
Click Action, and then select one item in each of the first three lists to describe what prompted this transaction.
Make your fourth selection to perform your desired action.
Once your action is complete, click Finish on the Action Menu.
The Create Log dialog opens.
- Navigate to the file(s) to be attached in your computer's local files, or on your desktop.
Select the document(s) or image file(s) to attach.
You can drag and drop multiple files into HawkSoft at once, using one of the following methods to select multiple files in Windows:
Click and drag your mouse over a group of files
Select the first file, and then press the Shift key to select the last file to be included.
Hold Ctrl on your keyboard, and individually click each file you want to attach
Click and hold your mouse to drag the item(s).
Release your mouse anywhere on the log note.
The Attachment Properties dialog opens, with a row for each file to be attached.
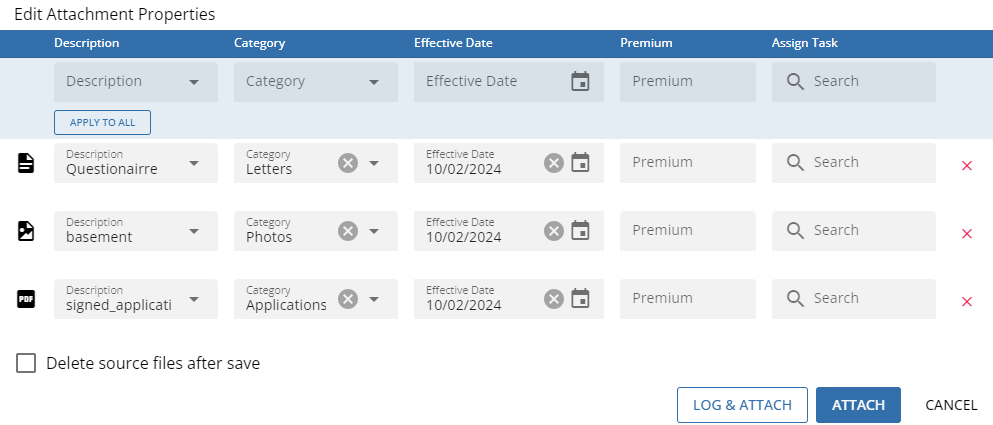
The Description defaults to the file name of the attachment.
The icon to the left of the attachment(s) signifies the attachment's file type, such as text document, image, or PDF. Hover over the icon to see the original name and file type of the attachment.
When adding multiple attachments, the top row allows you to update all of the new attachments at the same time. To make changes to all attachments at once, make your desired changes in the top row, and then click Apply To All.
The Description field will use numbers to distinguish between each attachment.Optional: Enter a new description for the file(s), or select one from the Description drop-down list.
Optional: Select a Category for the document(s) being attached from the drop-down list.
See for instructions and permissions required to modify Description and Category drop-down lists.
Modify the Effective Date of the document(s), as needed.
The effective date defaults to the current date, and is typically the effective date of the transaction the document is relevant to.
Optional:Record the Premium associated with the document(s) being attached.
The entered amount will display in the Premium column on the Attachments list on the client/policy.
Optional:In the Assign Task field, enter a user's name to create a new Task related to this document.
Once the attachment is saved, a Task with the same name as the attachment will appear in the assigned user's Task Center.
This is a "quick task" and will not include the same level of detail as other tasks. For example, this task will not have a due date. SeeTasks Overview to learn how to modify tasks and create tasks after the document is attached.
Optional: Check the Delete source file(s) after save checkbox to delete the attachment source file(s) from your local computer/storage after the attachment has been successfully uploaded into HawkSoft.
A notification will appear in HawkSoft if the source file(s) fail to delete from your local computer/storage.
To avoid deleting source files your agency needs to keep, HawkSoft recommends that you only check the Delete source file(s) after save box when you want to delete the source file(s) of all of the attachments you are currently uploading from your local computer/storage.
Deleting source files can help your agency minimize file clutter on your local computer/storage.
Click Attach to save and close the Attachment Properties dialog.
The attached document or image is now listed in the References section of the Create Log dialog.
You can click the attachment link to open and view the attachment, or click
More Optionsin the upper-right corner of the attachment to edit the attachment properties or remove the attachment.
Complete the rest of the log note, and add any task(s) as desired.
See Creating a Log Note for more information, and seeCreating a Task for steps on creating tasks.
- Click Save Log.
The attachment(s) can be viewed and opened from the log note, or from the Attachments tab.
You can drag and drop documents or images anywhere on the client to attach it to the client, or to a specific policy on the client. The document(s) will be included in the Attachments List.
- Select the specific policy you want to attach the document or image to, or select the Client tab to attach the file directly on the client.
- Navigate to the file(s) to be attached in your computer's local files, or on your desktop.
Select the document(s) or image file(s) to attach.
You can drag and drop multiple files into HawkSoft at once, using one of the following methods to select multiple files in Windows:
Click and drag your mouse over a group of files
Select the first file, and then hold the Shift key and select the last file to be included. Those two files and all files in between will be selected.
Hold Ctrl on your keyboard, and individually click each file you want to attach
Click and hold your mouse to drag the item(s).
Release your mouse anywhere on the client.
The Attachment Properties dialog opens.
The Description defaults to the file name of the attachment.
The icon to the left of the attachment(s) signifies the attachment's file type, such as text document, image, or PDF. Hover over the icon to see the original name and file type of the attachment.
Category: Enter a new description for the file(s), or select one from the Description drop-down list.
Optional: Select a Category for the document(s) being attached from the drop-down list.
See for instructions and permissions required to modify Description and Category drop-down lists.
Modify the Effective Date of the document(s), as needed.
The effective date defaults to the current date, and is typically the effective date of the transaction this document is relevant to.
Optional: Record the Premium associated with the document(s) being attached.
The entered amount will display in the Premium column on the Attachments list on the client/policy.
Optional: In the Assign Task field, enter a user's name to create a new Task related to this document.
Once the attachment is saved, a Task with the same name as the attachment will appear in the assigned user's Task Center.
This is a "quick task" and will not include the same level of detail as other tasks. For example, this task will not have a due date. SeeTasks Overview to learn how to modify tasks and create tasks after the document is attached.
Optional: Check the Delete source file(s) after save checkbox to delete the attachment source file(s) from your local computer/storage after the attachment has been successfully uploaded into HawkSoft.
A notification will appear in HawkSoft if the source file(s) fail to delete from your local computer/storage.
To avoid deleting source files your agency needs to keep, HawkSoft recommends that you only check the Delete source file(s) after save box when you want to delete the source file(s) of all of the attachments you are currently uploading from your local computer/storage.
Deleting source files can help your agency minimize file clutter on your local computer/storage.
Save your changes:
Click Log & Attach to attach the file to a log note as well as the Attachments list (recommended).
If you select Log & Attach, you can click the attachment link in the References section of the log note to open and view the attachment. You can also click
OR
Click Attach to attach the file directly to the Attachments list, with no associated log note.
You can also press CTRL + Enter on your keyboard to easily attach the file to the Attachments List, with no associated log note.
The attachment can be viewed and opened from the Attachments tab of the selected client or policy tab. If you chose Log & Attach, the attachment can also be viewed from the log note in question under the Logs tab.
Dragging and dropping emails from Outlook
If your email account is a Microsoft Office 365 account, you can drag and drop emails into HawkSoft from Outlook 365 on the web or from the New Outlook app.
Due to differences in the way Outlook retrieves emails from other email providers, dragging and dropping emails from non-Office 365 email accounts is not supported, even when these accounts have been added to the New Outlook app. For these accounts, you will need to first download the email as a file, then drag and drop that email file into HawkSoft.
If you are still using the classic Outlook app instead of "New Outlook", you may be able to drag and drop emails from any account in Outlook. Check with your IT to confirm which Outlook app you may have installed, or look for a "New Outlook" toggle in the upper right of the Outlook app.
Retrieve the client or log note you want to attach email to.
Select the email(s) to attach from your email list in Outlook.
You can drag and drop multiple emails into HawkSoft at once, using one of the following methods to select multiple emails in Outlook:
Select the first email, and then press the Shift key to select the last email to be included. This will select the first email, the last email, and all emails in between the first/last.
Hold Ctrl on your keyboard, and individually click each email you want to attach.
Use the checkboxes that appear in New Outlook after selecting at least two emails with one of the above methods
Click and hold your mouse to drag the email(s).
Release your mouse anywhere on the client or log note.
Edit the attachment properties as needed and finish attaching the email(s).
See all steps after step 5 in To attach documents or images to a log note if you are attaching emails to a log note.
Otherwise, see all steps after step 5 in To attach documents or images directly to the client/policy.
To drag and drop attachments out of HawkSoft
When using the HawkSoft 6 desktop application, you can also drag and drop documents out of HawkSoft. For example, you can drag an attachment from a client or policy's Attachment List to an email you are composing.
Click and drag the attachment from the Attachments list to the destination, wait for a few seconds, then release the mouse button. Depending on the file size, a Downloading progress bar may appear on screen while HawkSoft retrieves the file from the web server.
If the file is very large, the Downloading bar may remain on screen for several seconds. In these cases you can let go of the mouse button once you see the Downloading bar. Once the Downloading bar disappears, try the drag and drop again and the file should be transferred right away.
Related Topics