Creating a Task
Tasks are reminders to complete or follow-up on an action for a client and policy, or can also serve as non-client related reminders. Creating tasks enables you to set reminders, prioritize your upcoming client-related and non client-related actions, and helps you easily manage all of your tasks from the Task Center.
Tasks are not a form of permanent documentation and do not create E&O. All client, policy, and historical information must always be saved in a log note.
This article teaches you how to create a task directly from:
-
The Tasks tab on a client/policy
-
Log notes on a client/policy
-
Attachments on a client/policy
-
The My Tasks tab in the Task Center
 Best practices for creating tasks
Avoid entering sensitive data in tasks
HawkSoft recommends avoiding entering any sensitive data into Tasks, such as personal information. While client access permissions do apply to client related tasks, these permissions don't apply to non-client tasks created in the Task Center. Any users with access to Agency Tasks, including other offices with your agency, can see the task details on non-client related tasks.
Create log notes with your tasks
Tasks are only temporary reminders for your upcoming actions, and do not provide permanent documentation for client and policy interactions. When creating client-related tasks, it is best practice to also create a log note to permanently document the client/policy interaction or sensitive data. To learn more about the differences between tasks and logs, see Tasks Overview.
Depending on your agency's General Settings, you may automatically be required to create a log note whenever you create a Task.
Create standardized tasks
HawkSoft recommends that you utilize task templates and categories when creating tasks:
-
For consistency and standardization
-
For better organization in the Task Center
-
Create tasks more quickly
If task categories and templates are not appearing in the Use Template or Category drop-downs when creating tasks, check with your agency administrator to ensure they have been set up for your agency.
To create a task in the flow of work
Follow the steps below to learn how to create a task from a client or policy, a log note, an attachment, or from the Task Center. Once a task is created, you can view the task from the Tasks tab on the client/policy and from the Task Center. To learn more about the Task Center, see Tracking My Daily Tasks.
Depending on your agency's General Settings, you may be required to create a log note whenever you create, update, or complete a Task.
From a client or policy
You can create a task directly from the Client or Policy tab to set a reminder to follow-up. All tasks related to the client/policy will appear in the Tasks tab for that client/policy and in the Task Center.
-
With the client open, select the Client tab or a Policy tab.
-
Select the Tasks tab.
All tasks related to the selected client are displayed on the Tasks tab from both the client and policy tabs. You can select the Open Tasks or Closed Tasks options to filter the list of Tasks for the client or policy.
When Closed Tasks is selected, HawkSoft displays tasks that have been closed within the past 90 days. You can change this filter to the last 180 or 365 days. -
Click New Task and enter the task details.
-
Save the task:
-
Save - confirm and save the task without a log note.
Depending on your agency’s settings, the Save option may be unavailable, and a log note may be required when creating, editing, or closing a client-related task. If not required, HawkSoft recommends using Save and Log to ensure all task details are recorded in a client log note.
See Tracking My Daily Tasks or General Settings for more information. -
Save & Action - confirm and save, then take further action on the client/policy.
-
Save and Log - confirm and save, then create a linked log note.
If you select Save & Log or Save & Action the task is not saved until the log note is saved.
-
Once created, you can view the task from the Tasks tab or the Task Center, and then click  Share to copy a link to the task to your clipboard, and then paste the link into emails and chats to other users in your agency to allow them to quickly open the linked task on the client. Only client-related tasks can be shared.
To learn how to update and manage your tasks from the Task Center, see Tracking My Daily Tasks.
From a log note
You can create a task directly from a new log note or existing log note to set a reminder to follow up on the client or policy. To learn more about Log Notes, see Log Notes Overview.
For E&O purposes, all permanent documentation for a client and/or policy needs to be added to a Log entry. This ensures that your documentation remains easily accessible even after the Task is closed.
The Task Instructions field should only be used for temporary notes describing what is needed for the task to be completed.
When a task is created directly from a log note on a client/policy, HawkSoft recommends logging changes, interactions, and updates to the task using Save and Log or Save & Append.
See General Settings or Tracking My Daily Tasks for more information.
-
Right-click on the Log in the Log List and click New Task, or with the Log dialog open click + Add Task.
Right-click a log to access additional task-related options:
-
New Task – Opens the log dialog and starts the new task workflow, just like selecting New Task from the log.
-
Edit Task – Opens the log dialog to edit an open (unclosed) task.
This option appears only if the log has open tasks. If multiple open tasks exist, a sub-menu displays them for selection.
-
Close Task – Opens the log dialog and marks the selected task as Done (or Successful, if tracking success).
This option appears only if the log has open tasks. If multiple open tasks exist, a sub-menu displays them for selection.
-
-
Enter the task details.
-
Click Save & exit or click Save & Newto create another task.
While in the log note dialog, you can click on the task from the References section to open the task and edit the task details again, as needed.
-
Click Save Log.
The task is saved to the Log Note.
Once created, you can view the task from the Tasks tab or the Task Center, and then click Share to copy a link to the task to your clipboard, and then paste the link into emails and chats to other users in your agency to allow them to quickly open the linked task on the client. Only client-related tasks can be shared.
To learn how to update and manage your tasks from the Task Center, see Tracking My Daily Tasks.
From an attachment
You can create/assign a task from a new or existing attachment on a client/policy. To learn more about attachments, see Attachments Overview.
To assign a task while attaching a file to a client/policy:
You can create and assign a task from the Edit Attachments Properties dialog so that a task is created when an attachment needs review.
-
With the client open, select the Client tab or a Policy tab.
-
Drag and drop the attachment onto the client/policy.
The Edit Attachment Properties dialog opens. The name of the attachment defaults as the Description for the attachment and the task Title.
-
Modify and add details for the attachment as needed, and select a user to assign the task to from the Assign User field to create the task.
The fields on the Edit Attachments Property dialog are primarily related to the actual attachment. You can assign a user as a reviewer, which creates a task, but you do not have the ability to enter the task details from this dialog.
To find the related task after you save the attachment, click the Tasks tab on the client/policy, select the task, and then click Edit to add the task details.
For more information on updating and managing tasks, see Tracking My Daily Tasks. -
Save the attachment and task:
-
Log & Attach - create a log note associated with the attachment, then confirm and save the attachment and task.
-
Attach - confirm and save the attachment and task.
-
-
Recommended: Open the task from the Tasks tab on the client/policy or from the Task Center to modify the task details, as needed.
To create a task on an existing attachment on a client/policy:
-
With the client open, select the Client tab or a Policy tab.
-
Right-click the attachment in the Attachments tab, and then click New Task.
-
Enter the task details.
-
Click Save & exit or click Save & New to create another task.
The task is now associated with the attachment.
Once created, you can view the task from the Tasks tab or the Task Center, and then click Share to copy a link to the task to your clipboard, and then paste the link into emails and chats to other users in your agency to allow them to quickly open the linked task on the client. Only client-related tasks can be shared.
To learn how to update and manage your tasks from the Task Center, see Tracking My Daily Tasks.
From the Task Center
You can create a task unrelated to a client directly from the Task Center.
Tasks created from the Task Center are not associated with a client or policy.
-
To access:
From the Desktop: Select My Tasks from the Quick Links Panel or select Activities > My Tasks from the main HawkSoft menu bar.
OR
From the From the HawkSoft Browser app: Click the Task Center icon
 in the left column of the HawkSoft web start page.
 -
Click New Task and then enter the task details.
-
Click Save.
The task is saved to the My Tasks tab in the Task Center. To learn how to update and manage your tasks from the Task Center, see Tracking My Daily Tasks.
To complete task details
When creating a task, HawkSoft recommends that you complete as many task fields as possible to provide detailed information about the task for you, your agency owner/manager, and any other users assigned to the task.
Task details, such as category, due date, and priority, enable you and your agency owner/manager to easily filter and group your tasks from the Task Center. See Tracking My Daily Tasks for more information.
Task Settings
Customize the default behavior of the New Task dialog, as needed. These settings only affect you and will be remembered the next time you create a task. Click the
Settings menu to:
Filter task templates by Category
Remember the last used Task Category
Open the More Options section by default
Set Default Focus - Select a field from the drop-down to set your cursor to default to that field when creating a task.
Task Fields
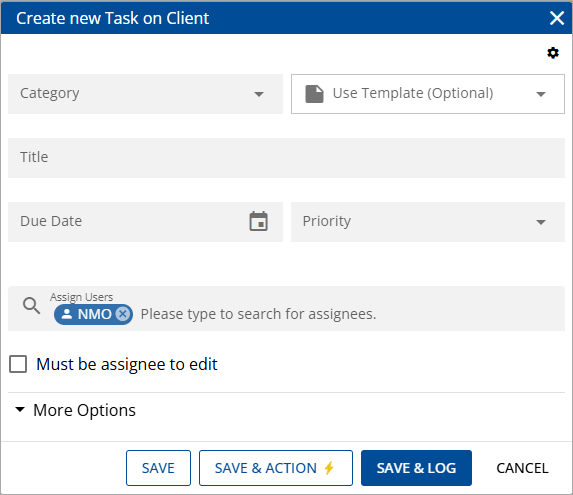
A Title or a Category must be entered when you create a task from a client/policy, an existing attachment, or the Task Center. All other task detail fields are optional.
Category: Select a category for the task.
Use Template: Templates are associated with a Category. Apply an existing template to quickly fill in pre-set details for the task. See Task Categories and Templates for more information about setting these up for the agency.
Title: Enter a brief description of the task.
Due Date: Set a date for when the task is due.
Priority: Assign a level of urgency to the task, such as High, Medium, or Low.
Assign Users: Your user initials appear in the Assign Users field by default. A maximum of 5 users can be assigned to the task, if needed.
Must be assignee to edit: Enable this setting to create a locked task and only allow assigned users or users with Task Management permissions to edit or close the task. All users can view the task on the client.
User permissions must be set to include "Must be assignee to edit" in order to lock a task. See User Permissions for more information.
Assign one task per assignee: This setting appears only when you select multiple users. Enable it to assign each user their own task; if you leave it unchecked, all users share one task.
More Options: Enter additional details for the task, as needed.
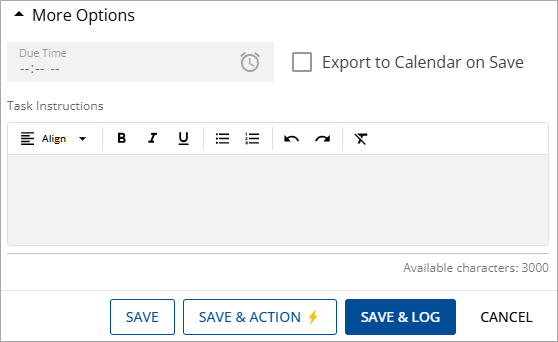
Due Time: Enter a time the task is due by on the due date.
Export to Calendar on Save: If you have set a Due Date for the task, you can check this box to automatically export the task to your preferred calendar on your device. See Tracking My Daily Tasks for more information.
Task Instructions: Enter the steps needed to complete the task.
To insert a hyperlink in the Task Instructions, you can highlight your desired text, click the
link icon or press CTRL + K, and then modify the Link text as needed. You can also copy and paste a hyperlink directly into the Task Instructions.
For E&O purposes, all permanent documentation for a client and/or policy needs to be added to a Log entry. This ensures that your documentation remains easily accessible even after the Task is closed.
The Task Instructions field should only be used for temporary notes describing what is needed for the task to be completed.
Required Permissions
To perform this task, your user permissions may need to include:
Client Access > You must have permission to the Client type and Customer type you want to access
See User Permissions for more information.
Related Topics