Using HawkLink
HawkLink enables you to quickly and easily move data from HawkSoft to webpages for quoting, policy inquiries, payment uploads, and more.
- Quickly fill in client, policy, and agency data from HawkSoft to any compatible website, including carrier websites
- Save mappings to automatically flood data from HawkSoft into websites on future visits
- Export and import saved mappings to share with other agents
- Use crowd-sourced mappings to automatically flood data into commonly visited websites
- Take a screenshot of a carrier website and attach the image to a client or policy in HawkSoft
This article gives a full tutorial on how to use HawkLink to open a website (or multiple websites) and map client/policy data to a webpage. For instructions on setting up and installing HawkLink, see HawkLink Setup.
For instructions on using the Crowd-sourced Mappings or Import/Export Mapping features in HawkLink, see Sharing Mappings in HawkLink
 Required Permissions
No special permissions are required to use HawkLink and view carrier websites or other Internet sites.
Other tasks associated with HawkLink may require additional permissions, as noted below.
See User Permissions for more information.
Before you begin
The HawkLink tool can save time and effort entering information that you already have in HawkSoft to carrier websites (or other websites), but it does require a small amount of setup before you can start using it.
First you'll need to make sure your User Preferences are configured to launch sites from HawkSoft in HawkLink.
After that, you'll need to install the HawkLink extension to your chosen browser. HawkSoft will guide you through the installation the first time you launch a website with HawkLink selected in your user preferences.
For step-by-step instructions on getting HawkLink configured for your PC, see HawkLink Setup.
Quoting with HawkLink (Opening carrier websites)
To open a single carrier website for inquiry
- Launch a client, then select the desired policy tab on that client.
-
Click the
 button on the main HawkSoft toolbar.
This launches HawkLink and opens the carrier website listed on the Website tab for the selected policy's carrier.
-
Click the
 HawkLink button on the right of the screen to expand HawkLink if it is collapsed.
 -
Use the Mapping Tool to map the fields on the website. See Mapping below.
To get quotes from multiple carrier websites
- Launch a client, then select the desired policy tab on that client.
- Click Action, and then select one item in each of the first three lists to describe what prompted this transaction.
-
Click Quote/Export.
The Bridge To... dialog opens.
-
Select each carrier to request a quote.
-
Click OK.
HawkLink launches and displays each selected carrier website on a separate tab.
If you don't see the full HawkLink panel on the right side of each browser tab that HawkSoft opened, click the
button to expand the HawkLink panel. - Use the Mapping Tool to map the fields on each website. See Mapping below.
Opening any non-carrier website with HawkLink
Create shortcuts in HawkSoft for your favorite websites.
To access your favorite websites from the HawkSoft toolbar, set up an External Tool. The website will open with HawkLink once it is set up.
In addition to carrier websites, HawkLink also enables you to quickly flood information from a client/policy in HawkSoft to any other type of website, as needed.
The method used for opening HawkLink determines which fields are available for mapping in HawkLink. Depending on the fields you intend to map, you will want to use one of the following methods to launch HawkLink:
If Launch Action Menu when launching Website is selected in General Settings, the Action menu opens and a log note will be created to record any action taken on the policy.
-
To map agency information only:
-
From the Start Page, click
on the main HawkSoft toolbar.This will launch HawkLink with your default home page, and only your agency information is available for mapping.
-
-
To map client and/or agency information only:
-
From a client tab, with a client open, click
on the main HawkSoft toolbar.Your HawkLink default home page launches and your agency information, as well as the selected client's information, are available for mapping.
-
-
To map policy, client, and/or agency information:
-
From a policy tab, with a client open, click
on the main HawkSoft toolbar.Your HawkLink launches with the carrier website for the selected policy's carrier. You can now navigate to a different website, and your agency information, client information, and policy information are available for mapping.
-
Once the HawkLink tab loads in your browser, you can visit another website while still using HawkLink by entering a different URL or search text in the URL field. You can also click on a Bookmark to select a saved website.
Mapping HawkSoft data to fields on a web page
You can easily map HawkSoft data from a selected client/policy to the fields on a web page, such as a carrier website.
After you select a client/policy in HawkSoft and then open HawkLink, you can begin mapping fields. See above for instructions for quoting on a carrier's website using HawkLink, as well as launching HawkLink for a non-carrier website.
-
Click in the first website field you want to map.
-
Double-click the corresponding field in the Mapping Tool on the right.
You can search for a field by entering a search term in the Search Fields box, at the top of HawkLink.
Example: If the first field on the website is labeled First Name, click inside the input field on the website, expand the Name field within the Mapping Tool (inside the Named Insured 1 section), and then double-click First.
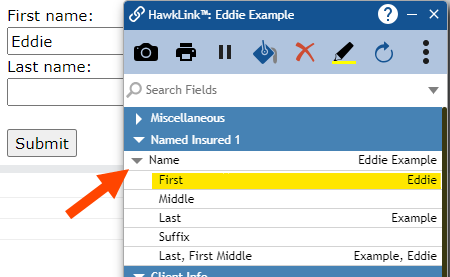
HawkLink populates the web page field with the corresponding information from HawkSoft, and then automatically moves your cursor to the next field in the web page's tab order.
-
Continue this process until mapping is complete.
You can click
 and then select Highlight Mapped Fields to verify that all relevant fields are mapped.
Select the field to un-map on the website.
Inside of the Mapping Tool, click the
button.
The selected field is unmapped, and can be mapped to a different value from HawkLink, if desired.
When a policy includes vehicles, the Vehicle section of the Mapping Tool displays an option to select the vehicle you want to map.
Scroll to the Vehicle section of the HawkLink Mapping Tool.
Select the vehicle you want to map from the Select Vehicle drop-down.
The vehicle data appears in the Vehicle section.
- Map the fields as described above.
- Optional: Choose a new vehicle from the Select Vehicle drop-down to map data from an additional vehicle to the open website.
When a policy includes drivers, the Driver section of the Mapping Tool prompts you to select the driver you want to map.
Scroll to the Driver section of HawkLink.
Select the driver you want to map from the Select Driver drop-down.
The driver's data appears in the Driver section.
- Map the fields as described above.
- Optional: Choose a new vehicle from the Select Driver drop-down to map data from an additional driver to the open website.
If there are unique fields on a website that do not correspond to data stored in HawkSoft, or if there is specific data that you always want pre-filled, use this option so that a field is populated with the same value each time.
- Click in the web page field you want to map.
Double-click the Fixed Value field in the miscellaneous section of HawkLink.
The Fixed Value dialog opens.
- Enter the data for this field.
Click OK.
Next time the web page is opened, the selected field will display this information.
HawkLink enables you to set a prompt for website fields that require manual input.
- Click in the field you want to set as a manual input field.
Double-click User Input in the Miscellaneous section of HawkLink.
The 'Enter desired prompt for this field' dialog opens.
Enter the prompt you want HawkLink to display for this field, and then click OK.
The dialog refreshes to display the prompt.
Optional: Enter the data for this field for this web page, and then click OK.
Next time the web page is opened, the user will be prompted to manually enter data for the mapped field.
Quick Actions and Menu Options
When HawkLink launches, your browser opens and the HawkLink Mapping Tool appears. The Mapping Tool includes a toolbar, a menu with additional actions, a search bar, and displays mappable data.
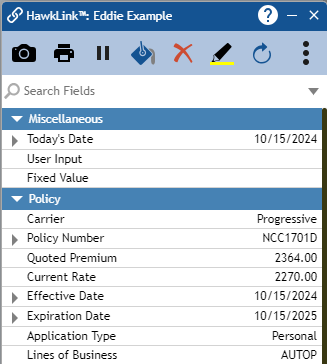
HawkLink Toolbar 
Click to capture the viewable portion of the webpage. The Virtual Printer opens, where the image can be attached to the client/policy. 
Click to print the entire webpage.
Print the document to the HawkSoft Virtual Printer to attach a copy of the entire webpage to a client/policy.

Pauses automatic flooding of mapped fields in the current browser tab and any tabs opened from it. 
Replaces the pause symbol above when flooding is paused. Resumes automatic flooding of mapped fields in this browser tab. 
Click to flood information to all currently mapped fields. This will work even if automatic flooding is paused.
Click to remove the mapping from the field currently selected on the webpage.

Click to highlight all mapped fields on the webpage. 
Click to check for a shared mapping file for the site you are currently on. If one is available, you will be prompted to Accept. 
Click to open the HawkLink Menu.
HawkLink Menu Submit Site Mappings Click to submit your currently mapped fields to HawkSoft. Revert to Prior Mapping Click to revert the current webpage's field mapping to the previous mapping. Import Site Mappings Click to import a mapping into HawkLink as a .hlsitemap file. Export Site Mappings Click to export the field mapping for the currently open website to your local Downloads folder as a .hlsitemap file.
Ignore input IDs on this site Click to tell HawkLink to use field names instead of field IDs when mapping on this site. Toggling this feature may improve site mapping reliability for some carrier sites.
Remove All Site Mappings Click to remove all mappings from the webpage.
Click the  icon to open the full HawkLink Mapping Tool when minimized, or mouse over the icon to see quick actions.
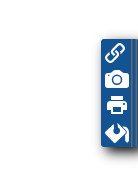
Quick Actions Click to open the HawkLink Mapping Tool. 
Click to print the entire webpage.
Print the document to the HawkSoft Virtual Printer to attach a copy of the entire webpage to a client/policy.

Click to capture the viewable portion of the webpage. The Virtual Printer opens, where the image can be attached to the client/policy.

Click to flood information to all currently mapped fields.
To attach a screenshot as a PDF
The HawkLink Capture  tool enables you to save a screen shot of the visible portion of the web page and attach it to the client/policy as a PDF file. The Print
  tool enables you to print the entire webpage, and you can use the HawkSoft Virtual Printer to attach the webpage to a client/policy.
-
Click the Capture icon
, or the Print icon, from the HawkLink toolbar.- If you clicked the Print button, select HawkSoft Virtual Printer, and then click Print.
The HawkSoft Virtual Printer opens.
- Select whether to attach the PDF to a specific policy on the client, or to the Client tab.
- Click Next.
- Enter attachment properties for this PDF, such as a Description and Effective Date.
-
Optional: Select a Category from the drop-down list.
Attachments can be grouped by category on the Importing and Attaching Documents to Clients and Policies screen in the client/policy.
-
Optional: Select an Assigned Userfrom the drop-down list to assign the user a basic task linked to this document.
-
Optional: Check the Open Client on Attach checkbox to open the client once the attachment has been added to the client/policy.
-
Click Attach to save the screen shot to the client/policy.
A confirmation message appears informing you that the PDF has been attached to the policy.
- Click OK to continue.
To link the HawkLink Mapping Tool to a different client
You can link the HawkLink Mapping Tool to a different client on a separate tab or window of HawkSoft. This enables you to change which client to map data from without needing to re-launch HawkLink.
-
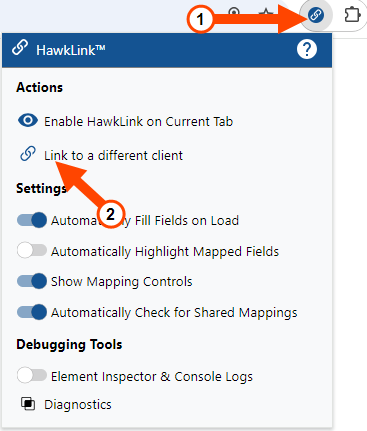
Click the
 HawkLink button in the top-right corner of your browser.If you do not see the button:
-
Click
 to access Extensions.
 -
Click HawkLink.
-
-
Select Link to a different client.
-
Select the client you wish to link to.
If you do not see the desired client, make sure the client is open in HawkSoft and that the client isn't archived.
The webpage refreshes, and the HawkLink Mapping Tool is loaded with the selected client.
Related Topics