State Specific ID Cards
HawkSoft enables you to generate Auto ID Cards for your clients to serve as proof of auto liability insurance. Some states may require Auto ID Cards to be printed in a state-specific form, with some states further requiring state-specific information to appear on the Auto ID Card, such as a unique "Company Number" issued to the carrier by the state.
This article includes steps for printing state-specific ID cards (including how to use the New York ID Card Generator for policies located in the state of New York), as well as steps for configuring state-specific company numbers/codes in HawkSoft Carrier Setup.
By default, ID cards are generated for a 30 day time frame and are meant to serve as a temporary card until a replacement card is issued by the insuring carrier. Dates can be adjusted manually at the time the card is being issued, or by changing the default ID Card Days in General Settings.
 New York - Generating a NY ID Card
For agencies with policies located in the State of New York, HawkSoft enables you to generate Auto ID Cards that meet the requirements of New York DMV.
This section provides instructions for generating a New York ID card using the Action menu.
To generate New York ID Cards in HawkSoft, you must configure your agency to use state specific ID cards by default, and install the NY ID Card DMV Software (IIES) and integrate the software with HawkSoft. See New York ID Card Generator Setup for more information.
- Retrieve the client, and then select the policy within that client.
- Click Action, and then select one item in each of the first three lists to describe what prompted this transaction.
-
Click Print/Create > ID Card.
The NY Auto ID-Card dialog opens.
-
Complete the information on the available side-tabs.
- Verify that the Effective and Expiration dates are correct.
- Effective Date – Defaults to the current date.
Expiration Date – Defaults to the number of days set in the ID Card Days field in General Configuration.
If the ID Card Days field in General Settings is set to zero, the Effective Date and Expiration Date default to the effective and expiration dates entered on the policy.
-
Select the Company. The company name and number are available based on the information entered for the writing carrier in HawkSoft Carrier Setup:
-
If you've added the writing carrier's New York ICC code in HawkSoft Carrier Setup as the Company Number for New York, the company name and number auto-fill from the Company list.
-
If the ICC Code was not saved to this writing carrier's Company Number in HawkSoft Carrier Setup, you can use the Company drop-down to select the appropriate writing carrier.
See New York ID Card Generator Setup to learn how to add, edit , or import ICC codes to the New York ICC list, and see the Company Number Setup section below to learn how to add a writing carrier's ICC code as a Company Number in HawkSoft Carrier Setup.
-
-
Document Type – Select a NY ID Card document type.
The FS-20 document is selected by default.
Document Type Description FS-20 Basic New York State insurance ID card FS-21 Temporary New York State insurance ID card FS-21 (OXD) Temporary New York State insurance ID card (Expiration Date field is unlocked) FS-83 New York State insurance ID card (Bonded) FH-1 Insurance certificate (For Hire passenger vehicle) FH-1B Corporate Surety Bond (For Hire passenger vehicle) See New York ID Card Generator Setup for more information.
-
Use Client Mailing Address - The address entered on the Name and Address Informationscreen will print on the ID card. You can change the address if needed. If there are multiple drivers and/or vehicles, all ID cards will print with the client mailing address.
If you modify the Client Mailing Address from the NY ID Card Address dialog the client's mailing address on the Name and Address Information screen is not updated.
-
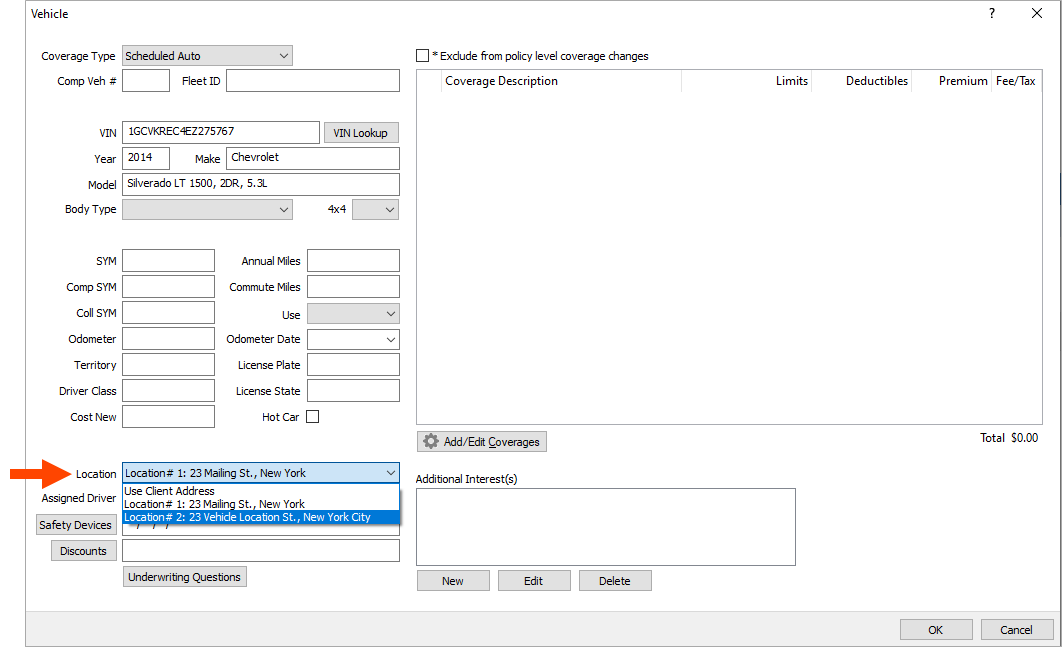
Use Vehicle Location - The address defaults from the Location drop-down on the Vehicle screen. If there are multiple drivers and/or vehicles, each ID card will print with each vehicle's specific Location address. If the Location drop-down doesn't have the location available, see Locations, Homes, and Buildings to learn how to add another location for the policy.
- Vehicle Code – The Vehicle Code is set to Scheduled Autos by default. The other options available on this drop-down list are from the NY DMV software and are not vehicle specific.
-
Find VIN – Enter a VIN and use the arrows to scroll through the Vehicle Identification Numbers listed for vehicles on the policy.
-
Verify the vehicle details (Year, Make, VIN, and Seats) are displayed for each vehicle on the policy.
The address printed on the NY ID Card defaults to the address that is selected in the Location drop-down menu when adding or editing a vehicle.
Seats are required only for Document Types FH-1 and FH-1B.
-
The box for each vehicle on the policy that you are printing the ID card for is checked by default. Uncheck the box for any vehicle that you do not want to include on the ID card, if needed.
-
Conditional:Check the following boxes for additional ID Card details, as needed:
- Replacement- Check this box to add an indicator on the ID Card that the vehicle is a replacement vehicle.
- Historical- Check this box to add an indicator on an ID Card that the vehicle is a historical vehicle.
- Tow Truck- Check this box to add an indicator on an ID Card that the vehicle is a tow truck.
-
Click Finish.
The Action to Perform dialog opens.
-
Select whether to Print, Email, Send as Text Message, and/or Save as Attachment.
The Send as Text Message feature requires HawkSoft Text Messaging. See HawkSoft Text Messaging Overview to learn more.
Print and Save as Attachment are selected by default. The Print, Email, and Send as Text Message options cause an additional dialog to open if selected.
- Click Finish.
-
The ID Card prints.
- Follow on-screen prompts to modify the print, text messaging, and/or email settings.
-
Click Finish in the Action menu.
The Finalize Log dialog opens.
- Add log comments and create a Task as needed, and then click Save Log.
General
Address
Select one of the following options to print on the auto ID card:
Vehicles
Registrant
For a Personal Lines Auto policy, the Registrant tab displays drivers listed on the policy.
For a Business policy, the Registrant tab displays the name of the Business with the option to use the Contacts (Named Insured(s)) on the policy for the printed ID card.
Check or uncheck up to two drivers to be listed as the Registrant on the ID card. The names can be modified to match the NY DMV registration.
Required Permissions
In order to complete this task, user permissions must be set to include:
Client Actions > Action Menu
See User Permissions for more information.
All states except NY - Generating a state-specific ID Card
This section provides steps for printing state-specific ID cards for all states other than New York, including states which require additional state-specific information such as New Jersey and Florida.
To follow these steps, your agency must be configured to use state-specific ID cards by default. Have an agency administrator follow the steps in "To configure HawkSoft to use state specific ID cards by default" to enable this setting.
- Retrieve the client, and then select the policy within that client.
- Click Action, and then select one item in each of the first three lists to describe what prompted this transaction.
-
Click Print/Create > ID Card.
The Auto ID-Card dialog opens.
If more than one vehicle is listed on the policy, you are prompted to select a vehicle.
-
Check or uncheck the vehicles to be included on the ID Cards, and then click OK.
If there is only one vehicle on the policy, and that vehicle has no VIN listed, a HawkSoft warning appears. Click Yes to continue printing the ID Card, or add a VIN to the vehicle. See Vehicles and Auto Coverages to learn how to add a VIN to a vehicle in HawkSoft.
Note that vehicles marked as "In Storage" cannot be added to an ID card.You can check multiple vehicles to print an ID card for each vehicle.
- Confirm or modify the Effective and Expiration dates, as needed.
- Effective Date – defaults to the current date.
Expiration Date – defaults to 30 days from the current date.
You can change the default Effective and Expiration dates to pull from the dates entered on the Policy Information screen, rather than a set number of days from today. To do this, set ID Card Days to 0 in General Configuration.
-
Optional: Check whether to include the DBA
Standard business abbreviation for Doing Business As. name for the insured. This option is only available for commercial policies that have a DBA entered on the Name and Address screen.
-
Enter or modify any state-specific fields, if needed.
State Specific fields
Depending on the policy state you are generating the ID card for, additional fields might appear on this dialog. For example:
-
Include names of additional drivers on ID-Cards – This option enables you to include additional drivers listed on the policy on the ID card. If unchecked, the main insured will be the only driver included on the ID card.
-
Liability Information – This option enables you to include liability information specific for the carrier.
-
NAIC Code – The Company Number on the ID Card is populated from the NAIC code on the Policy Information screen.
-
If the NAIC code on the Policy Information screen is left blank, but a state-specific Company Number has been entered for this writing carrier in Carrier Setup, this field floods with that Company Number instead.
-
-
Company Code – This field is required for New York, New Jersey, and Florida ID cards. This is a number specific to the writing carrier, issued to the carrier by the state. By default, this field floods with the Company Number set for this writing carrier in this policy's state, as set in Carrier Setup. If needed, you can enter a different Company Code.
-
To learn how to set up state-specific Company Numbers for your writing carriers, see Company Number Setup (New York, New Jersey, and Florida).
-
-
-
Select whether to Print, Email, Send as Text Message, and/or Attach the ID Card to the client.
The Send as Text Message feature requires HawkSoft Text Messaging. See HawkSoft Text Messaging Overview to learn more.
Follow the on-screen prompts to text the Auto ID Card to the client.Print and Attach are selected by default. The Print, Email, and Send as Text Message options cause an additional dialog to open if selected.
- Click OK to proceed.
- Follow on-screen prompts to print, text, and/or email the ID card.
-
Click Finish to close the Action menu.
The Finalize Log dialog opens.
- Add log comments and create a Task as needed, and then click Save Log.
If you selected Attach, then the Auto ID Card is saved to the Attachments tab on the policy.
Required Permissions
In order to complete this task, user permissions must be set to include:
Client Actions > Action Menu
See User Permissions for more information.
To configure HawkSoft to use state specific ID cards by default
To enable HawkSoft to automatically use state specific ID cards when generating auto ID cards for clients in New York, New Jersey, or Florida, set your General Settings to always use state specific ID cards, if available.
This task is typically performed by an Owner/Administrator or Manager.
-
Click the
 Setup menu and then select General Configuration.
The General Configuration dialog opens with the General Settings tab selected by default.
-
Check the Always use State Specific ID-Card if available box in the Print section.
Required Permissions
In order to complete this task, user permissions must be set to include:
Agency Setup > General Configuration
See User Permissions for more information.
Company Number Setup (New York, New Jersey, and Florida)
If your agency writes auto policies in states that require a state-specific Company Number (some states call this a "Company Code" or "ICC Code") on Auto ID cards, you can configure each writing carrier's Company Number in Carrier Setup. The following instructions will help you set up the Company Number information for each writing carrier in Carrier Setup.
When a parent company, general agency, or brokerage writes with multiple carriers, HawkSoft recommends entering the issuing carriers as writing carriers. The writing carrier name appears on printed materials, such as ID cards, Binders, and Certificates, etc.
Once the state-specific Company Number is entered for each writing carrier, HawkSoft will automatically print the Company Number on Auto ID cards generated for clients in New York, New Jersey, and Florida.
For carriers operating in New York state, the Company Number entered in HawkSoft should match the three-digit ICC Code entered for the writing carrier in New York ID Card Setup. For more informationsee New York ID Card Generator Setup.
For writing carriers that do business in multiple states, you can enter a different Company Number for each state. For steps on adding a writing carrier with a Company Number, see Writing Carriers and NAIC Codes
Follow the steps below to enter a Company Number associated with the writing carrier, to print on the ID card.
- Open the Setup menu, and then select Carrier/MGA Setup.
-
Select the Auto carrier you are adding a Company Number for.
The Editing Carrier dialog opens, with the Carrier/MGA Info tab selected by default.
-
Ensure all of the states this carrier does business in are checked in the Carrier/MGA States check-list.
-
Modify the Company Numbers on the Writing Carrier as needed.
To add, edit, or delete Company Numbers on an existing Writing Carrier
-
Click the
 Edit button to the right of the existing Writing Carrier you want to add/edit Company Numbers for.
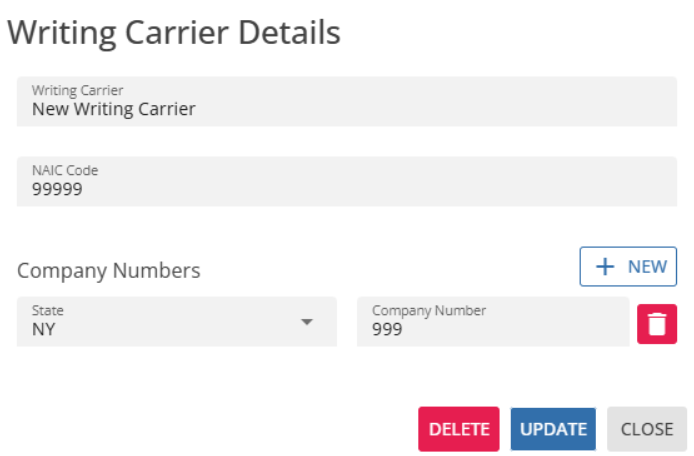
The Writing Carrier Details dialog opens.
 To edit or delete existing Company Number(s)
To modify a writing carrier's existing Company Number, simply re-type the new Company Number into the Company Number field, and/or change the state using the State drop-down, as needed.
Once the new number is updated, it will appear on the Auto ID Card as the Company Number.
For carriers operating in New York state, the Company Number entered in HawkSoft should match the three-digit ICC Code entered for the writing carrier in New York ID Card Setup. For more information about customizing the ICC List for New York ID Cards, see New York ID Card Generator Setup.
Only states that you have checked in the Carrier/MGA States checklist on the Carrier/MGA Info tab appear in the States drop-down menu.
You can also delete a Company Number by clicking the
 Delete icon next to a Company Number.To add new Company Number(s)
-
Click the +New button to enter a state's Company Number.
-
Select the appropriate state from the State drop-down menu.
Only states that you have checked in the Carrier/MGA States checklist on the Carrier/MGA Info tab appear in the States drop-down menu.
-
Enter the Company Number in the Company Number field.
This number will appear on the Auto ID Card as the Company Number.
For carriers operating in New York state, the Company Number entered in HawkSoft should match the three-digit ICC Code entered for the writing carrier in New York ID Card Setup. For more information about customizing the ICC List for New York ID Cards, see New York ID Card Generator Setup.
-
Optional: Repeat steps I-III to add additional Company Numbers.
-
-
Click Update to save changes to this writing carrier's Company Number(s).
To add Company Number(s) on a new Writing Carrier
-
Click Add Writing Carrier and NAIC Code.
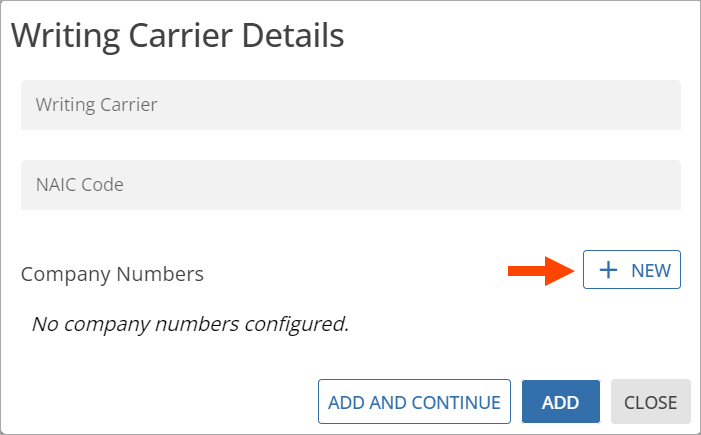
The Writing Carrier Details dialog opens.
-
Enter the name of the writing carrier in the Writing Carrier field.
-
Enter the NAIC Code.
-
Click the +New button to enter the Company Number.
-
Select the appropriate state from the State drop-down menu.
Only states that you have checked in the Carrier/MGA States checklist on the Carrier/MGA Info tab appear in the States drop-down menu.
-
Enter the Company Number in the Company Number field.
The Company Number will appear on the Auto ID Card as the Company Number.
For carriers operating in New York state, the Company Number entered in HawkSoft should match the three-digit ICC Code entered for the writing carrier in New York ID Card Setup. For more information about customizing the ICC List for New York ID Cards, see New York ID Card Generator Setup.
-
Optional: Click +New to add another state's Company Number to the current writing carrier.
-
Optional: Click Add and Continue to save this writing carrier and create another writing carrier.
-
Click Add to save this new Writing Carrier and its NAIC Code and Company Number(s).
-
-
Click Save at the bottom right of the Editing Carrier/MGA dialog.
The carrier is updated and saved.
-
Modify an additional carrier, or click Close to exit the Carrier Setup dialog.
See Editing Carrier/MGA Information for more general information and steps on modifying carrier details in HawkSoft, if needed.
Required Permissions
Required Permissions:
In order to complete this task, user permissions must be set to include:
Agency Setup > Carrier Setup
See User Permissions for more information.
Related Topics