Tips and Tricks
 Mass-select items using Shift + Click and Ctrl + Click
HawkSoft enables you to use the Windows keyboard shortcuts Shift + Click or Ctrl + Click to select multiple items from lists. You can use these keyboard shortcuts to quickly select a group of items from a list in many different places in HawkSoft, such as all reports, the Attachments list, the Correspondence Templates setup menu (for the purpose of exporting templates), when editing the Drivers or Vehicles lists on Auto policies, when editing a policy's Coverages, when editing a Certificate of Liability's Certificate Holders, and more.
The keyboard shortcuts generally function as follows:
-
To quickly select a group of consecutive items from a list, select the first item in the group, then hold Shift and click the last item in the group to select the first item, last item, and all items in between.
-
To individually select multiple items from a list, hold Ctrl and click on each item to add to your group selection. You can also Ctrl-click an already-selected item to remove it from your group selection; this is helpful if you need to select everything in a range except one or two items.
Finding your Ivans Y-Account and User ID
If your agency is already set up to receive downloads in HawkSoft, you can view your Ivans Y-account and ID from the Downloads Dashboard.
-
Click Activities on the main HawkSoft toolbar.
-
Select Downloads Dashboard.
-
Sign in using your username (formatted as [User initials]@[Agency ID], ex. ABC@12345) and HawkSoft password.
Your agency's ID appears on the HawkSoft Desktop App login window.
-
Click Configure in the top right corner.
-
Select the Download Accounts tab.
Your Ivans Y-Account and ID will be listed under the accounts.
Texting attachments to customers
You can text image and PDF attachments to customers using your personal cell phone. To do so, open the customer in Agent Portal , tap Attachments, and then click on the attachment. This will download the attachment to your phone, and then you can share the attachment via your cell phone's texting app. This will send the attachment using your personal cell number.
For more information about what you can do from your cell phone, see Agent Portal.
If you have access to your laptop or tablet, you can also access the HawkSoft Browser App while on the go.
Create Custom Policy Titles
By default, each policy tab on a client displays the Line of Business code of that policy. Package policies specifically use PPKGE for personal lines or CPKGE for commercial lines. You can configure custom policy titles for your agency to help users quickly distinguish between policy tabs on a client.
For example, if an insured has three separate Personal Auto policies—one for their vehicle, one for an ATV, and another for a trailer—custom policy titles can help you easily distinguish between them.
Before:

After:

Users with Carrier/MGA Setup permissions can create custom policy titles for each of your agency's carriers in Carrier Setup.
Once custom policy titles have been created for your agency, users can apply a Policy Title from the drop-down menu on the Policy Information screen of the desired policy.
For more information on creating custom Policy Titles, see Carrier Coverages and Lines of Business.
Print web pages directly into HawkSoft
When viewing carrier websites, you can print a copy of what you see on screen directly into HawkSoft. Open the client in HawkSoft, then print the web page normally from your browser (using Ctrl+P) and select the HawkSoft Virtual Printer from your list of available printers. The printed page is attached to the client.
This also works for other websites and documents - anything you can print works with Virtual Printer.
Additionally, you can combine multiple different pages or documents into a single document. To do so, leave the first document open in the HawkSoft Virtual Printer (don't match it to a client yet!), then print each subsequent page to the HawkSoft Virtual Printer. After printing each document, switch back to the Virtual Printer and confirm that you want to append the new document to your existing document. This can be helpful if the carrier documentation exists across multiple pages, such as having client info on one page, a policy overview on a second, and coverage details on a third.
For more information and detailed steps, see The HawkSoft Virtual Printer.
See customer data from your phone
You can use HawkSoft Agent Portal to view client and policy details from your mobile phone, using any web browser - no app required. The portal gives you quick, secure access while on the go. While you can’t edit client or policy data in Agent Portal, you can add log notes and attachments. For example, you can take pictures of a customer's vehicle or property while on the go and attach it directly to the policy to review when you return to the office.
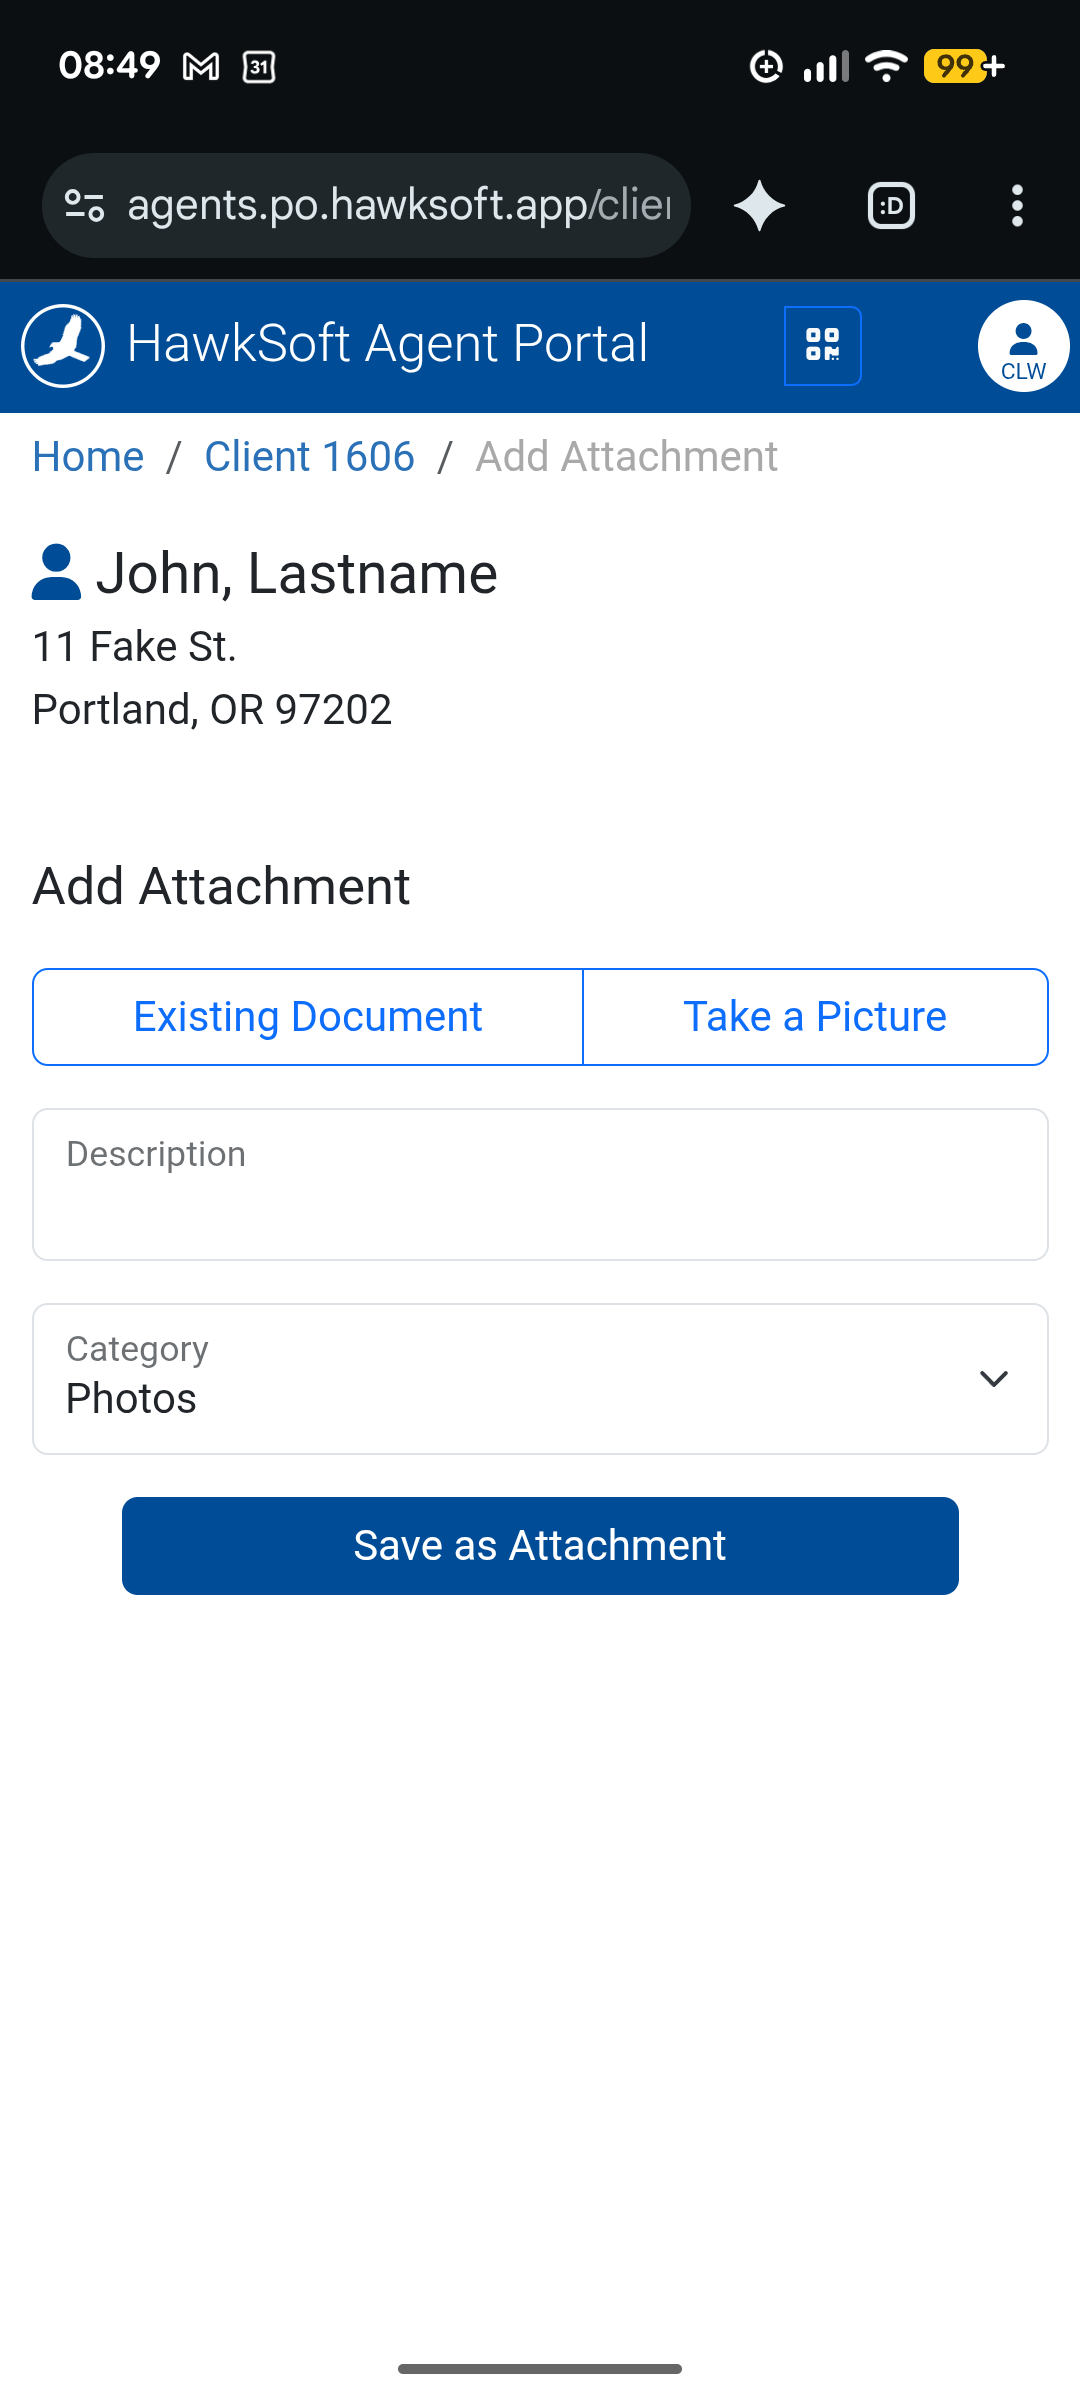
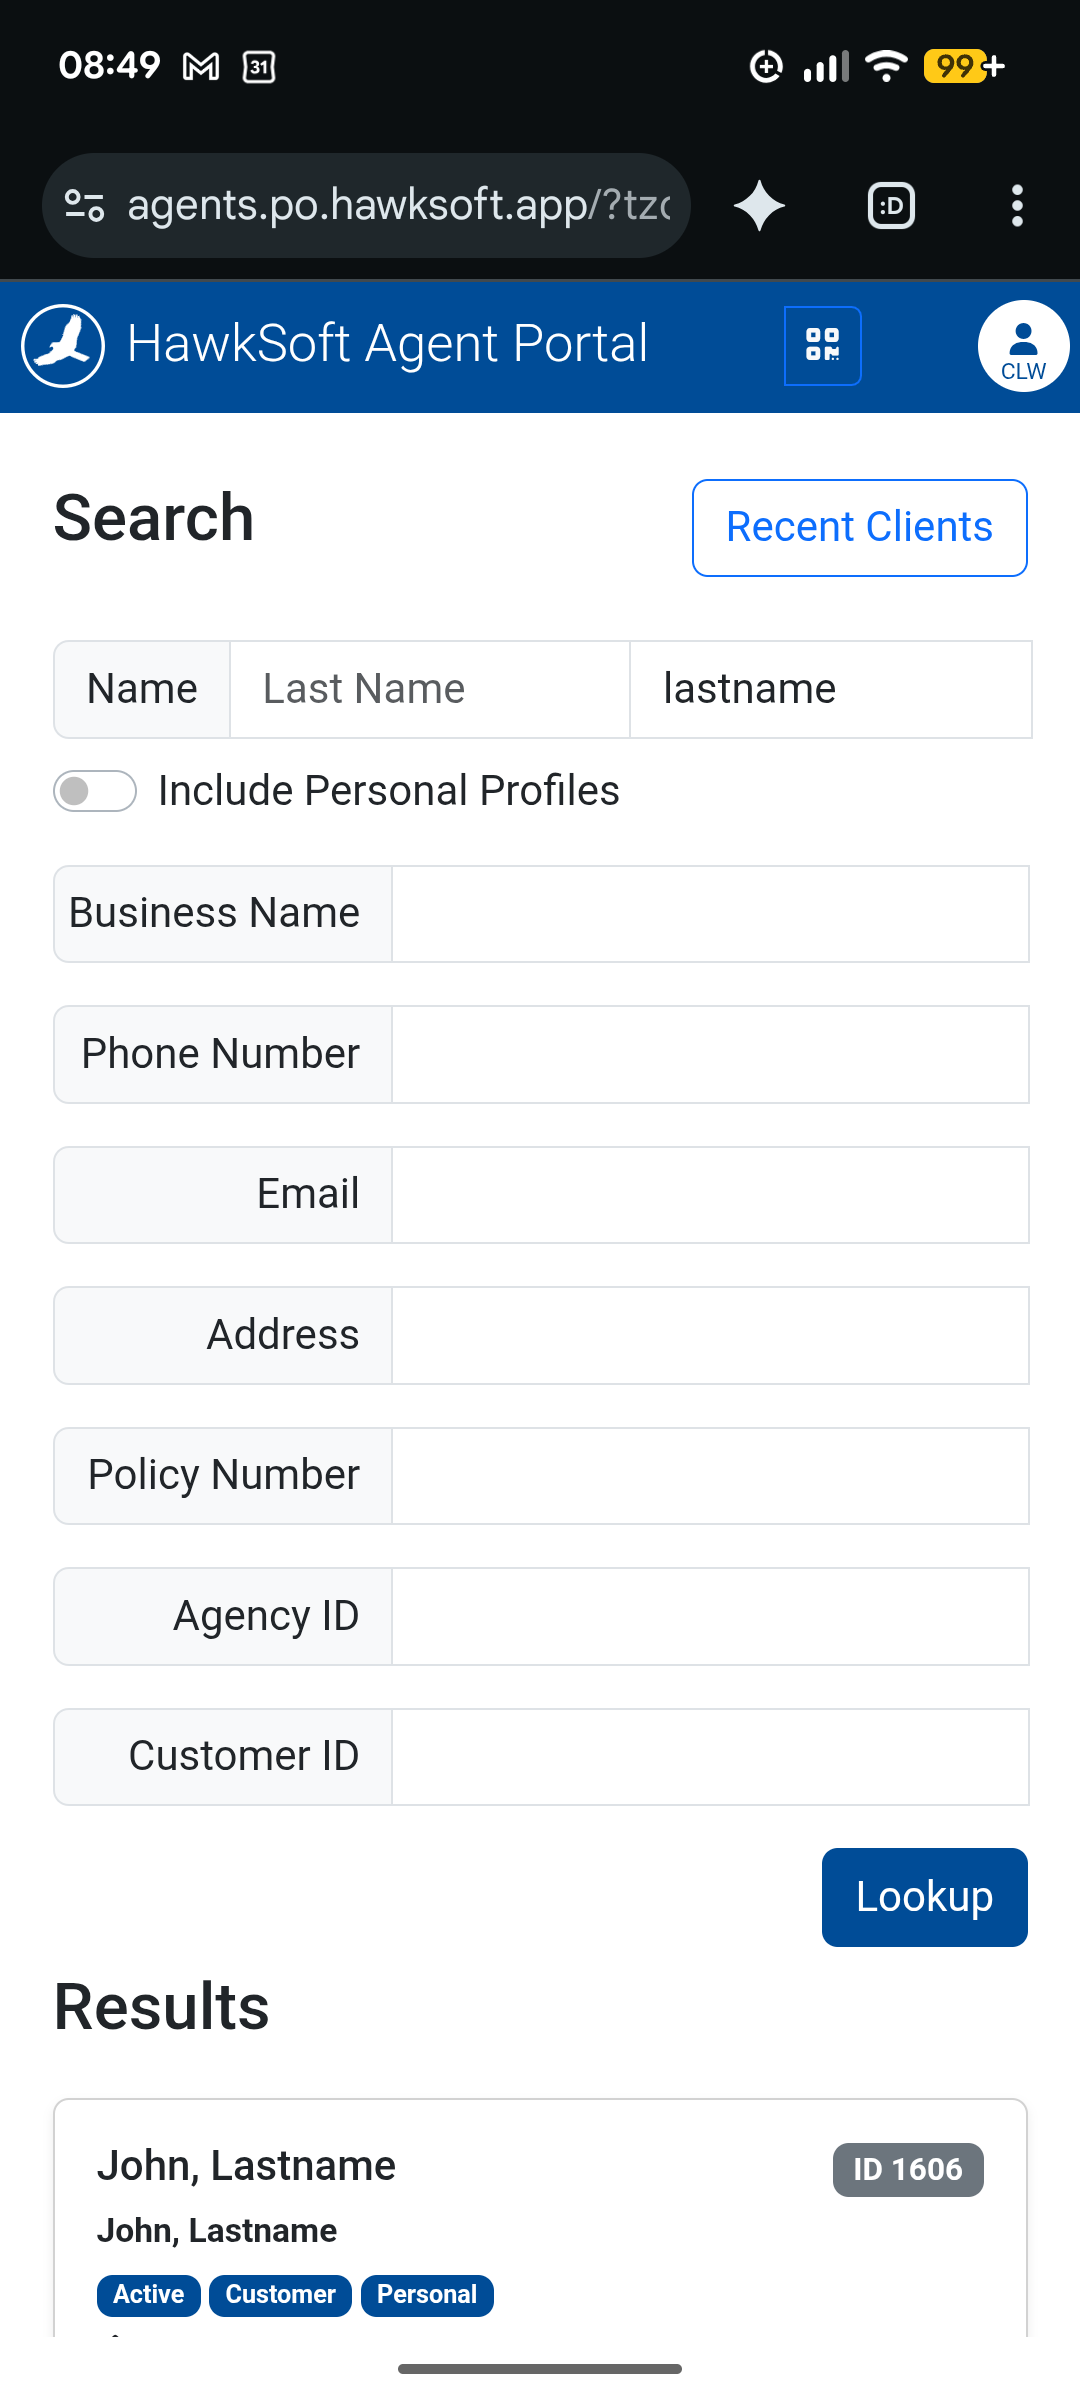
See Agent Portal for more information.
Add new client fields
You can configure additional client-level fields for your agency, including dates, numbers, phone numbers, or text. You can label and sort these custom fields, then view them on the client or run reports for clients with specific values.
For example, add a holiday-invite field to build your party list, an anniversary date field for personal lines clients, or a "Referred by" field to send thank-yous when clients refer friends.
Custom Fields have their own tab when viewing and editing a client. For more information about configuring these fields, see Client Custom Field SetupInsights
Pre-made Templates from the HawkSoft User Group
The HawkSoft User Group (HUG), a member-driven community of HawkSoft agencies, has created a list of templates to streamline your agency's workflows. This includes correspondence templates for Letters, Emails, E-Signature, Text Messages, and Proposals, all in one convenient location, available to everyone. They also have a list of suggested External Tools, Log Templates, and more.
For a list of available templates, see the HawkSoft User Group.
Save Time with the Insights Tab
The Insights tab provides an at-a-glance view of important client information, helping you quickly understand a client's current activity and status without navigating to multiple areas of HawkSoft. Insights can include details such as policy activity, claims, open tasks, recent client actions, and more.
The Insights tab is also fully customizable. You can choose which Insight widgets are displayed and arrange them in the order that best supports your workflow.
See Insights for more information.
Personalize Your Client & Policy Views
HawkSoft shows a lot of client and policy information at once, which can be more than you need for your specific role. You can control what's visible — including which policies show up, which sub-tab opens by default, and which sub-tabs appear at all — so you only see what's relevant to your job.
-
Set which policies are visible - You can control which policies are visible when you open a client based on the policy status. You can control if you see prospect, active, or cancelled/expired policies. In addition, you can control if you see archived policies.
If you don't want to see old policies, you can instead tell HawkSoft to only show policies that have lapsed within the past 30-days.
-
Set your default client sub-tab - You can control which client sub-tab opens when you open a new client.
If you want a quick overview of the client, try setting Insight as your default tab. If you are a bookkeeper try setting your default tab as Trust Accounting.
-
Customize visible sub-tabs - You can control how sub-tabs are shown and which tabs are visible. For example, you can hide the Trust Accounting tab if you do not handle invoices or payments.
Open any client file to access your view preferences, click on  View Settings at the top of the client/policy bar, and then select Preferences.
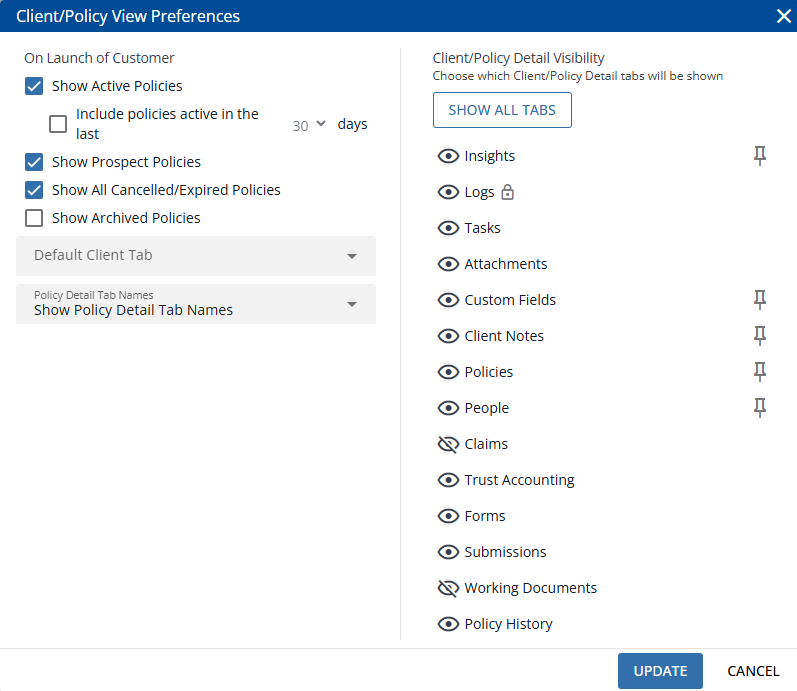
Most customization options can be overridden without changing your default settings. For example, if you occasionally need to look at expired policies, you don't need to change your default settings - your current client can display expired policies without forcing you to see expired policies on each new client you open.
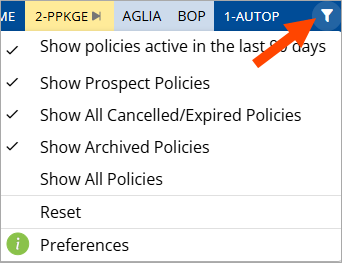
Customization options reduce clutter so you can focus on the information you need every day. See Personalizing your Client/Policy View for more information.
Abbreviate Policy Detail Tabs
Use the Policy Detail Tab drop-down menu to choose how policy detail tabs are displayed. Whether you prefer descriptive labels, a more compact view, or quick visual recognition, this setting helps you find policy information faster.
-
Icons and Labels – Displays tab names along with an icon. Short tab names are shown in full, while longer names are abbreviated (for example, Pol Info for Policy Information and Comms for Commissions).
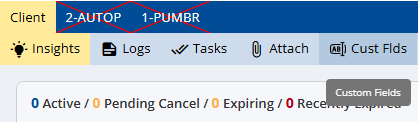
-
Icons Only – Displays only an icon for each policy detail tab, helping maximize screen space while still allowing quick tab identification.
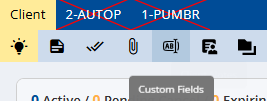
Hover over any tab to view its full name.
See Personalizing your Client/Policy View for more information.
Automate Follow-Up with Download Task Rules
Save time and ensure the right team members are notified by setting up Download Task Rules in HawkSoft. These rules automatically create and assign tasks when specific types of downloads are received, helping your agency stay organized and responsive.
When a download comes in, HawkSoft compares it against your configured Download Task Rules and automatically assigns follow-up tasks to the appropriate users—eliminating the need for manual monitoring.
Examples:
-
If one team member manages policy renewals, you can create a rule that automatically assigns renewal downloads to that user for review and follow-up.
-
If a group of users handle uprates for personal lines clients, you can set a rule to notify those users whenever a qualifying personal policy uprate is received.
See Download Task Rules for step-by-step instructions on configuring rules for your agency.
Simple Search
Try Simple search to streamline your client search experience:
-
Search by name, address, policy number, and more without needing to click into a different field each time.
-
Search in multiple client fields at the same time using Simple Search. For example, you can search for all clients whose first, last, or business name contain "Johnson".
-
When you search by name, HawkSoft will look for derivative names too. For example, searching for "Edward" will find "Ed" and "Eddy" too.
If you prefer the previous search experience, you can switch back at any time by selecting Back to Standard Search from the search window.
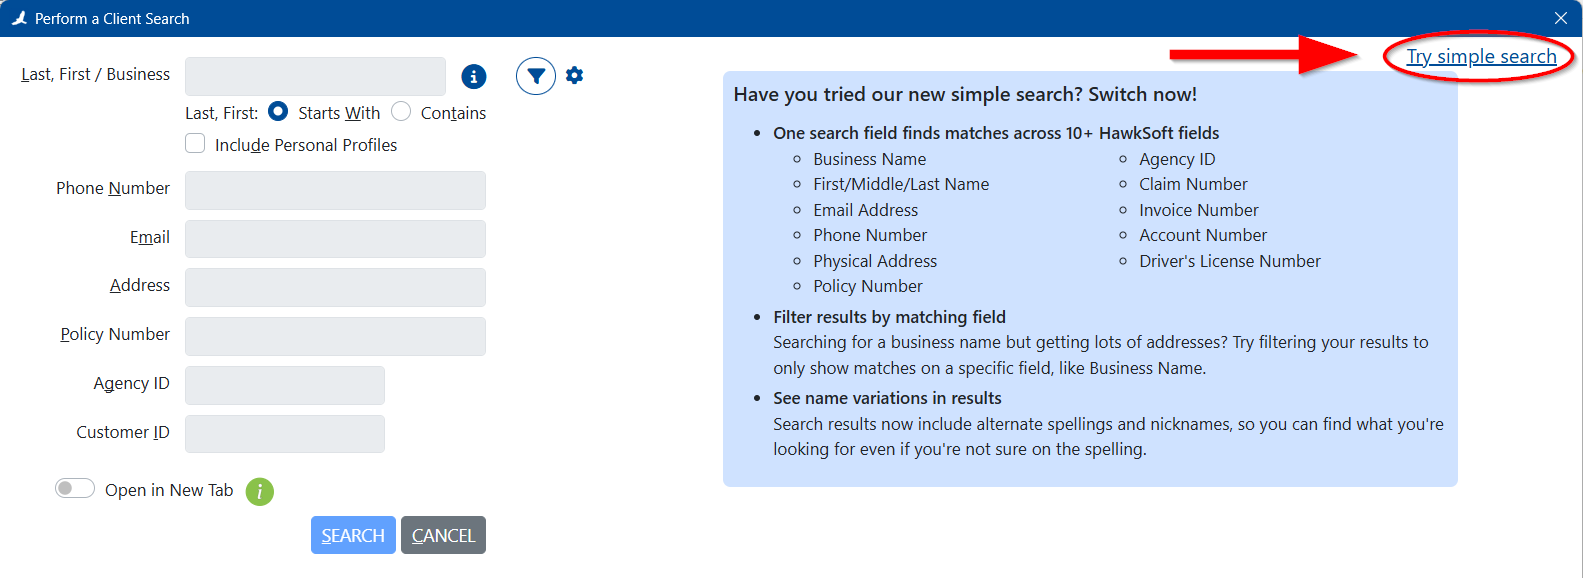
See Client Search for more information.
Customize Required Fields for your agency
Did you know you can choose which fields are important to your agency. Use required fields for information your agency always needs, and warnings for fields that are helpful but not critical. This helps maintain clean, consistent data while giving users flexibility when appropriate.
Watch this video to learn how:
The Missing Information widget on the Insights tab (client view) displays any required data that is missing from a selected client file.
Red highlights indicate missing information that your agency has configured as required.
Yellow highlights indicate information that is configured to warn users when missing.
For more information about setting important fields, see Configuring Required Fields for your Agency.
Open clients in a new tab from search
When searching for a new client, you can choose to open the client in a new tab instead of replacing the one you currently have open.
In Simple Search, the toggle for this option is located to the right of the Search button.

If you're using Standard Search, the toggle can be found between the text fields and the Search button.
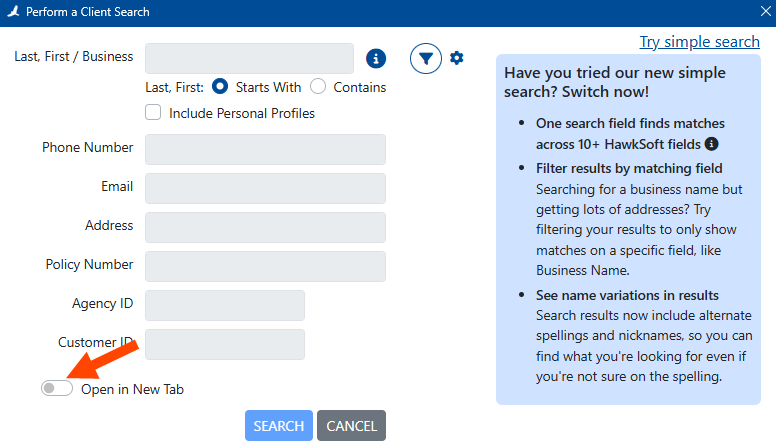
In both cases, you can click the gray inactive toggle to change it to active (blue). HawkSoft will remember this setting on future log-ins. While enabled, each client you launch from search results will open in a new tab, leaving your previously opened clients in their own tabs. If you want to stop opening in new tabs, click the toggle again to make it inactive.
For more information on the Search feature, see Client Search.
Using Voice to Text in HawkSoft
Voice to Text is a powerful Windows tool that converts your spoken words into written text, helping you work faster and more efficiently in HawkSoft—whether you're drafting emails, taking notes, or writing documentation. Watch the video below to see it in action and start saving time with your voice!
Best practices for processing text messages
As part of reviewing and processing texts received from clients via HawkSoft Text Messaging, HawkSoft recommends recording these texts to logs on the client. Received texts do remain in the HawkSoft Text Messaging window indefinitely, but there are several reasons why copying them to logs can help as well.
Text conversations with clients may include coverage discussions, requests, or changes that can directly impact a policy. By saving those conversations to a log note, you’re creating a clear, documented record within the client file, which supports your agency’s E&O protection and gives you a defensible record of communication.
It also ensures your entire team has full visibility into client interactions. Keeping text conversations in log notes brings everything into one place, so anyone on your team can easily pick up where another left off with full context.
Finally, saving text messages to log notes helps maintain data ownership. These records can be included in log exports, giving your agency easy access to important communication history when you need it.
See Processing Text Messages to learn more, or watch the video below to see it in action
Trust Accounting Reports by Pay Method
You can sort, summarize, and view payments on Trust Accounting Reports by pay method. After running your Trust Accounting Report, click the Pay Methods tab at the top of the report. From here, you can either click on a specific pay method to see only those entries or you can click on the X in Group by: Pay Method to view all payments, with a sortable column for Pay Method.
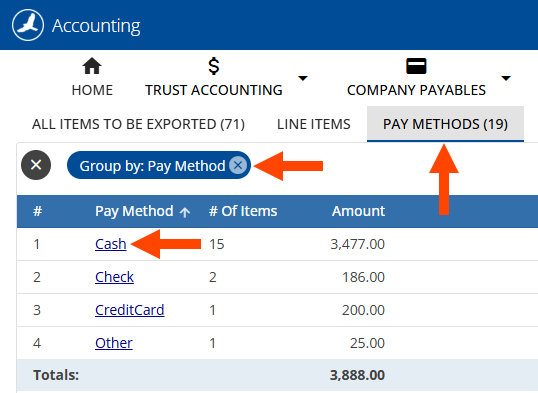
For more information on trust accounting reporting, see Accounting Reporting and Processing.
Expand Policy View
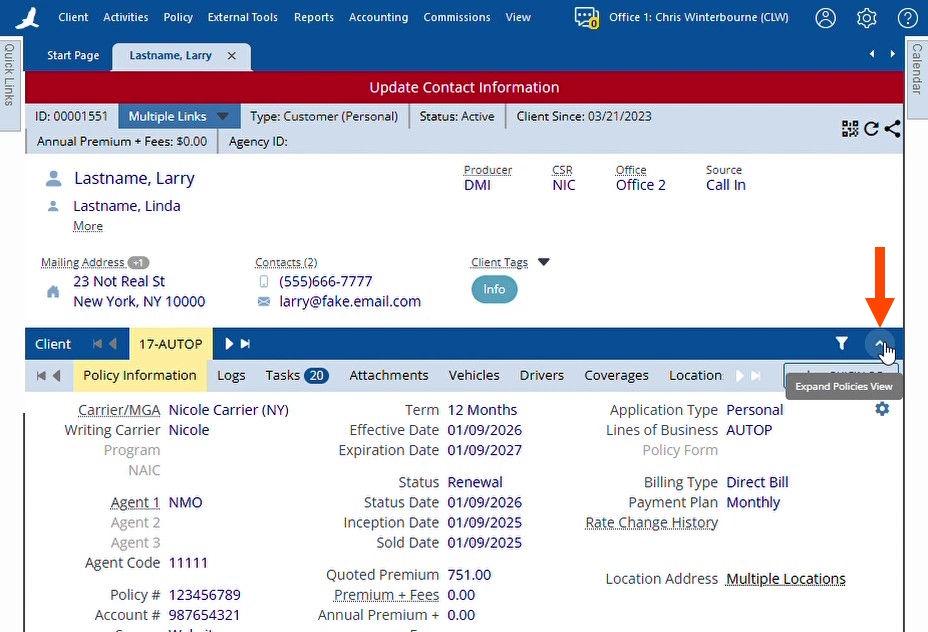
When you have limited screen space, such as when using split view or a tablet, or when you simply want more space to see policy details, click ^ Expand Policies View, to the far-right of the policies bar. This shifts space from the client information pane to the policy information pane, allowing you to see more logs, tasks, or attachments at once. For more information about viewing clients and policies, see Tour of the Client and Policy View.
Hide unnecessary policies and detail tabs
When looking at a client in HawkSoft, you might not need to see every policy, or every detail about a policy, all at once. For example, maybe you only want to see currently active policies. As another example, maybe you don't do accounting, and want to hide the "Trust Accounting" policy detail tab.
HawkSoft lets you control what policies and details are shown or hidden using the Client/Policy View Preferences dialog. These settings apply only to you, enabling each user to tailor their view to what matters most to their work.
If needed, you can temporarily override your preferences to see hidden policies or details, without having to change your saved preferences.
For more information, see the Personalizing your Client/Policy View section of the Tour of the Client and Policy View article.
Did You Know? Easy Ways to Get Help with HawkSoft
-
Any user, any question: Any HawkSoft user can reach out to Product Support – it’s not just for admins or managers. Whether you have a technical issue, a question, or need help building a workflow, our team is here to help.
-
Multi-channel support: Contact support by phone, email, or chat to connect quickly with a real person, not a robot – call wait times average about 2 minutes!
HawkSoft Help
-
Find answers fast: Our new AI-assisted search in the Help Portal supports conversational questions and returns quick summaries and relevant resources in one place, from help articles to videos to eLearning courses.
-
Contextual help: Use the ? question mark button directly within screens in HawkSoft to launch a help article about the screen you have open. Don't forget that the ? on many screens links to different articles depending on the specific information you are currently viewing.
More Help Resources
-
HawkSoft Community: The HawkSoft Community is where you can share your suggestions for improving HawkSoft, vote on other agencies' suggestions, and have your suggestions read by our development team.
-
HawkSoft User Group: The HawkSoft User Group (HUG) is a member-driven community of HawkSoft users to collaborate, educate, and share their experiences. HUG hosts webinars, in-person events, shared resources, and provides online spaces for questions and community building.
Entering negative numbers in coverage details
Did you know you can enter negative numbers in coverage details?
While it may not look like it at first, the numeric data fields in coverages and some other areas of HawkSoft will accept negative values.
Type the negative sign first, which won't display right away, then type in the numeric value. Once you click on another field, you'll see your value updated with the negative sign.
You can also perform basic arithmetic calculations in these fields! For example, enter "200 + 300". You won't see the plus sign, and the 300 will seem to replace the 200. But when you click into another field, HawkSoft does the math and updates it to the result of 500.
This works with negative results as well. Enter "300 - 500", and HawkSoft will update the field to -200 when you click into another field.
Accessing your Data in the Web
While the HawkSoft Desktop application gives you access to all features, HawkSoft offers two web-based tools, Agent Portal and the HawkSoft Browser App, to help you stay connected to your agency data from anywhere. Each serves a distinct purpose—Agent Portal provides mobile access to client and policy information, while the HawkSoft Browser App supports administrative tasks like reporting, downloads, and setup. Together, they give you flexible, secure access to the tools you need, whether you're in the office or not.
User Permissions still apply in Agent Portal and HawkSoft Browser App, ensuring secure and appropriate access based on each user's role.
Agent Portal
Use HawkSoft Agent Portal to view client and policy details from any web browser. Designed for mobile use, the portal gives you quick, secure access on your phone or tablet while on the go. While you can’t edit client or policy data in Agent Portal, you can add log notes and attachments.
See Agent Portal for more information.
HawkSoft Browser App (Hawksoft.app)
Use the HawkSoft Browser App to manage administrative settings, and access HawkSoft features from any computer, even if the desktop app is not installed. This browser version does not provide access to editing client or policy information, however logs, tasks, and attachments can be created.
Through the HawkSoft Browser App you can access agency-level features such as Task Center, Reporting, and Agency Setup.
You can access the HawkSoft Browser App from any computer by opening a web browser and typing "hawksoft.app" into the address bar. For full instructions on logging into the HawkSoft Browser App, as well as a full list of features available in the web, see Logging In and Out of HawkSoft.
Custom Trust Accounting Reports
When running the Trust Accounting report, HawkSoft enables you to Search for and review specific transactions, such as within a specific date range, for a specific carrier, or review items that have already been exported.
-
From the End of Period Processing and Reporting window, click on Trust Accounting > Search.
-
Enter filters as needed, and then click Generate Report.
Available filters include the date(s), customer information, transaction information, and office (for multi-office agencies). For details, see Step 3 of Running the Trust Accounting Report.
-
You can sort, summarize, filter, and review data in this report.
For more information, see Working with the Trust Accounting report.
Depending on the filters you selected, this report may include items that have already been exported to QuickBooks. Such items will have an Exported Date.
Correct Retained Commission when Processing Payables
When processing company payables, you can correct the retained amount without leaving the Company Payables screen. This can help save time when making corrections during the payables process. This also means you don't have to void the item to make a correction to the retained amount.
After clicking either Create Check Per-Item or Create Statement Check (depending on your workflow), you can edit the amount in the Retained field of selected payables with retained commission before finalizing the check. When you edit commission, the Check Amount is adjusted to match.
The border around the Retained field is a solid line for transactions that can be edited, and a dashed line for transactions that can't.
For more information, see Selecting Company Payables to Pay.
Create Tasks Faster with Task Templates
Task Templates help all users in your agency create tasks quickly and consistently. Each template includes preset details, such as the title, category, assignees, and priority, so you can build new tasks without having to manually enter each field. This keeps your work organized, reduces repetition, and ensures tasks across your agency follow a consistent structure.
Whether you’re creating tasks every day or just occasionally, templates make it easier to stay on track and keep your workflow efficient.
Administrators can manage and update Task Templates in the Task Center as needed.
Watch this short video to see how to create and use Task Templates.
Easily Access Client Contact Information
You can use the sorting and filtering options inside the Contacts Information dialog (and associated keyboard shortcuts) to quickly locate the right contact on a client.
-
Filter contacts on the Contacts Information screen to quickly narrow down long lists.
-
Use your keyboard—the arrow keys and space bar let you move through the list and launch actions without using your mouse.
-
Filter contacts from the People tab to find a specific person faster.
-
Double‑click a person on the People tab to open their Personal Profile, where you can view and copy associated contact information.
Watch the short video to see it in action.
Reporting on Activity Tags
Activity Tags are customizable keywords which you can add to logs to give context to actions or customer interactions. They help users quickly identify the purpose of a log, and allow those with the right permissions to run reports on tagged activity. These reports provide agency managers with insights into what drives activity across the agency. Watch the short video below to learn how to report on Activity Tags.
One Click to Quick Contact Details
Click the icon next to a client’s contact information (phone, email, website) to open the Contacts Information dialog with that specific contact info highlighted. You can press the space bar or click the green Call Now/Email/Launch button in the bottom-left corner to launch the contact method using configured integrations, such as phone or email.
Optimizing HawkLink
HawkLink Mapping connects data from HawkSoft fields to their corresponding fields on carrier websites. This makes it easy to transfer information from HawkSoft for quoting, policy inquiries, payment processing, and more. Users can also share their mappings with other HawkSoft users, helping streamline quoting and policy service tasks. In this video, we’ll share practical tips to help you optimize your HawkLink workflows and get the most out of these powerful features.
For more information, see Using HawkLink.
Create Mailing Labels with HawkSoft
Your agency may want to send letters, holiday cards or other mailings to customers. You can easily create mailing labels by exporting a customer list from a HawkSoft report and using Microsoft Word’s Mail Merge feature. For step-by-step instructions, see our Mailing Labels article. For personalized communication, check out Batch Letters to learn how to create a batch letter customized for each customer.
How to Report on Self-Service Certificates
If your agency uses Self-service Certificates, you can see a report of which clients are using Self-service Certificates, how often, and each date and time when a client accessed Self-service Certificates. To do this, run an Activity Report in HawkSoft for your desired date range, and specify the user "<S> - Self-service Certificates".
Watch the short video to learn how.
Easily Close Client Tabs
You can close a client tab by middle-clicking the tab with your mouse. This method provides a quick alternative to using the close button or keyboard shortcuts. Watch this short video to see how it works.
Use Default Tasks for Task Consistency
HawkSoft enables agency administrators to create Default Tasks—automated tasks that are created on a log when specific actions are performed on a client or policy.
Configure Default Task Rules to:
-
Define which actions automatically trigger a task
-
Apply a Task Template to generate the task
-
Apply additional conditions, such as only generating a Default Task on specific Application Types or Client Offices
When triggered, the system attaches the task directly to the relevant log, helping your team stay organized and on track with follow-ups. This automation eliminates some manual task creation and ensures staff follow consistent workflows.
Watch the video below to see how it works in action.
Harnessing HawkLink: Unlock Agency Efficiency
HawkLink lets you launch websites directly from HawkSoft and auto-fill fields using client or policy data—saving time and reducing manual entry.
Key Benefits:
-
Instantly transfer data from clients, policies, and agency information in HawkSoft to website forms (carrier portals, county assessors, property listings, and more).
-
Use Mappings to automatically fill data the next time you visit the page.
-
Use crowd-sourced mappings to auto-fill commonly visited websites.
-
Share mappings with other HawkSoft users at your agency and beyond.
-
-
Capture screenshots of carrier websites and attach them to client or policy records.
Watch this quick video to learn more about HawkLink.
See HawkLink Overview for more information.
Scheduling Reports with Hyperlinks
Save time and stay consistent by scheduling recurring calendar events for your regular reporting tasks. Simply create a recurring event that aligns with your reporting cadence (weekly, monthly, etc.), and paste a link to your reporting template directly in the calendar event description. This way, you’ll always have quick access to the right template when it’s time to report—no more searching through emails or folders.
Watch the video below for a quick tutorial!
Simplify Manual Commission Entry with Anticipated Commissions
Managing commissions for carriers that don’t provide downloadable statements just got easy!
With Anticipated Commissions, you can quickly generate commission statements using estimated transactions based on your policy data—no carrier download required.
Here’s how it works:
-
Configure with ease: In Commission Settings, use the new Agency Commission Settings to set the commission basis to As Paid or As Written, and apply rules just like you do for agents.
-
Create statements fast: Under Reconcile Statements, select Create New Statement then select Anticipated Commissions to generate a statement for your chosen carrier and date range.
-
Review the list of anticipated transactions, make any necessary edits, and select the items you want to add to your statement for reconciliation.
Watch this short video to see how it works:
See Commission Tracking Overview for more information on Anticipated Commissions.
Create Custom Reports with Summarizing and Filtering
HawkSoft makes it easy to generate reports tailored to your needs or create multiple reports to share with your team. For example, you can run an Active Clients report, then summarize by Agent, filter by ZIP code, and sort by Premium to focus on specific data.
Most customization options, like summarizing and filtering, are applied after the initial report is generated.
Watch this quick video to learn how to customize your reports.
See Customize, Summarize, and Filter Report Data for more information on working with Reports.
Icons make it easier to read the log list
When viewing the log list on a client or policy, you can simplify the display by minimizing action menu breadcrumbs in the Summary column. Once enabled, the breadcrumbs are replaced with icons, minimizing the amount of text and creating more space for log actions and activity tags.
To enable this setting, select the  gear icon for Log List Options, then select Minimize Breadcrumbs.
Before:
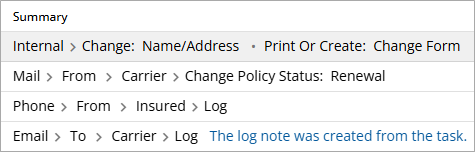
After:
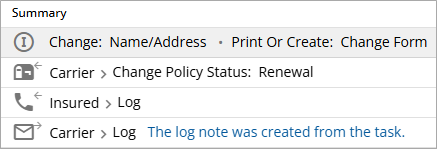
You can hover your mouse over an icon to view the full breadcrumb description. HawkSoft will remember this setting and automatically apply it the next time you view the log list on any client or policy.
Watch this brief video to learn more.
Using Text Color and Highlights in Log Notes
You can now customize your log notes in HawkSoft by adding font color and highlight. This feature helps you draw attention to important details, categorize information visually, or make follow-up actions stand out.
To apply formatting, either select existing text in the log and click the Font Color  or Highlight
  icons, or choose your desired formatting before you start typing. You can use both options to tailor your notes to your agency’s workflow and make them easier to skim.
These formatting styles are visible to anyone viewing the log within a client or policy, helping your team quickly identify key information. However, keep in mind that text color and highlights will not appear when viewing logs through an activity report.
Policy Bar Navigation
You can now click, hold, and drag the policy and policy detail bars to find your desired tab more easily. You can also click the arrows on either side of the client/policy and subtab bars to navigate between tabs, use the arrow keys to navigate between policy detail tabs, or hold CTRL and use the arrow keys to navigate between policy tabs.
(This is the Drop-down text)
Watch the video below for a quick tutorial on client/policy and subtab bar navigation. See Tour of the Client and Policy View for more information.
Tidy up your Client Tabs
It’s easy to let client tabs pile up during a busy day. In HawkSoft, you can keep things organized by dragging and dropping client tabs to rearrange them. Need a quick cleanup? Right-click a client tab to choose:
-
Close (current tab)
-
Close All
-
Close All but This
-
Close All Client Tabs
If you’ve disabled “Open Task Center in a separate window” in My Workstation Settings and External Tools, the Task Center will always open as the first tab by default. However, you can still drag and drop the tab to place it in your preferred order.
Access HawkSoft Community from your web browser (hawksoft.app)
You can access the HawkSoft community from your browser.
-
Log in to https://hawksoft.app in your web browser.
-
Enter your User Initials and Agency ID using the format <User Initials>@<Agency ID>.
For example, Allen Charleston, with user initials ABC, at agency 12345 would enter ABC@12345.
-
Enter your password, then click Sign In.
-
Conditional: For multi-office agencies, select your office from the drop-down and then click Submit.
-
Click the
 HawkSoft Help icon in the upper-right corner and then select HawkSoft Community from the drop-down menu.
While you are logged in to the HawkSoft Browser App, you can click on community topic links received via email or Facebook, for example, to view, reply to, and vote on community suggestions.
You will need to log in periodically to stay authenticated.
Display labels for taskbar icons in Windows 11
By default, Windows 11 displays an icon on the taskbar for each program that is open on your computer. You can enable your Windows 11 settings to show descriptive labels in addition to the icons to see HawkSoft windows you have open.
-
Click the Windows Start icon, and then open Settings.
-
In the left menu, select Personalization, and then select Taskbar.
-
Click to expand Taskbar behaviors and then find Combine taskbar buttons and hide labels.
-
From the drop-down, select When taskbar is full. This will display the icon labels only when there is room on the taskbar.
Before:

After:

Create Log Notes with Quick Log
You can create a log note on a client or policy without performing an action through the Action menu. Click Quick Log or press Ctrl + L to quickly create a log note directly on a client or policy.
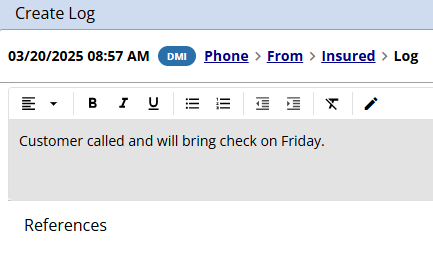
Unlike the Action menu, creating a log note from the Quick Log option does not lock the client, allowing you to document the client/policy interaction without restricting access to the client for other users.
New Task Setting - Require Log Notes on Client Tasks
HawkSoft has implemented a new setting for client-related Tasks that enables agency owners, administrators, and/or managers to decide which task action(s) will require the creation of a log note. By default, HawkSoft users are required to create a log note on the associated client/policy whenever a task is created, edited, or closed on the client/policy. Agency owners, administrators, and/or managers can now opt to only require a log when a client-related task is closed or created.
The following options are available in General Settings:
-
Require a log when creating, editing or closing a client task(default setting)
-
Only require a log when closing a client task
-
Do not require a log when editing or closing a task(a log is created when a task is created)
Filtering with Quick Reports
In HawkSoft 5, the first step to run an Advanced Report began with selecting filters to build a report from scratch. In HawkSoft 6, Quick Reports start with a pre-designed report to quickly get you started. Once you select a report, you can easily summarize and filter down to your desired report data.
For best results, begin with a report from the Quick Reports list, and then use the summarize button to refine the data. If you are unsure where to start, the Quick Reports with the broadest scope, like Active Policies or All Policies reports are good options.
The following video demonstrates how to run a Quick Report, and easily summarize and apply filters to drill down to the data we need.
As another example, the following steps walk you through the process of running a Quick Report to ultimately see all policies with an AutoP title.
-
Select Reports, then Quick Reports.
-
Select New Report.
-
Select the Policy category.
-
Select All Policies Report.
-
Click Run Report.
-
Click the
 Summarize button.
 -
Use the column drop-down to select the Policy Title row.
-
Click Summarize.
-
Select the number listed under the # of Items column in the AUTOP row to run a report of all policies with the policy title of AUTOP.
See Quick Reports for a list of pre-defined reports to get you started, and Customize, Summarize, and Filter Report Data for more information about using summaries and filters to refine your report data.
How to Reverse a QuickBooks Transaction
When you void an accounting item in HawkSoft, the system automatically prompts you to reverse the item if it was sent to QuickBooks.
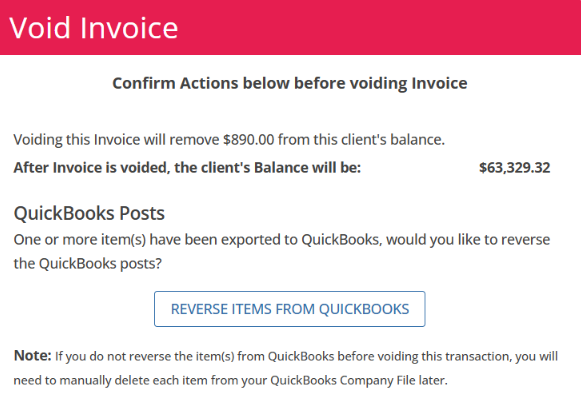
You can also select and reverse any transaction exported to QuickBooks from a Review Trust Accounting Report, including Today, Yesterday or Search. See Reversing a QuickBooks Transaction to learn more.

Get an Attachment from an eDoc
There may be times you want to save or share an eDoc file. You can download the file and drag and drop it to your desired location.
-
Open the Client and select the Policy tab.
-
Select the Attachments tab and double click to open the download.
If you cannot locate the download, make sure the filter is selected (blue) on the attachments tab. See The Attachments List for more information.

The download attachment window opens.
-
Under the Files section, click the
 download button next to the file (see step 2 in figure below).
 -
The file will appear in the upper right corner of the window. You can drag and drop that file to your desktop, email or other preferred destination (see step 3 in figure below).
You can also find this file in your computer's download folder.
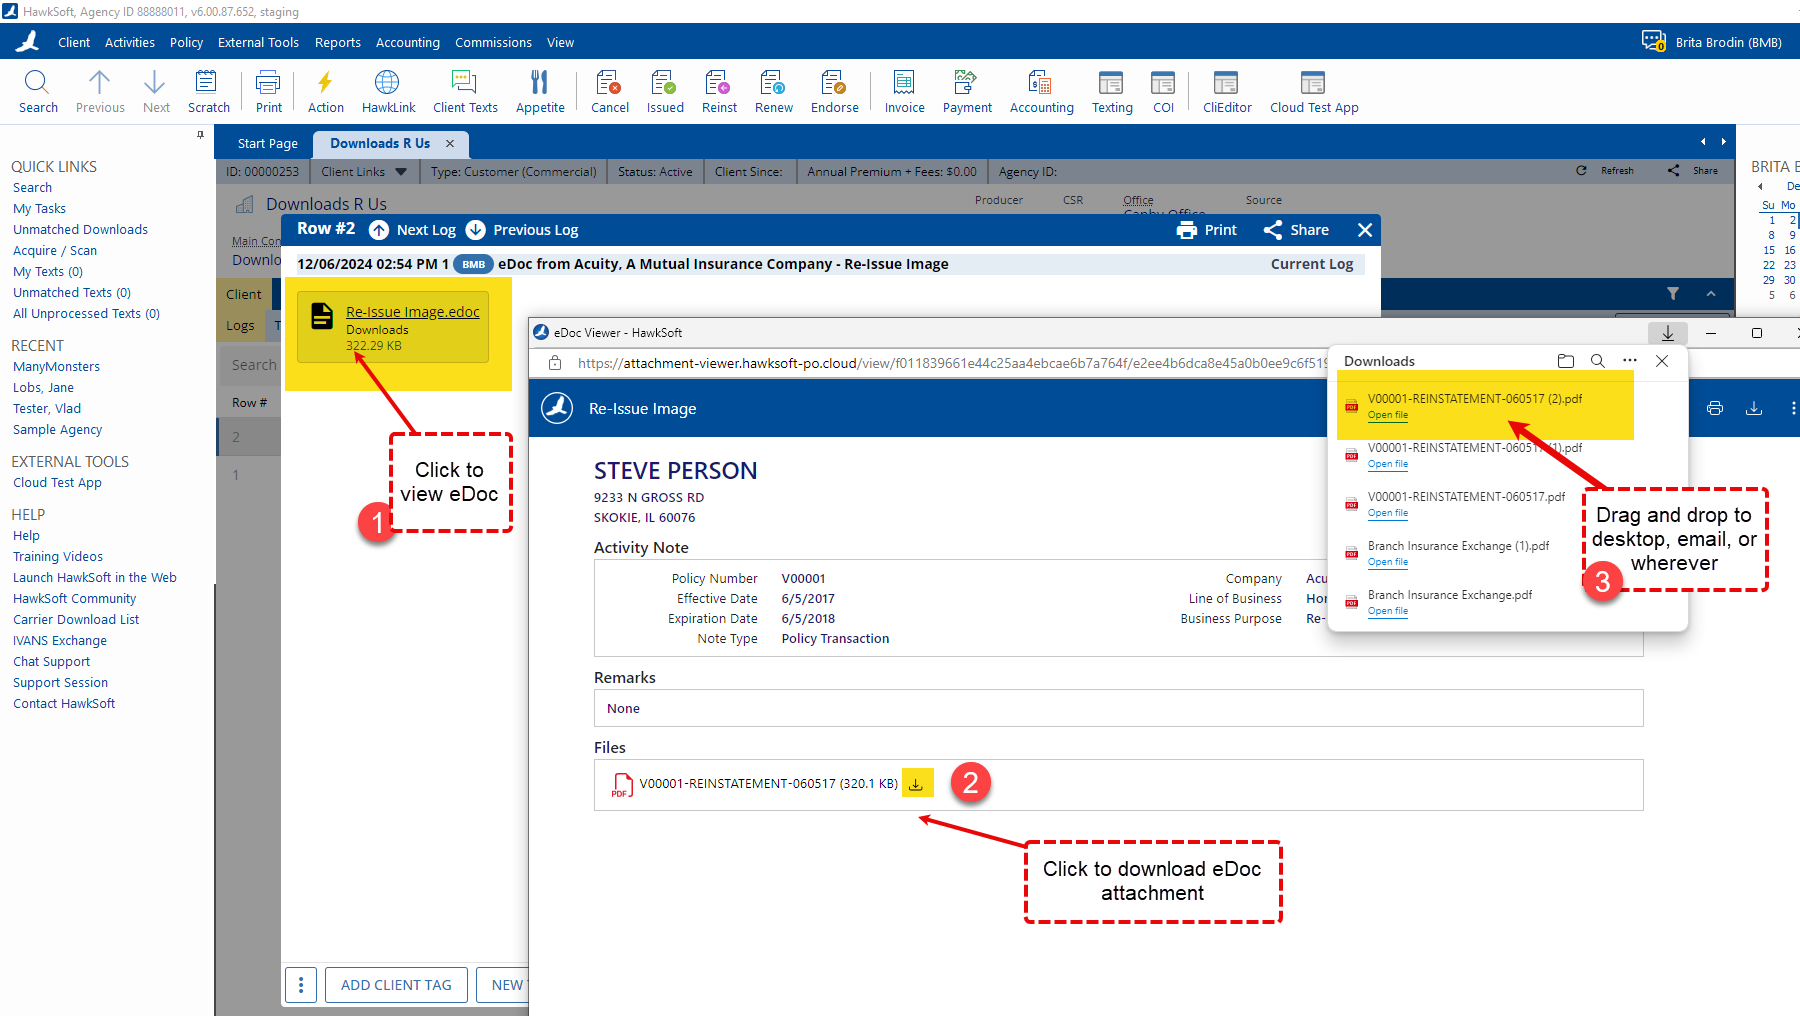
You can also access the download from the log note. Open the log note and click on the eDoc to open (see step 1 in figure below).
Attachment Filters
When viewing attachments on the client, you can use any combination of filters, search options, and sorting to refine which attachments you currently see.
For more information, see To search or filter attachments.
How to view Commercial Company Information (ex. FEIN)
Click on the  Building icon to the left of your customer's Business Name on the client. A Company Information dialog opens and displays the FEIN (Federal Employment ID Number), as well as the Business License #, NAICS, and Website. See Name and Address Information to learn more.
For personal lines customers, click on the  Personal icon to display personal profile information, such as date of birth or occupation.
ACORD Form Defaults
You can create user-defined default fixed values for ACORD Form fields that will override the data HawkSoft automatically floods to those fields. That means you don't have to update them each time you create the form! See ACORD Form Defaults to learn more.
Invisible link for HawkSoft Help Portal Search